
How To Color Candles Naturally With Herbs And Spices
Synthetic dyes get the job done, but they're not your only option. If you've been searching for how to color candles naturally, you're already on the right track, herbs, spices, clays, and botanicals can produce beautiful, earthy tones without any artificial additives.
At Small Flame Candle Company, we've spent years hand-pouring candles and learning what works (and what doesn't) when it comes to wax, fragrance, and color. That hands-on experience taught us something important: natural colorants behave differently than synthetics. They require a bit more patience and a different set of expectations. But the results, soft, organic hues that feel warm and intentional, are absolutely worth the effort.
This guide breaks down the most reliable natural colorants, how to use them, what shades to expect, and the common mistakes that trip people up. Whether you're making candles for yourself or as gifts, you'll walk away with a clear process for adding color using ingredients you might already have in your kitchen. Let's get into the specifics so you can start experimenting with confidence.
What you can and cannot use to color candles
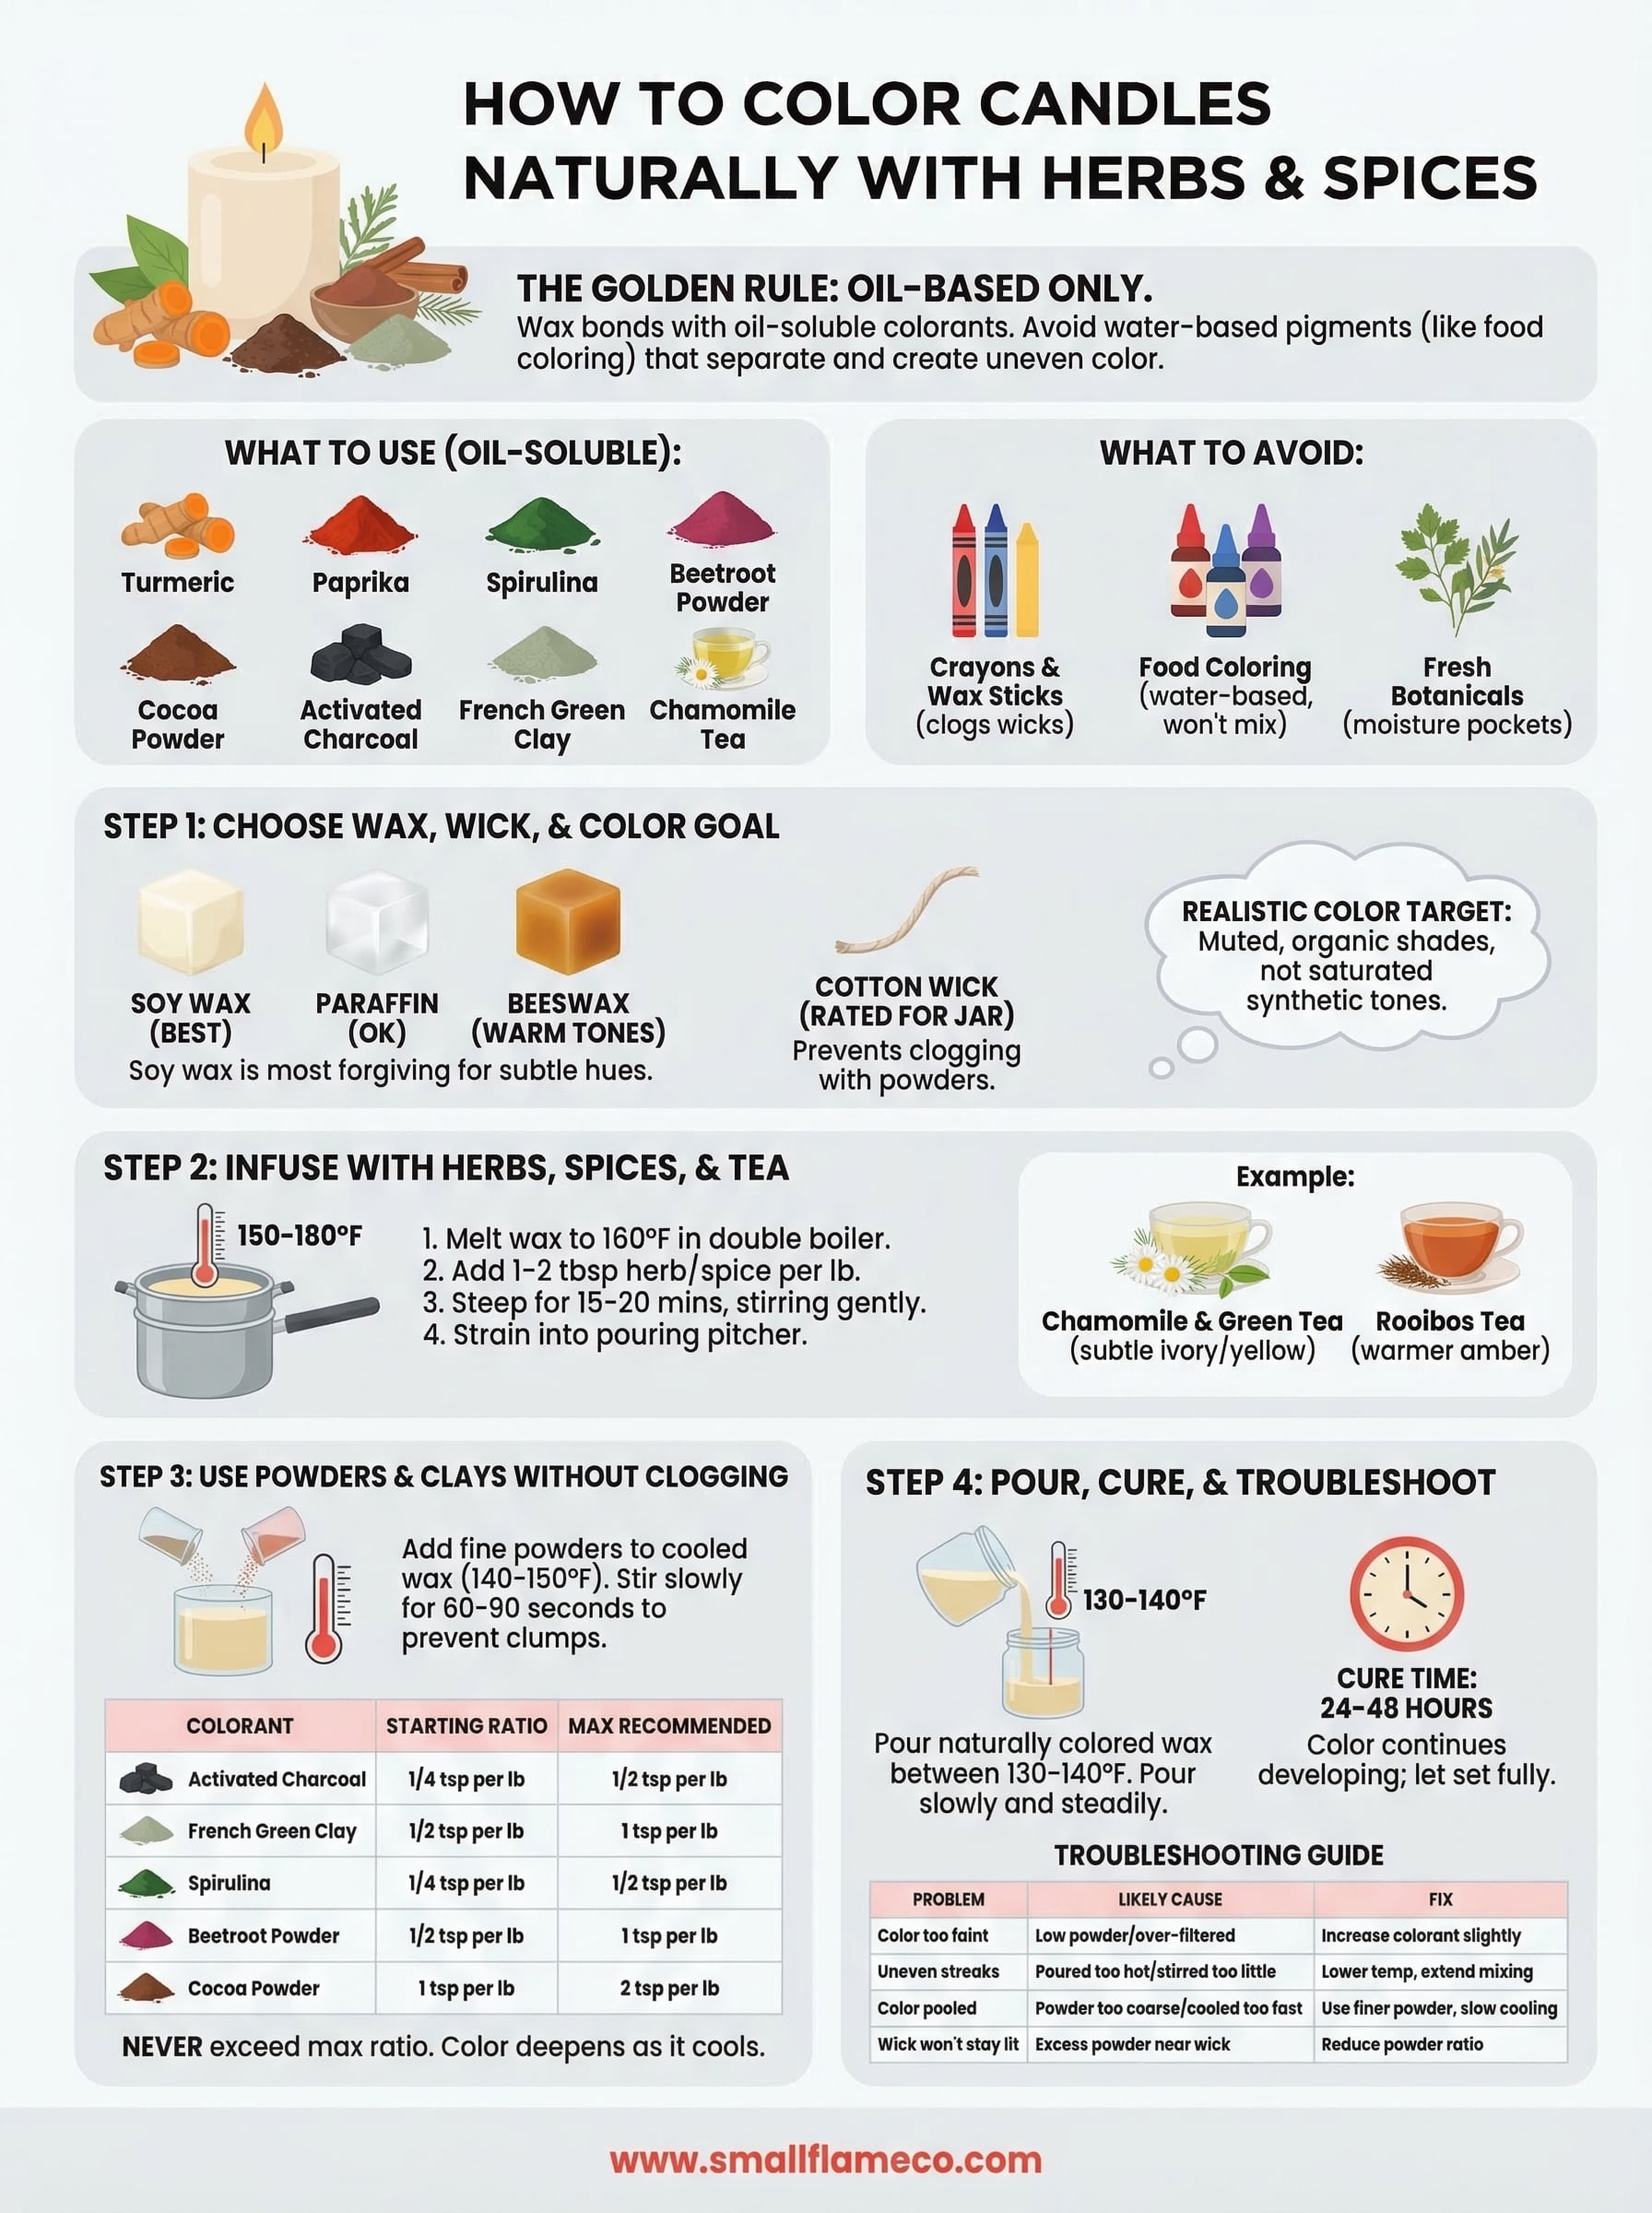
Not every natural ingredient will behave well in melted wax. Before you start experimenting with how to color candles naturally, you need to understand one fundamental rule: wax is an oil-based medium, which means it only bonds with oil-soluble colorants. Water-based pigments, like standard food coloring, won't mix into wax properly. Instead, they'll sink, form droplets, or create uneven blotches that ruin the finished look. Getting this right from the start saves you a lot of wasted wax and frustration.
Wax is oil-based, so only oil-soluble colorants will mix in properly. Water-based dyes will separate and ruin the pour.
Natural colorants that actually work
Herbs, spices, clays, and mineral powders are your best options when you want to keep things organic and free from synthetic compounds. Each one produces a distinct hue and intensity, and many options are already sitting in your pantry or available at a natural foods store. Some colorants work through direct infusion into melted wax, while others are stirred in as fine powders. These plant-based and mineral colorants give you a solid range of warm, cool, and neutral tones without any artificial additives. Here's a quick reference for what to expect from each:
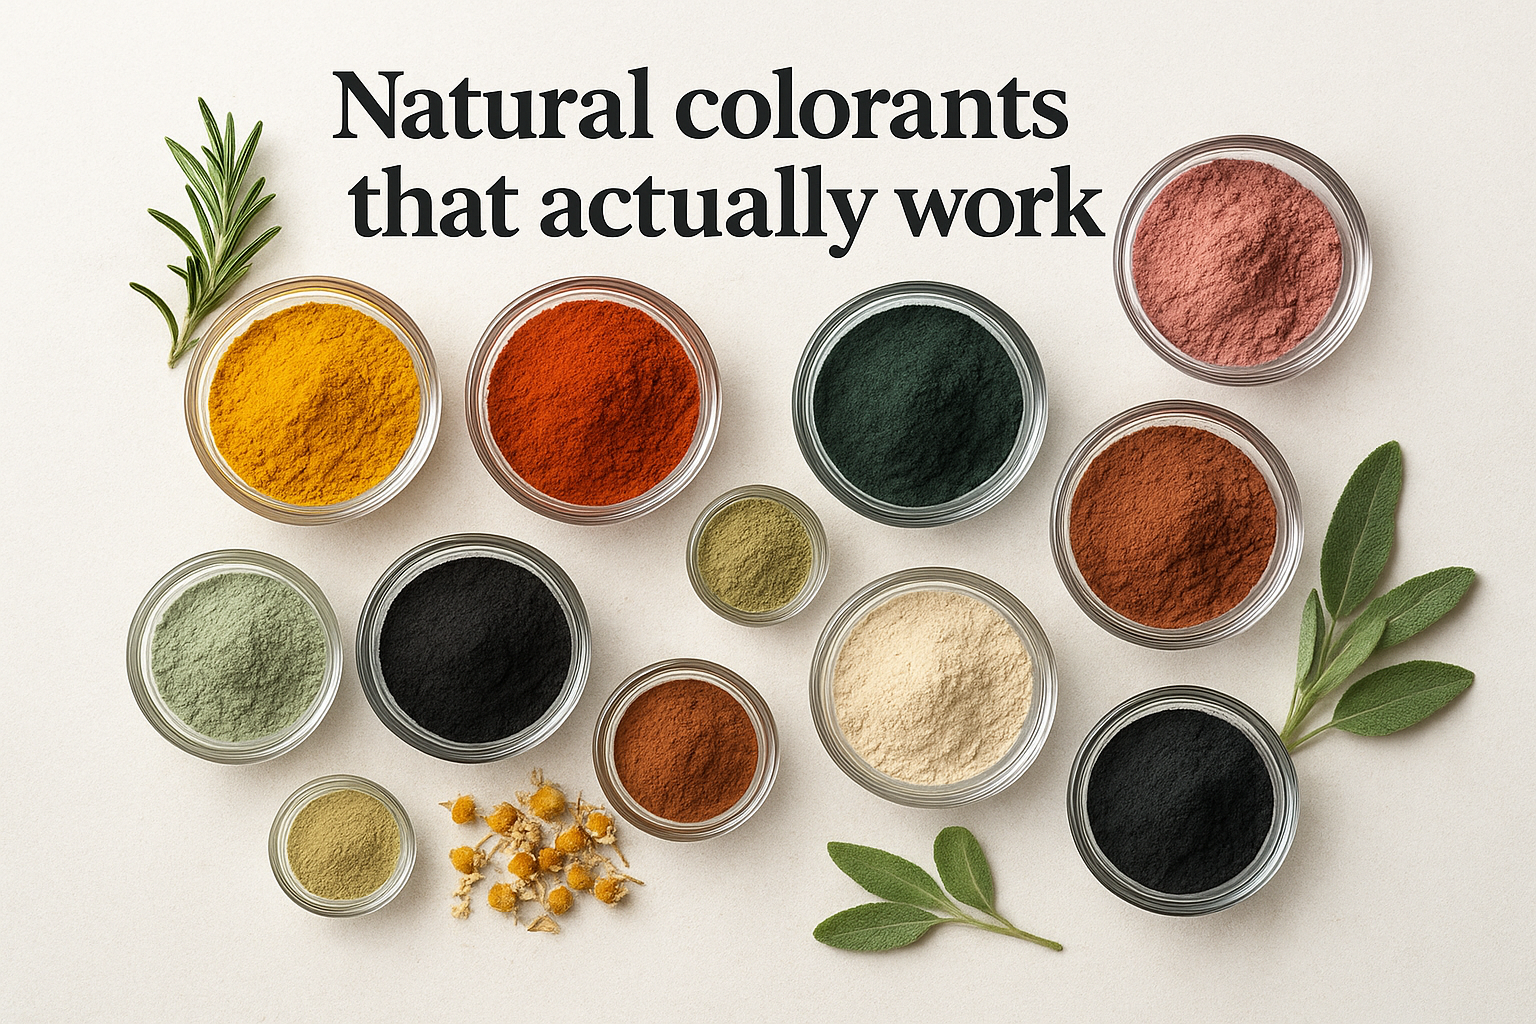
| Colorant | Color result | Notes |
|---|---|---|
| Turmeric | Warm yellow to gold | Strong tint, use sparingly |
| Paprika | Soft orange to tan | Mild and earthy |
| Spirulina | Muted green | Can fade with high heat |
| Beetroot powder | Pale pink to dusty rose | Light color, best in soy wax |
| Cocoa powder | Warm brown | Adds a faint scent as well |
| Activated charcoal | Deep gray to black | Bold and consistent |
| French green clay | Soft sage green | Works well in low-heat pours |
| Chamomile tea | Pale ivory to yellow | Subtle, requires infusion |
What to keep out of your wax
Some ingredients seem like reasonable choices but will cause serious problems in practice. Crayons and art supply wax sticks contain pigments that clog your wick over time, which leads to poor burn performance or a flame that dies out before the wax pool reaches the edges. Standard food coloring is water-based, so it simply won't bind with the wax at all. Fresh botanicals, like whole flowers or leafy herbs, carry moisture that creates steam pockets inside the candle, which is both a quality issue and a potential fire risk. You can place dried botanicals on the surface as decoration, but never embed anything with moisture content inside poured wax that will sit near an open flame.
Step 1. Choose your wax, wick, and color goal
Before you start infusing colorants, you need to make a few decisions about your base materials. The type of wax you use will directly affect how your natural colorants show up in the finished candle, and the wick you choose will determine whether powdered colorants cause burn problems down the line. Getting these two choices right sets the rest of the process up for success.
Pick the right wax for natural color
Soy wax is the most forgiving base when you're learning how to color candles naturally. It has a lighter, creamier appearance than paraffin, which means even subtle colorants like chamomile or beetroot powder show up without needing a heavy hand. Paraffin wax takes color well too, but its semi-transparent finish can make earthy tones look muddier than expected. Beeswax already carries a natural amber tone, so it works best with warm-spectrum colorants like turmeric or paprika rather than cooler greens or grays.
Soy wax is your best starting point for natural colorants because its opaque, creamy base makes soft hues visible without overloading the wax with powder.
Set a realistic color target before you pour
Natural colorants produce muted, organic shades, not the saturated tones you get from synthetic dyes. Going in with a specific target, such as a soft sage green from French green clay or a dusty rose from beetroot powder, keeps you from overloading the wax and risking wick clog or scent disruption. For your wick, use a cotton wick rated for your jar's diameter to reduce residue buildup, especially when working with fine powders like activated charcoal or spirulina. A thicker wick burns hotter and pulls more material through the flame, which increases your chance of uneven burning or excess soot.
Step 2. Infuse wax with herbs, spices, and tea
Infusing wax is one of the most reliable approaches when you're learning how to color candles naturally. The method works by steeping the herb or spice directly in melted wax at a controlled temperature, straining out all plant material, and then using that tinted wax for your pour. Think of it like brewing tea, except your liquid is wax instead of water.
How to build a wax infusion
You need to keep your wax temperature between 150 and 180 degrees Fahrenheit throughout the infusion process. Going higher than that destroys the color compounds in the plant material, and going lower means the colorant won't release properly into the wax. A double boiler setup gives you the most consistent heat control, and you should never leave melted wax unattended over a direct flame.
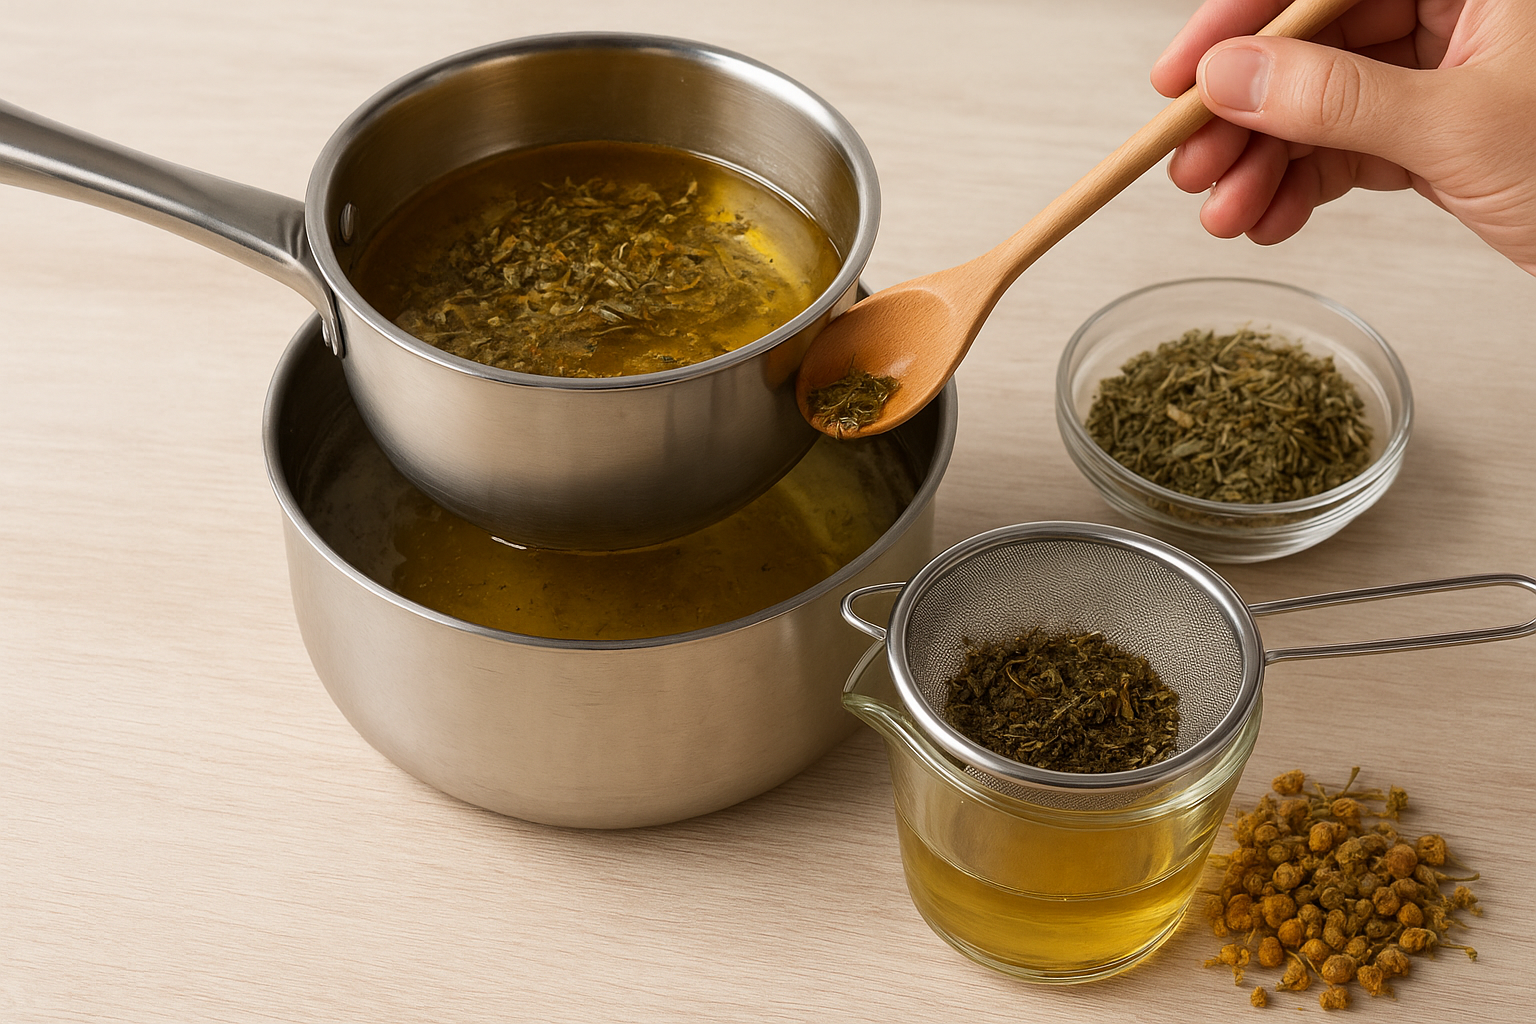
Here's a step-by-step process for a basic wax infusion:
- Melt your wax to 160 degrees Fahrenheit using a double boiler.
- Add one to two tablespoons of your chosen herb or spice per pound of wax.
- Stir gently and hold the temperature for 15 to 20 minutes.
- Strain through a fine mesh strainer or cheesecloth into a clean pouring pitcher.
- Let the wax cool slightly before adding fragrance oil, then pour as normal.
What to expect from tea-based colorants
Chamomile and green tea produce the most subtle results in this category. You'll get a pale ivory or soft yellow tint rather than a bold color, which suits candles with a natural or understated look. Rooibos tea produces a warmer amber tone and pairs well with spiced or vanilla fragrance oils without needing any additional colorant.
Tea infusions deliver the most delicate color range, so use them when you want a lightly tinted wax rather than a saturated hue.
Step 3. Use powders and clays without clogging
Powders and clays give you direct control over color intensity without requiring a long infusion process, but they come with one significant risk: too much powder clogs your wick and kills the burn. Knowing how to color candles naturally with powders means understanding that restraint is the key. You're aiming for even dispersion throughout the wax, not a concentrated dose that settles at the bottom of your container.
How to mix powders evenly into melted wax
You should always add fine powders to wax that has been removed from the heat source and allowed to cool slightly, around 140 to 150 degrees Fahrenheit. Adding powder to wax that's too hot causes color compounds to break down before they can bond properly. Stir the powder slowly in a circular motion for at least 60 to 90 seconds to prevent clumping and ensure even distribution throughout the batch.
Here's a safe starting ratio guide for common natural powders:
| Colorant | Starting ratio | Max recommended |
|---|---|---|
| Activated charcoal | 1/4 tsp per pound | 1/2 tsp per pound |
| French green clay | 1/2 tsp per pound | 1 tsp per pound |
| Spirulina | 1/4 tsp per pound | 1/2 tsp per pound |
| Beetroot powder | 1/2 tsp per pound | 1 tsp per pound |
| Cocoa powder | 1 tsp per pound | 2 tsp per pound |
Never exceed the maximum powder ratio, even if the color looks lighter than expected before the pour. Color always deepens as the wax cools and sets.
Keeping your wick clear during the pour
Pour your colored wax slowly and steadily to reduce the chance of powder settling near the wick base. Once poured, avoid disturbing the candle for at least four hours while the wax solidifies. If you notice residue building up around the wick after a test burn, reduce your powder ratio by half on the next batch and reassess from there.
Step 4. Pour, cure, and troubleshoot color problems
The final stage of learning how to color candles naturally involves getting your pour right and giving the wax enough time to fully set. Rushing either of these steps is where most color problems start, so treat this phase with the same care you gave the infusion and powder mixing process.
Pour at the right temperature
Pour your naturally colored wax between 130 and 140 degrees Fahrenheit for container candles. At this temperature, the wax is fluid enough to fill the vessel evenly without trapping air pockets, but cool enough that your colorant stays suspended rather than settling. Direct the wax in a slow, steady stream toward the center of the container, then leave the candle undisturbed on a flat, level surface.
Pouring too hot causes colorant to migrate toward the wick base, which creates uneven color distribution and potential burn issues.
Cure time and color shift
Natural colorants continue developing for 24 to 48 hours after the wax solidifies. What looks pale or patchy right after the pour will often deepen and even out as the wax finishes curing. Give your candle a full 48-hour cure before you evaluate the color, burn-test it, or adjust your recipe.
Fix common color problems
Sometimes the finished color still doesn't land where you expected. Use this quick-reference guide to diagnose and correct the most common issues:
| Problem | Likely cause | Fix |
|---|---|---|
| Color too faint | Low powder ratio or over-filtered infusion | Increase colorant by 1/4 tsp increments |
| Uneven streaks | Poured too hot or stirred too little | Lower pour temp and extend mixing time |
| Color pooled at base | Powder too coarse or wax cooled too fast | Use finer-milled powder and slow your cooling |
| Wick won't stay lit | Excess powder near wick | Reduce powder ratio by half |
Ready to make your next candle
You now have a complete process for how to color candles naturally using ingredients that are safer, more sustainable, and easier to source than synthetic dyes. The key takeaways are simple: match your colorant to your wax type, stay within the recommended powder ratios, pour at the right temperature, and give each candle a full 48-hour cure before you judge the results.
Getting your own batches right takes a few test pours, but the process is straightforward once you understand how oil-based wax interacts with plant-based pigments. Start with one colorant, note your ratios, and build from there.
If you want to see what expert hand-poured candles look like when craftsmanship and quality ingredients come together, browse the Small Flame Candle Co. coconut wax candle collection. It's a solid reference point for the results that careful, intentional candle-making can produce.