
Pillar Candle Making: How To Make Pillar Candles at Home
Pillar candles stand on their own, literally. Unlike container candles, they don't need a jar or vessel to hold their shape, which makes them versatile centerpieces for mantels, dinner tables, and just about any flat surface. If you've ever wondered how to make pillar candles at home, you're in good company. It's one of the most rewarding candle-making projects you can tackle, and the results look genuinely impressive.
At Small Flame Candle Company, we've hand-poured thousands of candles and learned what works (and what creates a waxy mess). That hands-on experience shapes everything we share here. Making pillar candles requires different techniques than pouring into containers, you'll need specific wax formulations, proper molds, and a few tricks to achieve that smooth, professional finish.
This guide walks you through the entire process from gathering materials to unmolding your finished candle. You'll learn which waxes perform best for freestanding pillars, how to prepare and use molds correctly, and the small details that separate amateur attempts from candles worth displaying. Whether you're a complete beginner or have some candle-making experience, these steps will help you create pillar candles you'll actually want to burn, or give as gifts.
What you need before you start
Learning how to make pillar candles starts with gathering the right supplies. You can't improvise your way through this project with container candle materials. Pillar wax formulations need higher melting points than typical container waxes, usually between 130°F and 150°F, to maintain their structure when burning. Shopping for dedicated pillar wax saves you from structural failures later, specifically look for paraffin blends labeled for pillar candles or straight paraffin wax.
Wax and wick supplies
You'll need approximately one pound of wax for every sixteen ounces of candle volume you plan to create. Square or flat braided wicks work best for pillars, sized according to your candle's diameter. Pre-tabbed wicks simplify the process, especially for beginners who haven't mastered wick centering yet. Add fragrance oil if you want scented pillars, calculating at roughly 6% to 10% of your total wax weight.
Purchase wax with built-in stearic acid or add it separately at 10% to 15% of your wax weight for improved opacity and easier mold release.
Liquid candle dye gives you color control that blocks and chips can't match. One drop typically tints eight ounces of wax, but test your exact shade in a small batch before committing to your full pour.
Molds and pouring tools
Metal or polycarbonate molds produce the smoothest pillar surfaces, far better than silicone alternatives that leave texture marks. Sizes range from two-inch votives to six-inch statement pillars. You'll also need mold sealer to prevent leaks around the wick hole, a pouring pot with a spout for controlled wax transfer, and a thermometer that reads between 100°F and 200°F.
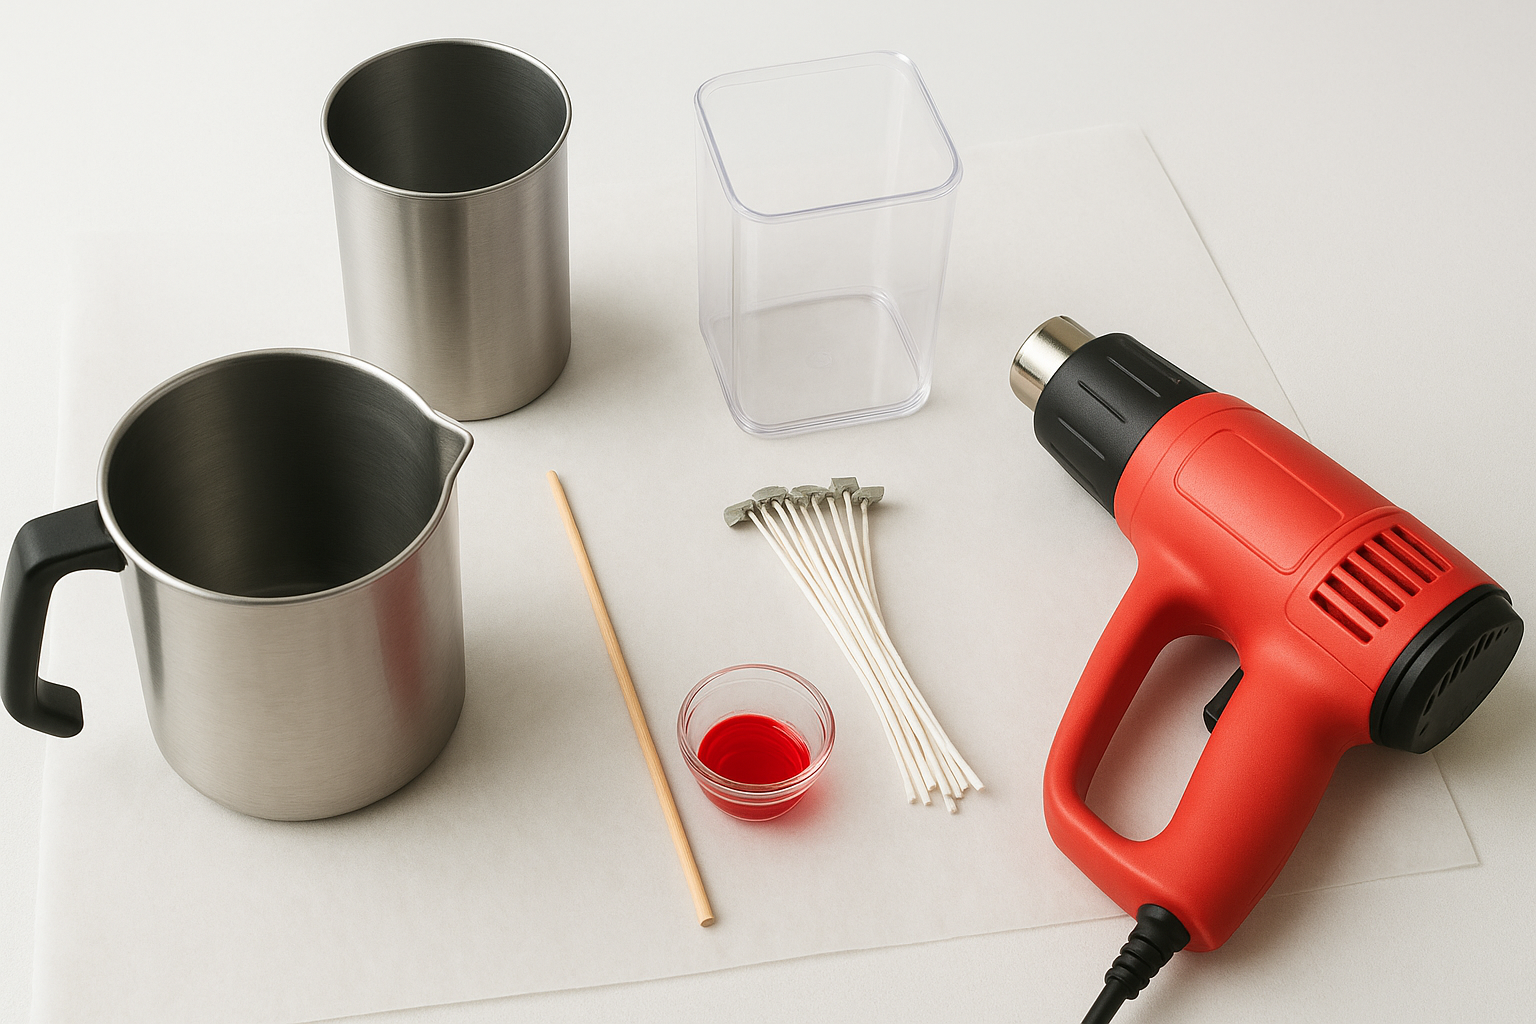
Keep wooden skewers or metal wick bars handy to center your wick while the wax sets. A heat gun helps smooth surface imperfections after unmolding, though this step is optional for rustic-style candles.
Safety and workspace essentials
Set up your workspace on a heat-resistant surface covered with newspaper or parchment paper. Wax spills happen, and cleanup is significantly easier when you've planned ahead. Keep a fire extinguisher within arm's reach anytime you heat wax, even for small projects. Wax fires require specific suppression methods that water makes worse.
Digital kitchen scales accurate to 0.1 ounces help you measure ingredients precisely for consistent results batch after batch. Add heat-resistant gloves to protect your hands when handling hot molds and pouring pots.
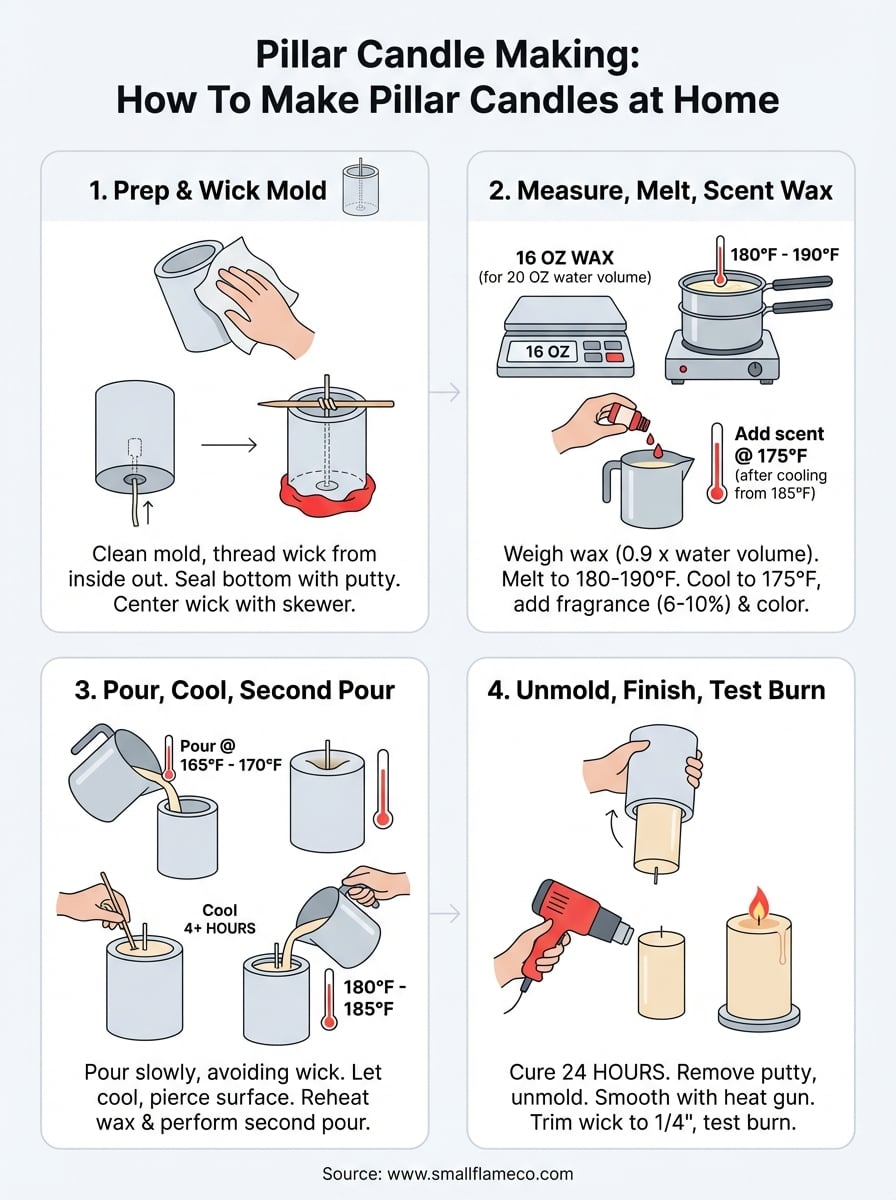
Step 1. Prep and wick the mold
Your mold preparation determines whether you'll release a smooth pillar or fight with stuck wax for twenty minutes. Clean your mold thoroughly with warm soapy water and dry it completely before starting. Any residue from previous pours creates texture problems and affects how cleanly your finished candle releases. Spray a light coating of mold release spray if you're working with a new mold or one that's given you trouble before.
Thread and secure your wick
Pull your pre-tabbed wick through the bottom hole of your mold from the inside out, leaving the metal tab inside. The tab should sit flush against the mold's interior base. Cut your wick about two inches longer than your mold's height to give yourself working room at the top. This extra length makes centering significantly easier and you'll trim the excess after unmolding.
Thread the wick from inside the mold outward through the bottom hole, never force it from the outside in or you'll damage the wick fibers.
Seal and center the setup
Apply mold sealer putty around the wick hole on the outside bottom of your mold, pressing firmly to create a watertight seal. Roll the putty between your palms to warm it first for better adhesion. Lay a wick bar or wooden skewer across the top opening and wrap the wick around it two to three times, then pull it taut. The wick should run perfectly vertical through the mold's center when viewed from any angle. Double-check your seal by gently pressing the putty again, leaks during pouring ruin everything.
Step 2. Measure, melt, and scent the wax
Getting your wax measurements right prevents waste and ensures your pillar candle fills the mold completely. Weigh your empty mold on a digital scale, then fill it with water and weigh it again. The difference gives you the volume in ounces. Multiply that number by 0.9 to calculate your wax weight, accounting for wax's lower density compared to water. For example, a mold holding twenty ounces of water needs eighteen ounces of wax.
Heat the wax to optimal temperature
Place your measured wax in a double boiler or pouring pot set over medium-low heat. Direct heat burns wax and creates safety hazards you don't want in your kitchen. Monitor the temperature constantly with your thermometer, heating pillar wax to 180°F to 190°F for complete melting. This temperature range ensures proper fragrance binding and color distribution throughout your wax.
Never leave melting wax unattended or heat it above 200°F, as overheated wax releases harmful fumes and increases fire risk.
Add fragrance and color at proper timing
Remove your wax from heat once it reaches 185°F and let it cool to 175°F before adding fragrance oil. This temperature preserves the fragrance compounds without burning them off. Measure your fragrance oil at 6% to 10% of your wax weight, stirring slowly for two full minutes to distribute it evenly. Add liquid dye one drop at a time until you reach your desired shade, remembering that wax appears darker when liquid than when solid. Stir for another thirty seconds to eliminate streaks.
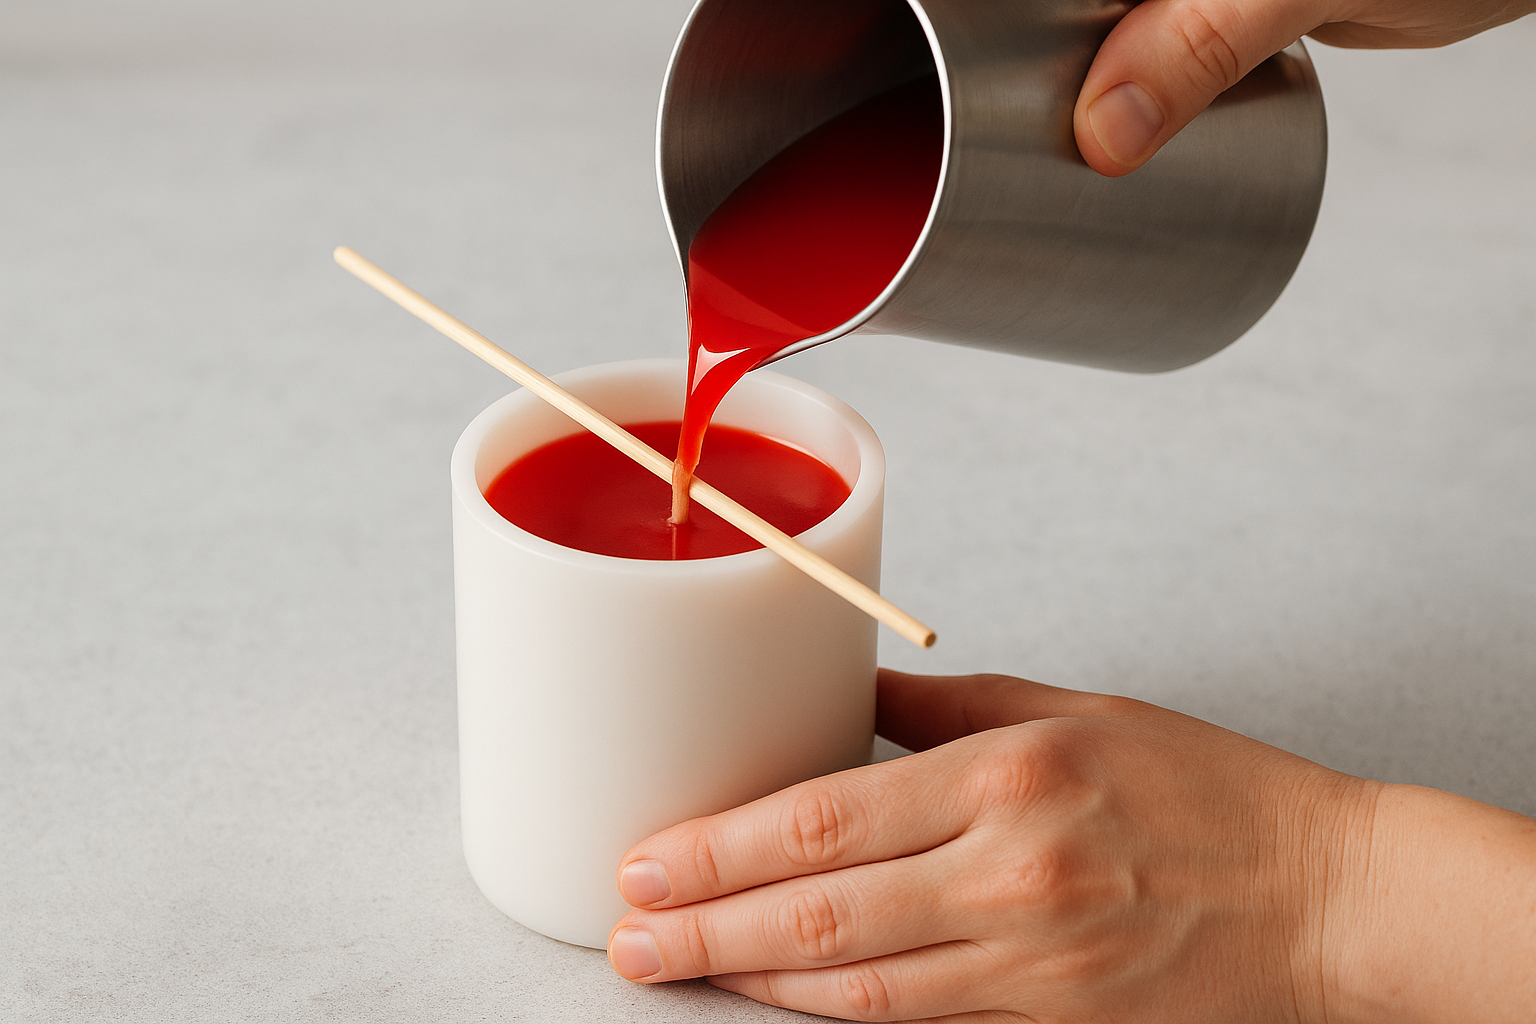
Step 3. Pour, cool, and do a second pour
Pouring pillar candles requires precision timing that container candles don't demand. Wait until your wax cools to 165°F to 170°F before pouring into your prepared mold. This temperature range prevents sinkholes while maintaining enough heat to create strong bonds between wax molecules. Pour slowly down the side of your mold rather than directly onto the wick to avoid displacing it from center position.
Monitor the cooling process
Fill your mold to within half an inch of the top during your first pour, leaving room for the inevitable second pour. Place your filled mold on a level, heat-resistant surface away from drafts or air conditioning vents. Temperature fluctuations during cooling create surface cracks and internal voids that weaken your finished candle. You'll notice a depression forming around the wick as the wax contracts, this happens to everyone learning how to make pillar candles and signals you need that second pour.
Allow your candle to cool for at least four hours at room temperature before attempting the second pour, rushing this step creates visible seams and structural weaknesses.
Execute the second pour correctly
Reheat your leftover wax to 180°F to 185°F for the second pour. Pierce the cooled wax surface multiple times with a wooden skewer around the wick, creating channels for the new wax to flow down and fill internal cavities. Pour carefully into the depression until the surface sits level with your original pour line. This second application bonds with the first layer and eliminates the sink hole that forms naturally during cooling. Let your candle cure for twenty-four hours minimum before attempting to unmold it.
Step 4. Unmold, finish, and test burn
After twenty-four hours of curing, your pillar candle is ready to release from its mold. Gently pull away the mold sealer putty from the bottom and flip your mold upside down on a clean towel. Tap the sides of the mold firmly with your palm or a rubber mallet, working your way around the entire perimeter. The candle should slide out with minimal resistance if you've prepared your mold correctly. Stuck candles usually respond well to fifteen minutes in the refrigerator, the cold contracts the wax slightly and breaks the seal.
Smooth surface imperfections
Examine your unmolded candle for seams, bumps, or rough spots that need attention. Run a heat gun on low setting over problem areas from six inches away, moving constantly to prevent melting through to the core. Buff the entire surface with a soft cloth or old nylon stocking to create a professional shine that matches store-bought pillars. Trim the wick to one-quarter inch using sharp scissors, angled cuts prevent mushrooming during the burn.
Never use sandpaper or abrasive materials on pillar surfaces, as they create micro-scratches that trap dirt and dull your finished candle's appearance.
Conduct a test burn
Light your finished pillar and observe it for two hours to verify proper performance. The flame should burn steadily without excessive smoking or tunneling down the center. Check that your melt pool reaches within half an inch of the candle's edge within the first hour. This confirms you've selected the correct wick size for your diameter. Problems at this stage mean you need to adjust your wick size before making additional pillars using the same specifications.
Next steps
You've learned how to make pillar candles from start to finish, covering everything from wax selection to test burns. Your first few pillars might reveal minor imperfections as you refine your technique, but each batch teaches you something new about temperature control, wick placement, and mold handling. Keep detailed notes on your wax temperatures, fragrance percentages, and wick sizes for each project so you can replicate successful results and troubleshoot problems quickly.
Experiment with different mold shapes and heights once you've mastered basic cylinders. Seasonal scent profiles create gift-worthy pillars that friends and family actually appreciate receiving. Consider documenting your candle-making journey with photos of each finished piece, tracking your progress builds confidence and helps you spot patterns in what works best for your specific setup.
Ready to explore more candle varieties beyond pillars? Small Flame Candle Company offers hand-poured options that showcase different wax formulations and scent combinations. Sometimes studying finished examples sparks ideas for your own creations.