
How To Make Soy Candles: Supplies, Temps, And Pouring Tips
Making your own candles at home is one of those satisfying projects that looks complicated but really isn't once you understand the basics. At Small Flame Candle Company, we've hand-poured thousands of candles, and we're sharing exactly how to make soy candles the right way, no guesswork, no wasted wax, no disappointing results. Whether you want to craft gifts, experiment with custom scents, or simply enjoy a new creative hobby, this guide breaks it all down.
You'll find everything from the supplies you actually need (and the ones you can skip) to precise temperatures for melting and pouring. We'll cover fragrance ratios, wick selection, and the small details that separate a decent candle from one that burns clean and throws scent beautifully. These are the same principles we use in our own workshop.
By the end, you'll have a clear, repeatable process for creating soy candles you're genuinely proud of, or at least confident enough to light without holding your breath.
What you need before you start
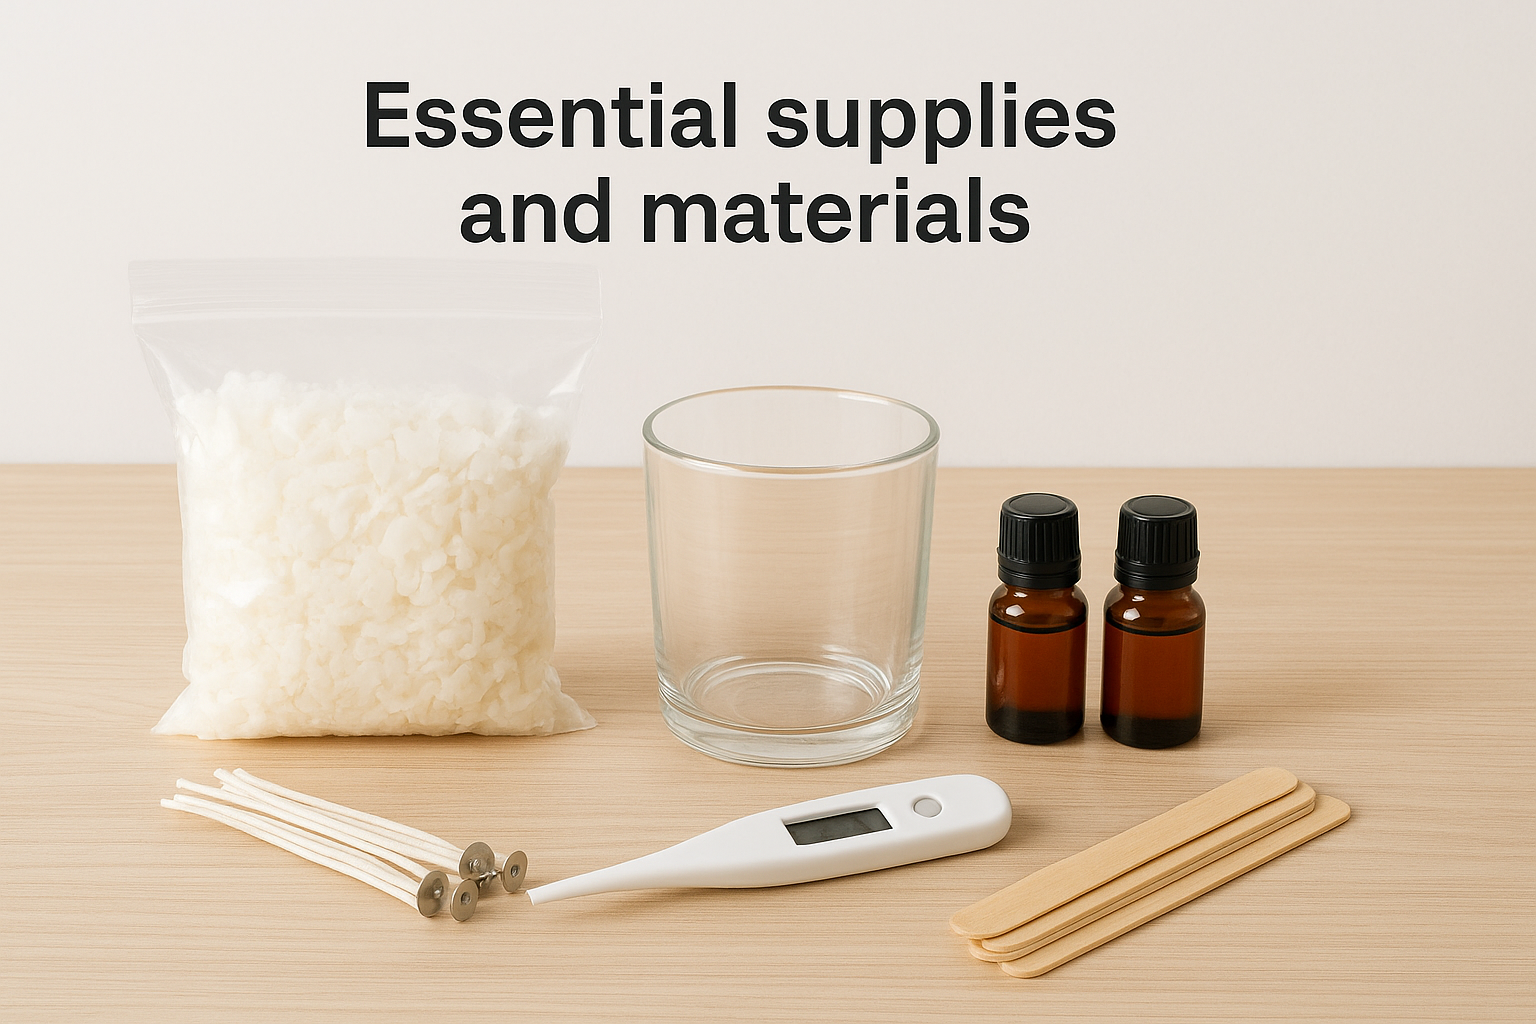
The supplies for learning how to make soy candles are simpler than most craft projects, and you probably already have half of them in your kitchen. You'll need soy wax flakes (not pellets or blocks, which take longer to melt), candle wicks sized for your container diameter, and heat-safe containers like glass jars or tins. Beyond those core items, you'll need a few basic tools and a clean workspace where you can safely heat wax without interruption.
Essential supplies and materials
Start with one pound of soy wax per eight-ounce candle you plan to make. This gives you enough wax to fill the container with a little left over for testing. Most beginners buy 444 soy wax or 464 soy wax, both of which work well in containers and hold fragrance reliably. You'll find these at craft stores or online, and a five-pound bag typically costs between fifteen and twenty-five dollars.
Your wick choice depends entirely on container diameter, not candle height. For jars that measure two to three inches across, use cotton wicks rated for soy wax in sizes like CD-8 or ECO-4. If your jar is wider, you'll need a larger wick number to create a full melt pool. Buy a wick variety pack if you're experimenting with different container sizes, since using the wrong wick ruins an otherwise perfect candle.
The wick size matters more than any other single decision you make in candle making.
Pick fragrance oils designed specifically for candle use, not essential oils meant for diffusers or body products. Candle-safe fragrances can handle high heat and distribute scent evenly when the wax melts. Plan to use one ounce of fragrance per pound of wax as your baseline ratio, though you can adjust slightly depending on how strong you want the throw.
Basic tools you already own
You need a double boiler setup to melt wax safely. Use a large pot filled halfway with water, then nest a smaller pot or heat-safe pouring pitcher inside it. This indirect heat prevents the wax from scorching and gives you better temperature control. Any stainless steel or aluminum pot works fine, just avoid using your best cookware since wax residue is stubborn.
Grab a candy or candle thermometer that reads up to two hundred degrees Fahrenheit. Digital thermometers with clips work best because you can attach them to your pouring pitcher and monitor temps hands-free. You'll also need wooden craft sticks or chopsticks for stirring, wick stickers or a small dot of hot glue to anchor wicks, and wick centering devices (or DIY versions using pencils and clothespins).
Keep paper towels and rubbing alcohol nearby for cleaning up wax spills before they harden. A kitchen scale helps you measure wax and fragrance accurately, since eyeballing ratios leads to weak scent throw or wasted materials. These items cost almost nothing if you're buying them new, and most people already have them tucked in a drawer somewhere.
Setting up your workspace
Choose a flat, stable surface near your stove, like a kitchen counter or table you can wipe clean easily. Cover the area with newspaper or a silicone mat to catch drips, and make sure you have good ventilation by opening a window or turning on a fan. Wax fumes aren't toxic, but they can get heavy in a closed room, especially when you're adding fragrance.
Keep your containers prepped and within arm's reach before you start heating wax. This means cleaning them with soap and water, drying them completely, and arranging them in the order you'll pour. You'll also want to clear pets and kids from the area, since hot wax causes serious burns and spills quickly. Set up everything in advance so you're not scrambling once the wax hits the right temperature.
Step 1. Choose wax, wick, and container
Getting these three elements right before you start is the difference between a candle that burns beautifully and one that tunnels or produces weak scent. The wax type determines how well your candle holds fragrance and forms a melt pool, the wick controls burn speed and flame height, and your container needs to handle sustained heat without cracking. You can't fix poor choices here with better technique later, so spend time on this step when learning how to make soy candles.
Picking the right soy wax blend
Golden Brands 464 and Golden Brands 444 dominate the container candle market because they're formulated specifically for jar candles and hold fragrance well. The 464 blend has a lower melting point (around 113-118°F) and creates a smoother top finish, while 444 offers slightly better scent throw but may show more surface texture. Both work reliably for beginners, so start with whichever your supplier stocks regularly.
Avoid pure soy wax without additives if you want consistent results, since it's prone to frosting and adhesion problems. Blended waxes that include small amounts of coconut or other vegetable waxes often perform better in varying humidity and temperature conditions. Check the product description to confirm it's rated for container candles, not pillars or tarts, since those formulations behave differently when poured.
The wax blend you choose sets the ceiling for how strong your candle's scent throw can be, no matter how much fragrance you add later.
Matching wick size to container width
Use this wick sizing guide based on your jar's diameter at the widest point:
| Container Width | Cotton Wick Size | ECO Wick Alternative |
|---|---|---|
| 2-2.5 inches | CD-6 or HTP-52 | ECO-2 |
| 2.5-3 inches | CD-8 or HTP-62 | ECO-4 |
| 3-3.5 inches | CD-10 or HTP-83 | ECO-6 |
| 3.5-4 inches | CD-12 or HTP-105 | ECO-10 |
Cotton wicks with paper cores like CD series give you the most control over burn rate, while ECO wicks (cotton with thin paper filaments) burn slightly cooler and work well in pure soy. Start with the middle size for your container width, then adjust up if you get tunneling or down if the flame gets too large during test burns.
Selecting safe containers
Your container must be heat-resistant glass, metal, or ceramic that can handle temperatures up to 200°F without cracking. Mason jars, recycled candle jars, and purpose-made candle tins all work well. Avoid thin glass like drinking glasses or anything with painted exteriors that might peel from repeated heating cycles.
Check that the container has straight or slightly tapered sides rather than narrow necks, since you need room to center the wick and achieve full wax melt across the surface. The opening should be wide enough to fit your hand in for cleaning and wick adjustments.
Step 2. Prep jars and secure the wick
Clean containers and properly centered wicks prevent most of the frustrating problems beginners face when learning how to make soy candles. Wax won't adhere to oily or dusty surfaces, and a crooked wick causes uneven burning no matter how carefully you pour. This prep work takes less than five minutes per candle but directly affects how your finished product performs, so don't skip it even when you're excited to start melting wax.
Clean containers thoroughly
Wash each jar with hot soapy water and rinse until no residue remains on the glass. Dish soap works fine, but avoid anything with moisturizers or fragrances that might leave a film. Dry the containers completely with a lint-free cloth or let them air dry for at least thirty minutes, since any moisture will cause the wax to separate from the sides as it cools.
Wipe the inside with rubbing alcohol on a paper towel right before you attach the wick. This removes fingerprints, dust particles, and any remaining oils that regular washing might have missed. The alcohol evaporates quickly and leaves the surface perfectly clean for maximum wax adhesion.
Clean glass is the foundation for candles that burn evenly without gaps forming between the wax and container walls.
Attach and center the wick
Place a wick sticker on the bottom of your wick tab (the metal piece at the wick's base) and press it firmly into the center of your container's bottom. If you don't have wick stickers, use a small dot of hot glue instead, but work quickly since it sets fast. Press down for five seconds to ensure it bonds completely.
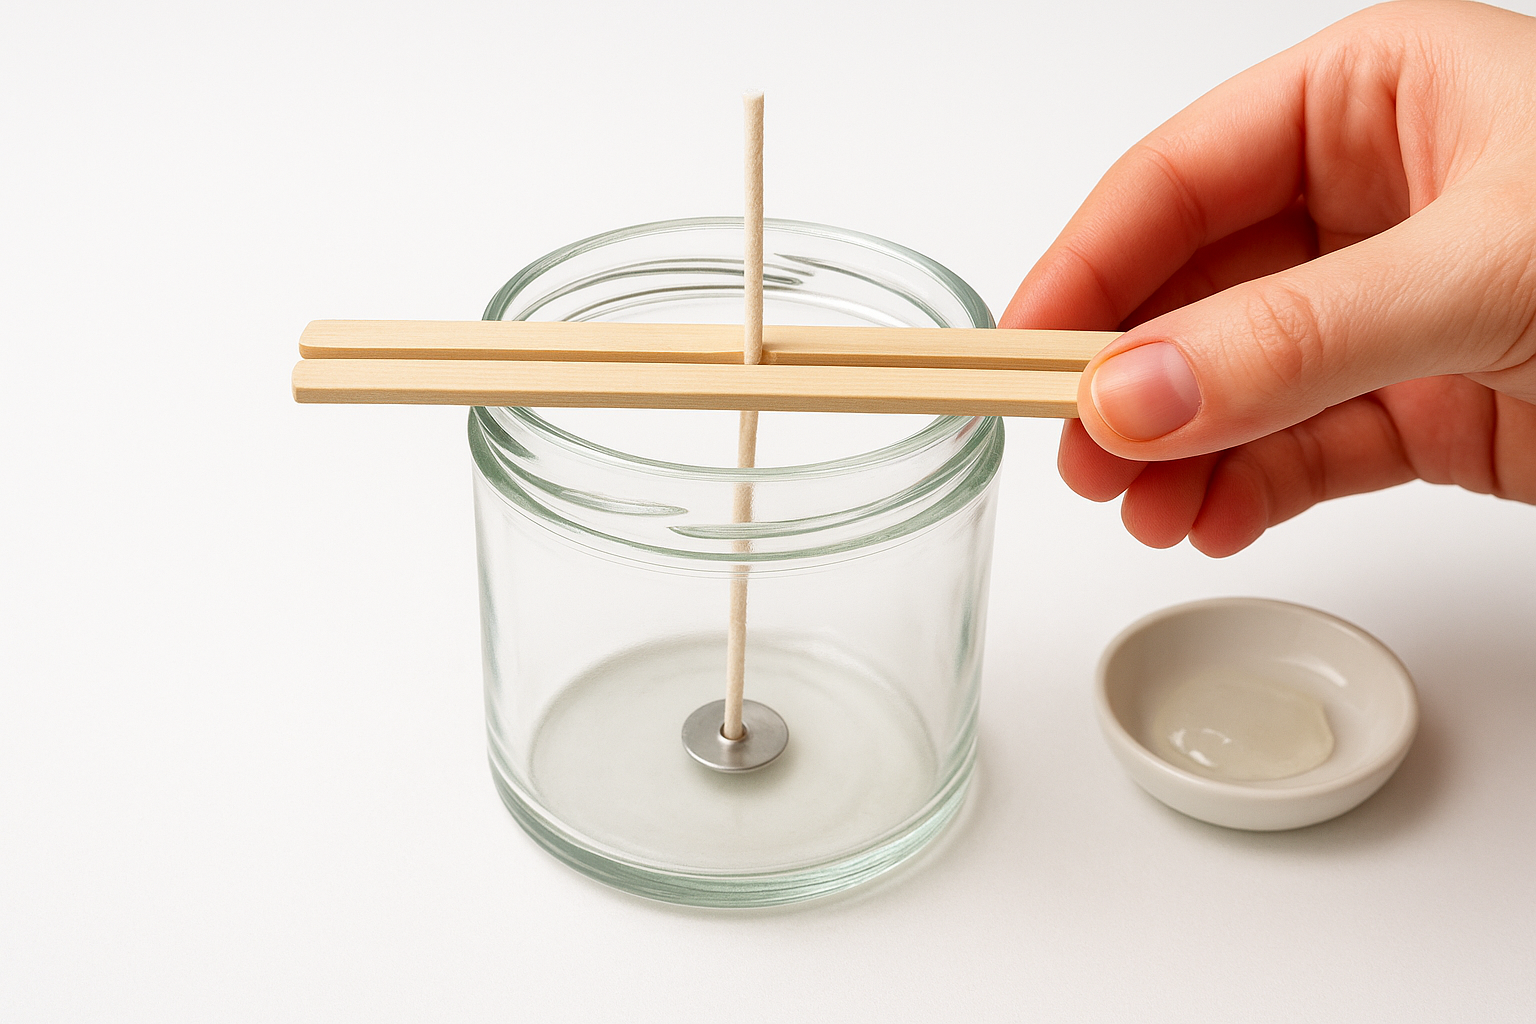
Use a wick centering device to hold the wick perfectly upright while you pour. These look like metal bars with a slot in the middle, and you can buy them for less than five dollars. Alternatively, lay two wooden craft sticks or chopsticks across the jar's opening and trap the wick between them. Adjust until the wick stands straight up without leaning toward any side.
Test your setup by gently tugging the wick upward. It shouldn't move at all if properly secured. Check from multiple angles to confirm the wick runs perpendicular to the bottom and doesn't tilt. Fixing this now takes seconds, but trying to correct a crooked wick after pouring means starting over with new wax.
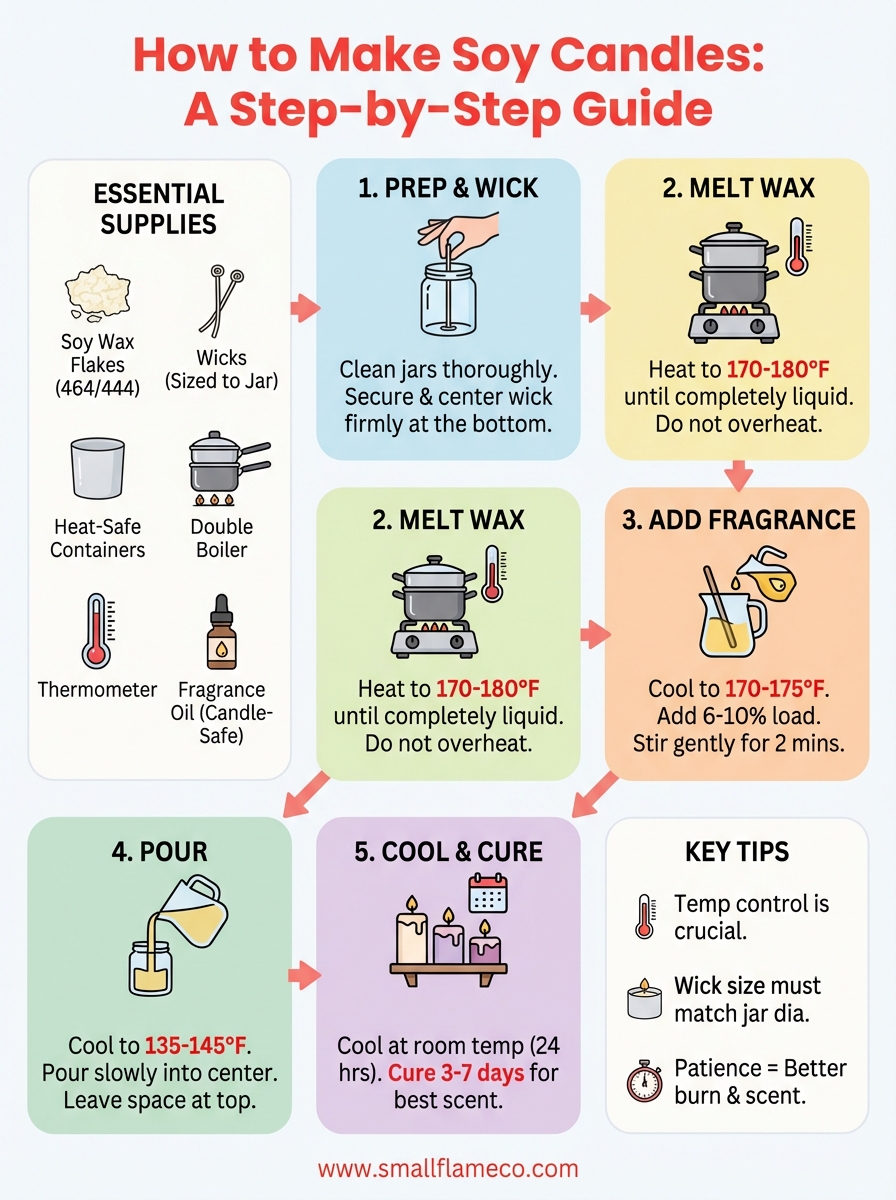
Step 3. Melt soy wax and track temps
Temperature control separates successful candle makers from those who waste materials on cloudy, poorly scented results. Soy wax needs specific heat ranges at different stages, and guessing leads to frosting, poor scent throw, and wax that doesn't bond to your container. When you're learning how to make soy candles, a reliable thermometer becomes your most important tool because visual cues won't tell you when wax hits the critical temperatures for fragrance addition or pouring.
Set up your double boiler safely
Fill a large pot halfway with water and place it on your stove over medium heat. Set a smaller pot or heat-safe pitcher inside the larger pot, making sure the bottom doesn't touch the water directly. This indirect heating method prevents scorching and gives you steady, controlled temperature increases that protect your wax from burning.
Measure your wax flakes using a kitchen scale and pour them into the top vessel. For an eight-ounce candle, you'll need roughly ten ounces of wax flakes to account for what adheres to your tools and pitcher. Clip your thermometer to the side of the pitcher so the probe sits in the wax without touching the bottom, which would give you false readings from the metal rather than the actual wax temperature.
Heat wax to the proper range
Bring your wax to 170-180°F for melting, stirring occasionally with a wooden craft stick to help it liquify evenly. This temperature fully melts soy wax without breaking down its molecular structure or creating discoloration. Watch your thermometer constantly during this stage, since wax can jump from 160°F to 190°F faster than you expect on a responsive burner.
The difference between 175°F and 200°F might seem small, but higher temps burn off fragrance molecules before you even add them.
Once the wax reaches 180°F and appears completely liquid with no solid pieces floating, remove it from heat and let it cool to the fragrance addition temperature (around 175°F for most oils). Your wax should look clear and slightly golden, with no cloudiness or separation. Stirring gently during cooldown helps maintain an even temperature throughout the liquid.
Adjust heat when needed
If your wax temperature climbs above 185°F, remove the entire double boiler from the stove immediately and let it cool naturally. Adding cold wax flakes to bring temps down creates temperature pockets that cause problems during pouring. Patience here prevents the frustration of reheating wax that cooled too much or dealing with fragrance that evaporated from excessive heat.
Keep your burner at medium-low heat rather than rushing the process with high temperatures. Slow, steady heating gives you better control and reduces the risk of accidentally overheating your wax beyond the safe range.
Step 4. Add fragrance and dye the right way
Fragrance timing and temperature determine whether your candle smells amazing or barely produces scent when lit. Adding oils too hot burns off the delicate compounds that create strong scent throw, while adding them too cool prevents proper binding with the wax molecules. This step in learning how to make soy candles requires precision with your thermometer and quick work once you start mixing, since the window for optimal fragrance addition closes faster than beginners expect.
Add fragrance at the correct temperature
Wait until your melted wax cools to 170-175°F before adding any fragrance oil. This temperature range lets the oil molecules bond with the wax without evaporating from excessive heat. Pour your measured fragrance (typically one ounce per pound of wax) directly into the melted wax and stir gently but thoroughly for two full minutes. Use slow, deliberate circles with your wooden stick to distribute the oil evenly throughout the batch.
Check your thermometer constantly during mixing, since the temperature will drop as you stir. If it falls below 160°F before you finish mixing, the fragrance won't integrate properly and you'll get weak scent throw or oil pools on your finished candle's surface. Work in a warm room (at least 70°F) to help maintain stable temperatures during this critical stage.
Fragrance added at the wrong temperature accounts for most complaints about homemade candles that don't smell strong enough when burning.
Measure fragrance carefully
Use this fragrance load guide for reliable scent throw:
| Wax Amount | Standard Load (6%) | Strong Load (10%) |
|---|---|---|
| 8 oz | 0.5 oz fragrance | 0.8 oz fragrance |
| 16 oz | 1 oz fragrance | 1.6 oz fragrance |
| 24 oz | 1.5 oz fragrance | 2.4 oz fragrance |
Start with 6% fragrance load (0.6 ounces per pound of wax) for your first batch, which provides noticeable scent without overwhelming the space. Increase to 8-10% only after testing the lower amount, since some fragrances perform differently and too much oil can prevent proper wax hardening.
Skip or minimize dye usage
Most candle makers avoid dye entirely in soy wax because it interferes with scent throw and creates an artificial appearance that contradicts soy's natural appeal. If you must add color, use liquid candle dye rather than chips or blocks, and limit it to just a few drops per pound of wax. Add dye at the same time as fragrance and stir thoroughly to prevent streaking.
Step 5. Pour, cool, and cure for best burn
Pouring technique and patience during cooling determine whether your candle develops that frustrating sink hole in the center or maintains a smooth, professional finish. The curing period after your candle hardens affects scent throw more dramatically than most beginners realize when learning how to make soy candles. Rush any part of this final step and you'll waste all the careful temperature work you did earlier, so plan to let your candles sit untouched for at least a few days before you light them.
Pour at the right temperature
Wait until your fragrance-mixed wax cools to 135-145°F before pouring into your prepared containers. This range gives you the best balance between smooth tops and strong adhesion to the jar walls. Pouring hotter than 150°F causes excessive shrinkage and sink holes, while pouring below 130°F creates visible pour lines and prevents the wax from bonding properly to the glass.
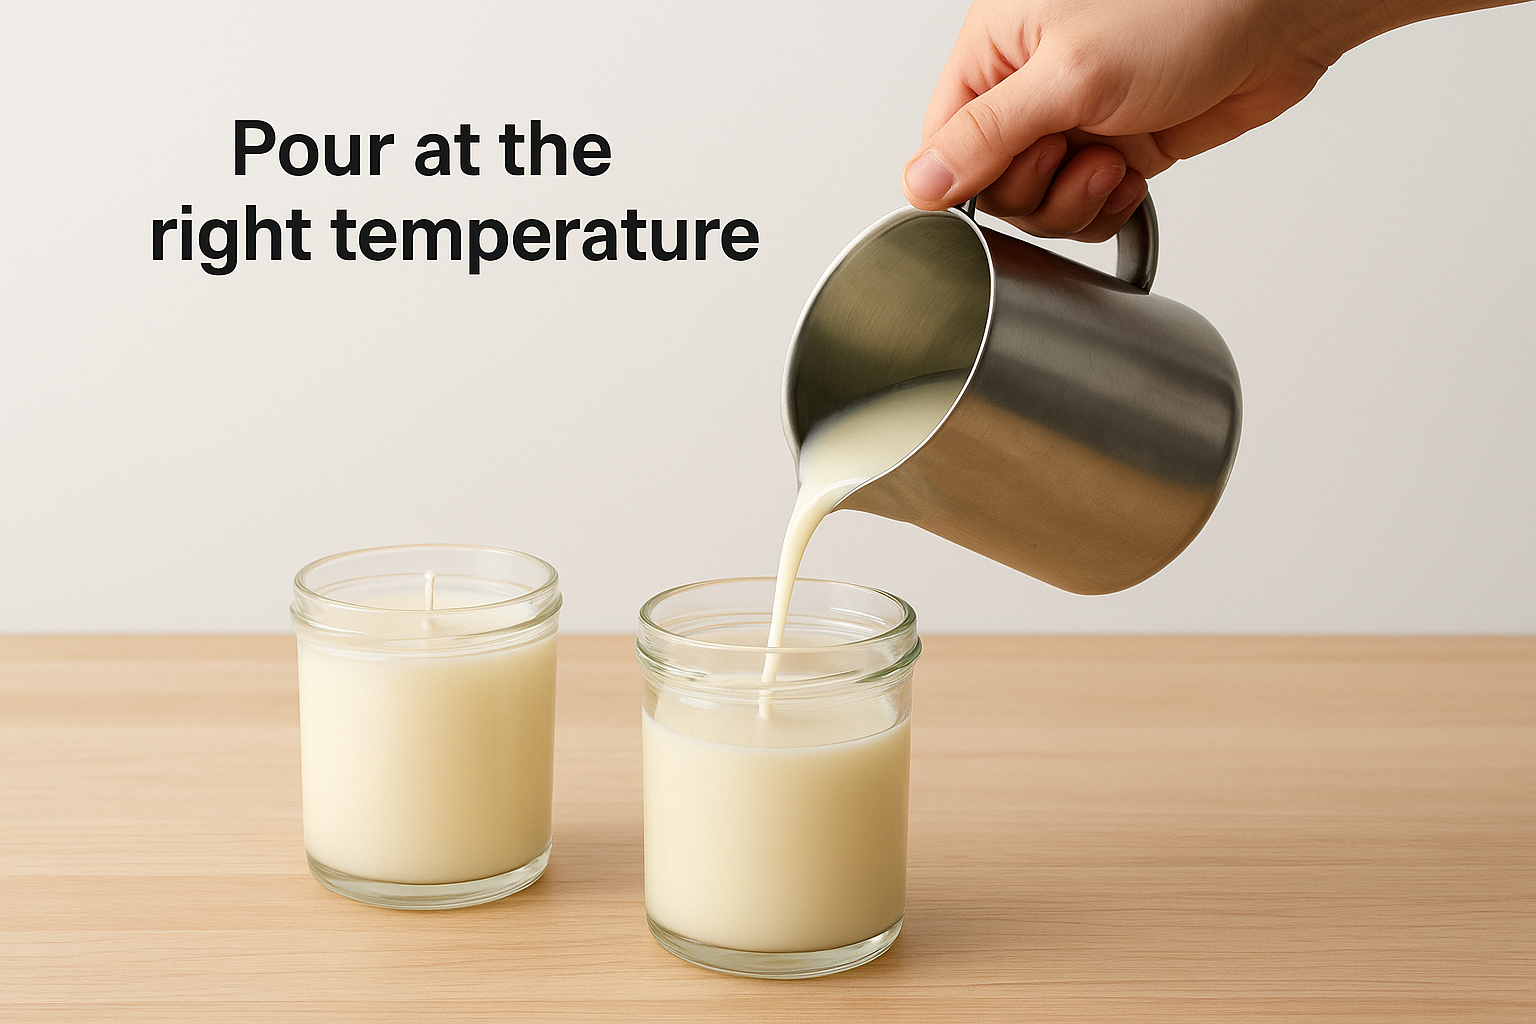
Pour slowly in a steady stream near the jar's edge rather than directly onto the wick, which can knock it off center. Fill to about half an inch below the rim, leaving space for the wax to settle. The wax level will drop slightly as it cools, which is normal and expected with soy wax.
Slow, controlled pouring at the right temperature prevents more problems than any other single technique in candle making.
Cool without rushing the process
Let your candles cool at room temperature (65-75°F) for at least 24 hours without moving or disturbing them. Avoid placing them in the refrigerator or near fans, since rapid cooling creates cracks and pulls the wax away from the container sides. The slower your candles cool, the better they'll look and perform.
Cure before lighting
Wait a minimum of three to seven days before burning your finished candles. This curing time lets the fragrance molecules fully bind with the wax and distributes scent evenly throughout the candle. Candles tested immediately after hardening produce weak scent throw compared to properly cured ones, even when you used the correct fragrance load.
Store your curing candles in a cool, dry location away from direct sunlight, which can fade colors and degrade fragrance oils. The patience pays off with stronger scent and cleaner burns.
Fix common soy candle problems fast
Even experienced makers encounter issues when learning how to make soy candles, but most problems have simple fixes you can apply to your next batch. The four most common complaints (sink holes, frosting, tunneling, and weak scent) all stem from temperature mistakes or material mismatches rather than bad technique. Identifying which problem you're facing takes seconds, and the corrections rarely require buying new supplies or starting from scratch.
Stop sink holes and surface dips
Sink holes appear as depressions in the center of your candle's surface, usually within a few hours of pouring. This happens when you pour at temperatures above 150°F, causing the wax to shrink excessively as it cools. Save some melted wax and reheat it to 160-165°F, then pour a thin layer over the cooled candle to fill the depression. Let this repair layer cure with the rest of the candle.
Prevent sink holes entirely by pouring at 135-145°F and allowing full room-temperature cooling without disturbance. Resist the urge to move your candles to speed up hardening, since temperature shifts create internal voids that collapse the surface.
Fix frosting and wet spots
Frosting looks like white crystalline patches on your candle's surface or along the glass. This natural characteristic of soy wax doesn't affect burn quality, but you can minimize it by pouring at slightly higher temperatures (140-145°F instead of 135°F) and pre-heating your containers to around 100°F in a warm oven.
Wet spots (gaps between wax and glass) occur when your containers were too cold during pouring. Clean your jars with rubbing alcohol and ensure they're at room temperature before pouring. Adding 5% coconut oil to your soy wax blend also improves glass adhesion.
Temperature consistency from container prep through cooling prevents both frosting and adhesion problems simultaneously.
Improve weak scent throw
Candles that smell strong cold but produce no scent when burning suffer from incorrect fragrance temperature. Always add fragrance at 170-175°F and increase your load to 8-10% of wax weight if 6% doesn't provide enough throw. Check that you're using candle-safe fragrance oils rather than essential oils, which evaporate at the temperatures needed for proper wax binding. Proper curing for seven full days also dramatically improves scent performance compared to testing candles after just one or two days.
You can make great candles at home
You now have everything you need to create professional-quality soy candles in your own kitchen. The process breaks down into five straightforward steps that become second nature after you make two or three batches. Temperature control matters most when learning how to make soy candles, followed closely by proper wick sizing and allowing adequate cure time before lighting your finished products.
Start with a single test batch using eight-ounce containers and one fragrance you love. Take notes on temperatures, timing, and results so you can replicate successes and avoid repeating mistakes. Your first few candles might not look perfect, but they'll teach you more than any tutorial ever could.
Looking for hand-poured inspiration or ready-made options while you practice your technique? Browse our candle collection to see what's possible with careful craftsmanship and quality materials.