
How To Add Fragrance To Candles (Temps, Ratios, Tips)
Getting the scent right is the single hardest part of candle making. We know this firsthand, at Small Flame Candle Company, every candle we sell is hand-poured, and learning how to add fragrance to candles properly took us more failed batches than we'd like to admit. Pour your fragrance oil at the wrong temperature or use the wrong ratio, and you end up with a candle that either smells like nothing or throws scent so poorly it might as well be a plain block of wax.
The difference between a candle that fills a room and one that just sits there comes down to a few specific decisions: when you add the fragrance oil, what percentage you use, and how long you stir. These aren't creative choices, they're technical ones, and getting them wrong wastes both your materials and your time. The good news is that once you understand the mechanics, consistent results become repeatable.
This guide covers everything you need to get fragrance into your candles the right way. We'll walk through optimal temperatures for soy, paraffin, and coconut wax, proper fragrance load ratios, stirring techniques, and the common mistakes that kill scent throw. Whether you're pouring your first candle or troubleshooting a weak hot throw on your fiftieth, you'll find something useful here.
What you need before you add fragrance
Before you figure out how to add fragrance to candles, you need to gather the right materials. Missing even one item mid-pour forces you to rush or improvise, and that is when batches go wrong. Having everything set up and within reach before you melt a single ounce of wax keeps the process smooth and gives you full control over timing, temperature, and ratios.
Core supplies
Your supply list does not need to be expensive, but it does need to be complete. Fragrance oil (not essential oil, which behaves differently and can separate from wax) combined with a digital thermometer are the two items most beginners skip or substitute, and both are critical. You also need a double boiler or a dedicated pouring pitcher, a scale that reads in grams or ounces, a silicone or stainless-steel stirring tool, your chosen wax, pre-tabbed wicks, and containers or molds.
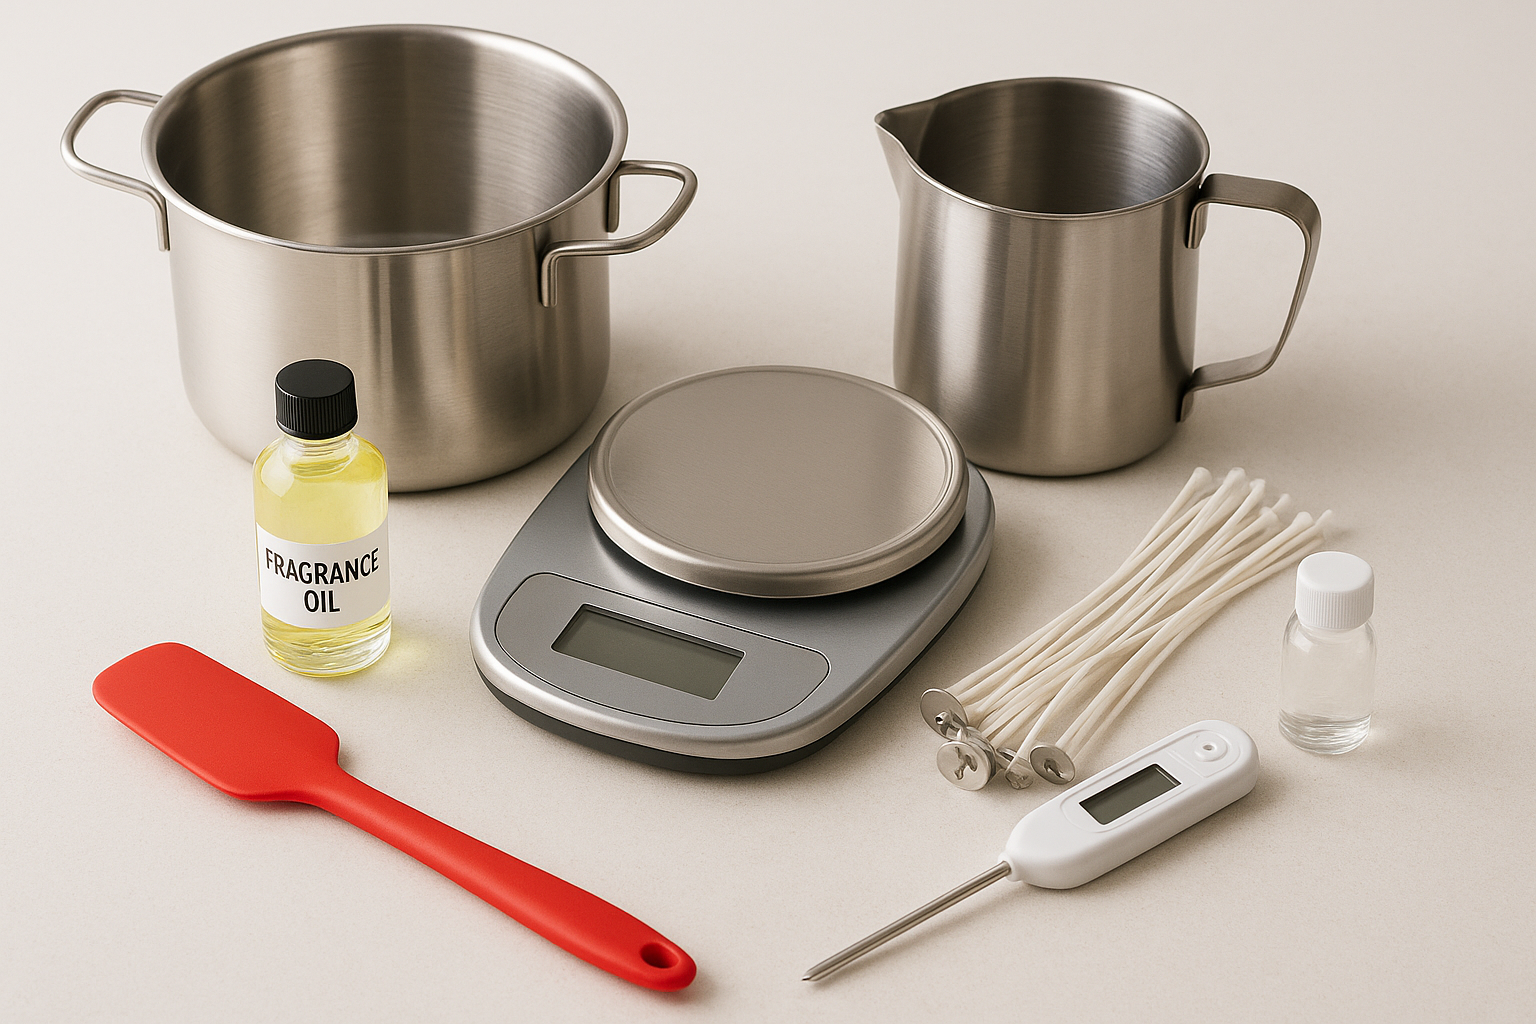
Here is a full reference for what to have ready before you start:
| Item | Why you need it |
|---|---|
| Fragrance oil (candle-grade) | Formulated to bind with wax and survive heat |
| Digital kitchen scale | Measures wax and fragrance by weight, not volume |
| Digital thermometer | Monitors melt temp and fragrance add temp |
| Double boiler or pouring pot | Melts wax without direct flame contact |
| Silicone or stainless stirring tool | Mixes fragrance thoroughly without absorbing it |
| Pre-tabbed wicks | Sized correctly for your container diameter |
| Containers or molds | Glass, tin, or silicone depending on candle type |
| Rubbing alcohol and paper towels | Cleans equipment and containers before use |
Weigh both your wax and your fragrance oil on a digital scale every single time. Estimating by volume leads to inconsistent fragrance loads and candles that perform differently batch to batch.
Wax types and their differences
Soy wax, paraffin, and coconut wax all behave differently when fragrance is introduced, so identifying your wax before you do anything else is not optional. Soy is popular and widely available, but it holds less fragrance oil by weight than paraffin and requires a longer cure time before the scent fully develops. Coconut wax binds fragrance oil well and produces a clean, creamy finish, but it is softer and costs more than either alternative.
Paraffin is the most traditional candle wax and typically produces the strongest hot throw of the three, meaning it releases scent more aggressively when the candle is burning. If you are making your first few batches and want the most predictable results with fragrance, paraffin gives you a shorter learning curve. Soy is a better fit if you want a natural product, and it pairs well with lighter, cleaner scent profiles once you understand its curing requirements.
Workspace and safety setup
Your workspace matters as much as your tools. You need a heat-resistant, flat surface, strong ventilation, and no flammable materials near your heat source. Fragrance oils are flammable liquids, and wax that overheats past its flash point can ignite without warning.
Keep a fire extinguisher within reach and never leave melting wax on an open flame without a thermometer in it. Clear your counter space before you start, wipe containers with rubbing alcohol to remove dust or residue, and have your scale zeroed and your fragrance oil already measured out. Doing this prep work takes five minutes and prevents the majority of beginner mistakes.
Step 1. Choose the right scent and set a safe ratio
Picking the right fragrance oil and calculating how much of it to use are decisions you need to make before any wax hits the heat source. Rushing past this step is one of the main reasons candles come out with a weak scent throw, and it's also where many people learning how to add fragrance to candles make their first costly mistake. Get the scent type wrong and it won't bind properly with your wax. Get the ratio wrong and the extra fragrance oil will pool on the surface instead of locking into the wax.
Pick a candle-grade fragrance oil
Not every fragrance oil works in candles. You need a candle-grade fragrance oil with a flash point above 170°F (77°C), which means the oil won't ignite during your pour. Essential oils burn off quickly at candle temperatures and often separate from wax, leaving you with uneven scent distribution and a disappointing result.
Always check the fragrance oil's Safety Data Sheet (SDS) before using it. The flash point tells you the minimum temperature at which the oil can ignite, and you need that number to pour safely.
Look for fragrance oils specifically labeled for candle use. Reputable suppliers list the flash point, recommended usage rate, and compatible wax types directly on the product page. If that information is missing, skip that oil and find one with full documentation.
Calculate your fragrance load
Your fragrance load is the percentage of fragrance oil by weight relative to the total wax weight. Most waxes have a maximum fragrance load, and going beyond that ceiling causes the excess oil to bleed out during cooling or create a fire hazard.
Use these ratios as your starting point:
| Wax type | Recommended fragrance load | Maximum load |
|---|---|---|
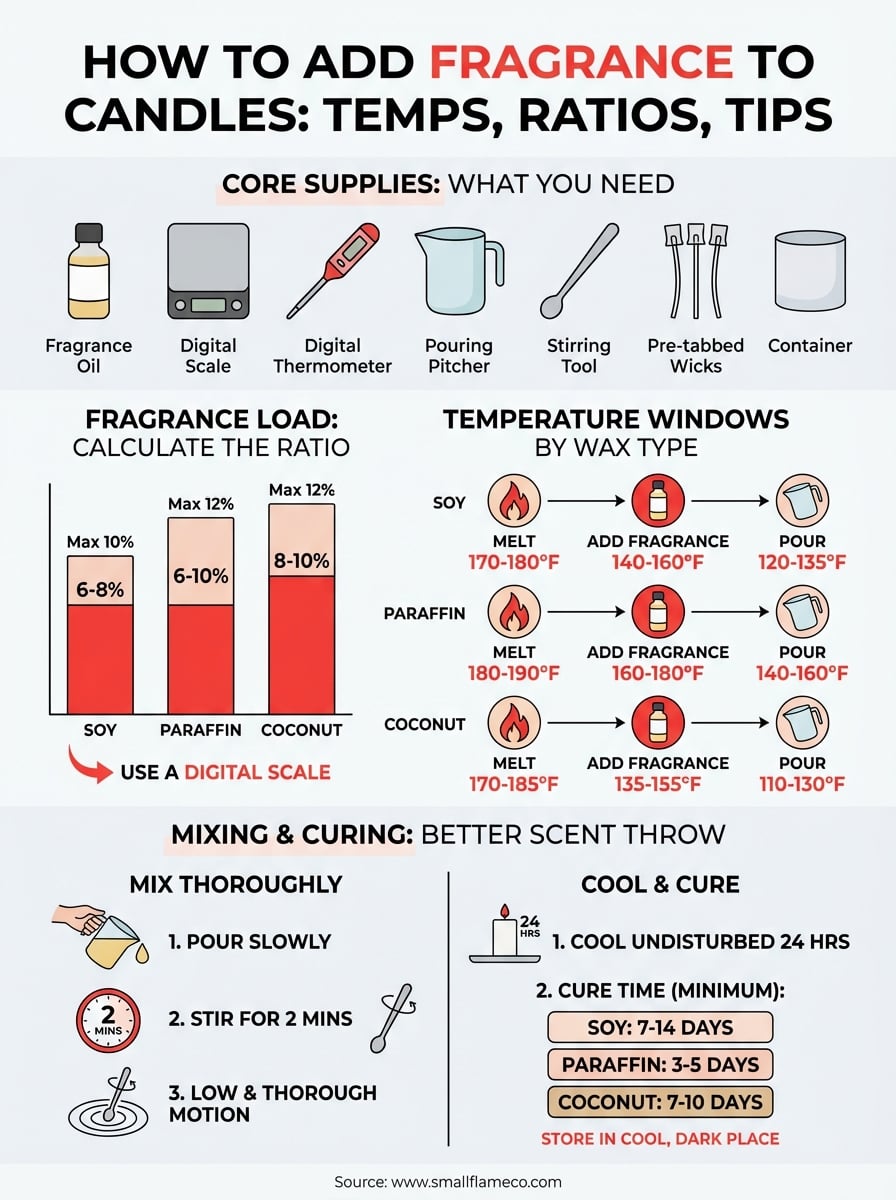
| Soy wax | 6-8% | 10% |
| Paraffin wax | 6-10% | 12% |
| Coconut wax | 8-10% | 12% |
To find your exact amount, multiply your wax weight by the fragrance percentage. If you're working with 16 oz of soy wax at 8%, you need 1.28 oz of fragrance oil. Always weigh both on a digital scale rather than estimating.
Step 2. Heat wax and hit the right temp window
Temperature is where most people learning how to add fragrance to candles lose control of their batch. Add fragrance oil when the wax is too hot and it burns off before it binds. Add it when the wax has dropped too far and the fragrance won't fully incorporate, leaving you with uneven distribution and a candle that smells different from one burn to the next. The window you're aiming for is specific, and your digital thermometer is the only reliable way to stay inside it.
Melt your wax safely with a double boiler
A double boiler setup keeps your wax away from direct heat, which prevents scorching and gives you more control over how quickly the temperature rises. Fill the bottom pot with water, set your pouring pitcher inside it, and place your pre-weighed wax into the pitcher. Heat the water on medium and let the wax melt gradually, stirring occasionally so it melts evenly throughout.
Never melt wax directly on an open burner without a buffer layer of water beneath it. Direct heat creates hot spots and dramatically increases the risk of overheating past the flash point of your fragrance oil.
Temperature windows by wax type
Each wax type has a specific temperature range where fragrance oil blends in cleanly and binds well to the wax structure. Keep your thermometer in the wax the entire time you're heating so you never have to guess where you are.
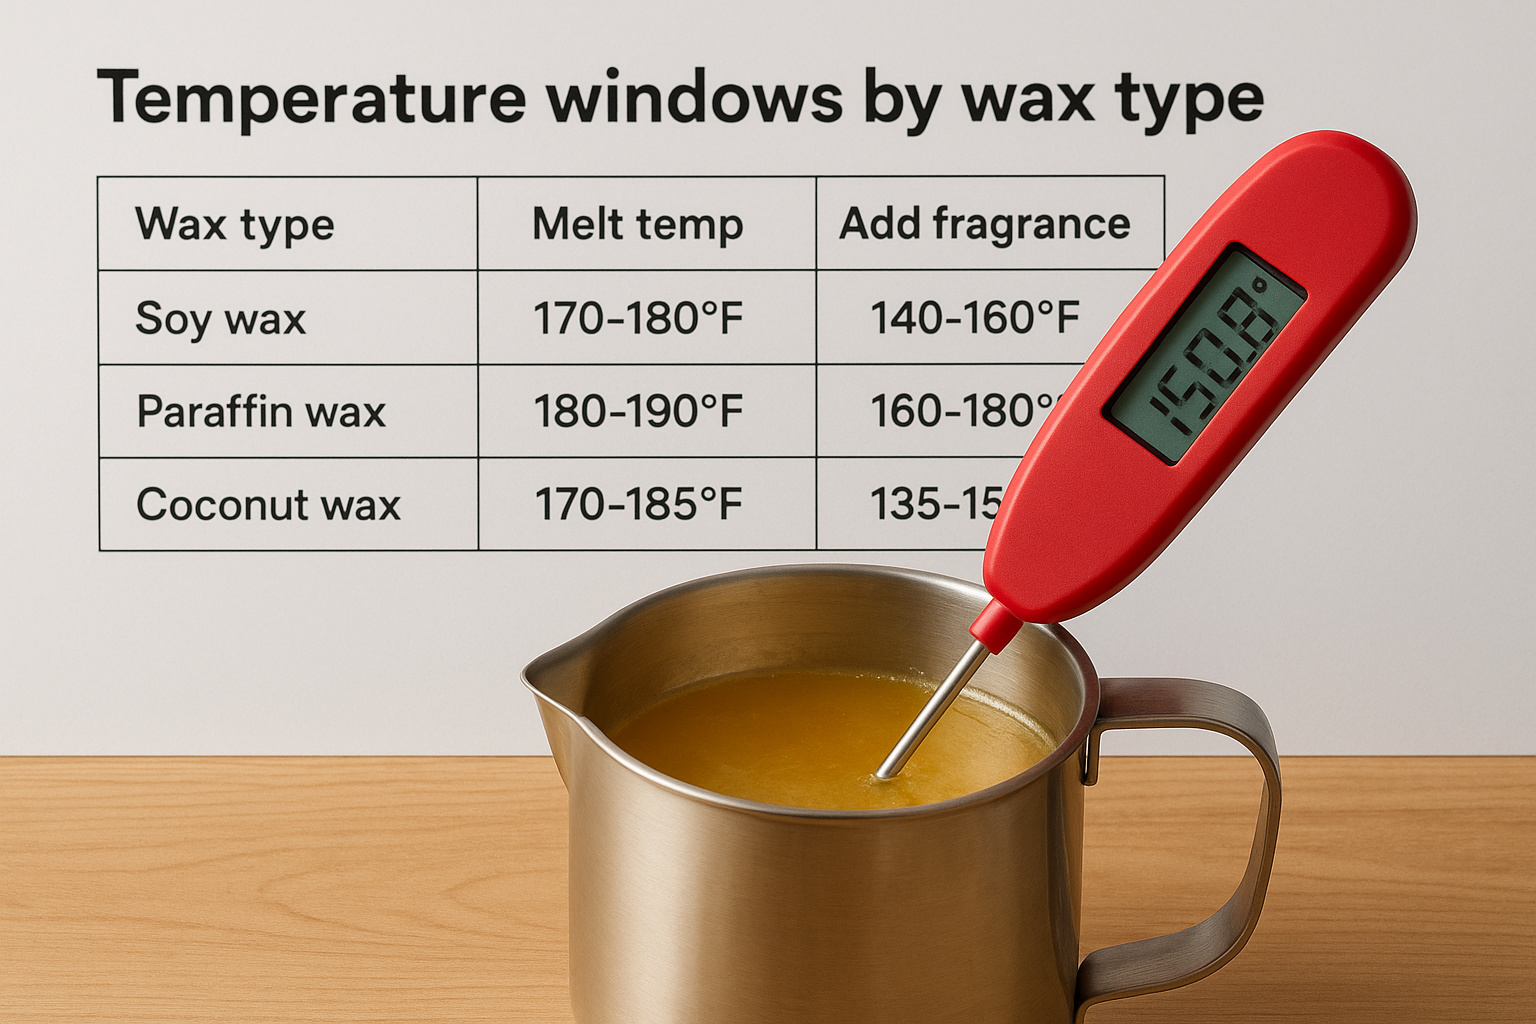
| Wax type | Melt temp | Add fragrance at |
|---|---|---|
| Soy wax | 170-180°F | 140-160°F |
| Paraffin wax | 180-190°F | 160-180°F |
| Coconut wax | 170-185°F | 135-155°F |
Watch the temp as your wax cools
Once the wax fully melts, pull it off the heat and let it cool to your target add temperature before you do anything else. Rushing this cooling phase by adding fragrance while the wax is still too hot is the most common reason a finished candle has little to no scent after it cures.
Check your thermometer every thirty to sixty seconds while the wax cools. Wax can drop several degrees per minute depending on your room temperature, so staying close and watching the reading keeps you from overshooting your target window in either direction.
Step 3. Add fragrance and mix it in thoroughly
Once your wax hits the target temperature window, you're ready for the most critical step in learning how to add fragrance to candles: the actual addition and mixing. How you pour and stir the fragrance oil determines whether it bonds completely with your wax or stays partially separate, which directly affects your finished candle's scent throw.
Pour the fragrance oil in slowly
Add your pre-measured fragrance oil directly into the wax in a slow, steady stream rather than dumping it in all at once. Pouring it quickly creates uneven distribution from the start and makes thorough mixing harder to achieve. Keep the fragrance oil at room temperature before adding it so the temperature difference between the oil and wax doesn't cause a sudden drop that pushes you outside your ideal blending window.
Pour your fragrance oil in a thin stream while moving it slightly side to side across the surface of the wax. This distributes the oil more evenly before you even start stirring.
Stir with purpose and track your time
Stirring is where most people cut corners, and it shows up clearly in the finished candle. Use a silicone or stainless-steel stirring tool and stir in slow, consistent circles for a full two minutes minimum. Avoid fast or aggressive stirring, which introduces air bubbles into the wax and can create a chalky or uneven surface texture once the candle cools.
Keep your stirring motion low and thorough, reaching the bottom and sides of the pitcher on each pass. Fragrance oil is denser than melted wax, so it naturally sinks toward the bottom. If you only stir near the top of the pitcher, the oil settles unevenly and you end up with inconsistent scent distribution throughout the finished candle.
Check your wax temperature during stirring as well. If the wax drops below your minimum blending temperature before you finish, gently reheat it and continue stirring once it returns to range. Stopping the stir early is one of the most common causes of fragrance oil separation during cooling, and it results in oily residue pooling on the surface of your cooled candle.
Step 4. Pour, cool, and cure for better scent throw
The final stage of learning how to add fragrance to candles is the one most people rush, and rushing it directly costs you scent throw. How you pour, how you let the candle cool, and how long you cure it all determine whether the fragrance you carefully measured and mixed actually performs when you light the wick.
Pour at the right temperature
Your pour temperature needs to be slightly lower than your fragrance add temperature, not at the same temp you mixed. Pouring too hot causes the fragrance to rise toward the surface as the wax cools, leading to an uneven scent distribution throughout the candle. For most wax types, pouring between 10 and 20 degrees below your fragrance add temperature gives you the cleanest result.
Pour in a single, slow, controlled stream aimed at the center of your container. Avoid splashing, which traps air bubbles near the wick and creates surface imperfections.
| Wax type | Recommended pour temp |
|---|---|
| Soy wax | 120-135°F |
| Paraffin wax | 140-160°F |
| Coconut wax | 110-130°F |
Let it cool without interference
Place your poured candles on a flat, room-temperature surface away from drafts, fans, and air conditioning vents. Uneven airflow causes the wax to cool at different rates across the surface, which creates sinkholes, rough tops, and can pull fragrance to one side of the candle. Do not move the candles while the wax is still liquid or semi-solid.
Let the candles sit undisturbed for a minimum of 24 hours before you touch them. Some wax types, particularly soy, may show a rough or frosted top layer after cooling. That is normal and does not affect performance.
Cure for maximum scent throw
Curing is the step that separates a good candle from a great one. Fragrance oil continues bonding with the wax structure for days after the initial pour, and lighting a candle before it finishes curing gives you a fraction of the actual scent potential.
Follow these minimum cure times before testing or using your candles:
- Soy wax: 7 to 14 days
- Paraffin wax: 3 to 5 days
- Coconut wax: 7 to 10 days
Store curing candles in a cool, dark place with lids or plastic wrap covering the surface to protect the fragrance from evaporating during the wait.
Next steps
You now have everything you need to understand how to add fragrance to candles correctly, from picking a candle-grade fragrance oil to curing your finished pour for maximum scent throw. The process comes down to four decisions: the right oil, the right ratio, the right temperature, and enough patience to let the candle cure fully. Nail those four things consistently and your results will improve with every batch.
Start with a single wax type and one fragrance oil before experimenting with blends or new scent profiles. Keeping your first few batches simple lets you identify exactly what's working and what needs adjustment without too many variables in play. Document your temperature, ratio, and cure time for each batch so you can repeat what works.
If you want to see what well-executed fragrance work looks like in a finished candle, browse our hand-poured coconut wax candles for real examples of scent and craft done right.