
How To Label Candle Jars: Design, Safety, And Application
A great candle deserves a label that matches. Whether you're starting a candle business or upgrading your current packaging, knowing how to label candle jars properly can make the difference between a product that looks homemade and one that looks professional. Labels do more than identify your brand, they communicate safety information, ingredients, and burn instructions that customers (and regulators) expect to see.
At Small Flame Candle Company, we've hand-poured thousands of candles and learned firsthand that the labeling process matters just as much as the wax and fragrance inside the jar. A poorly applied or incomplete label can undermine even the best candle. Getting it right takes attention to detail, from choosing the correct material and adhesive to meeting legal requirements set by federal guidelines.
This guide walks you through the full process: designing your label, including the required safety and compliance elements, and applying it cleanly to your jars. By the end, you'll have a clear roadmap for creating labels that look sharp and check every box, whether you're producing ten candles or ten thousand.
What you need before you start
Before you start figuring out how to label candle jars, gather everything in one place. Trying to source materials mid-project slows you down and leads to inconsistent results across your batch. Knowing what you need upfront keeps your labeling process repeatable, whether you're running ten jars or filling a wholesale order.
Label materials and printing supplies
The label stock you choose determines how your finished jar looks and how long it lasts. For most candle jars, a white or clear vinyl or BOPP (biaxially oriented polypropylene) label material holds up better than standard paper because it resists moisture and wax residue. You'll also need a printer that can handle your label size. A laser printer produces sharper text and more durable output than inkjet on most label stocks, though inkjet works if you match it to the right media.
Here's what to have ready before you print a single sheet:
| Item | Recommendation |
|---|---|
| Label stock | Vinyl or BOPP, matte or gloss finish |
| Printer type | Laser preferred; inkjet with compatible stock |
| Design file format | PDF or PNG at 300 DPI minimum |
| Label dimensions | Measured against your jar's flat surface area |
Always run a test print on plain paper first, wrap it around your jar, and confirm the fit before committing to label stock.
Tools for clean application
A few basic tools separate a label with bubbles from one that looks factory-applied. You need a squeegee or an old credit card to press out air pockets, plus isopropyl alcohol at 70% or higher concentration and clean, lint-free cloths to prep each jar. Wax residue, fingerprints, and dust on glass prevent adhesive from bonding properly, so skipping surface prep leads to peeling labels within days. Keep all of these within reach before you open your first roll of label stock.
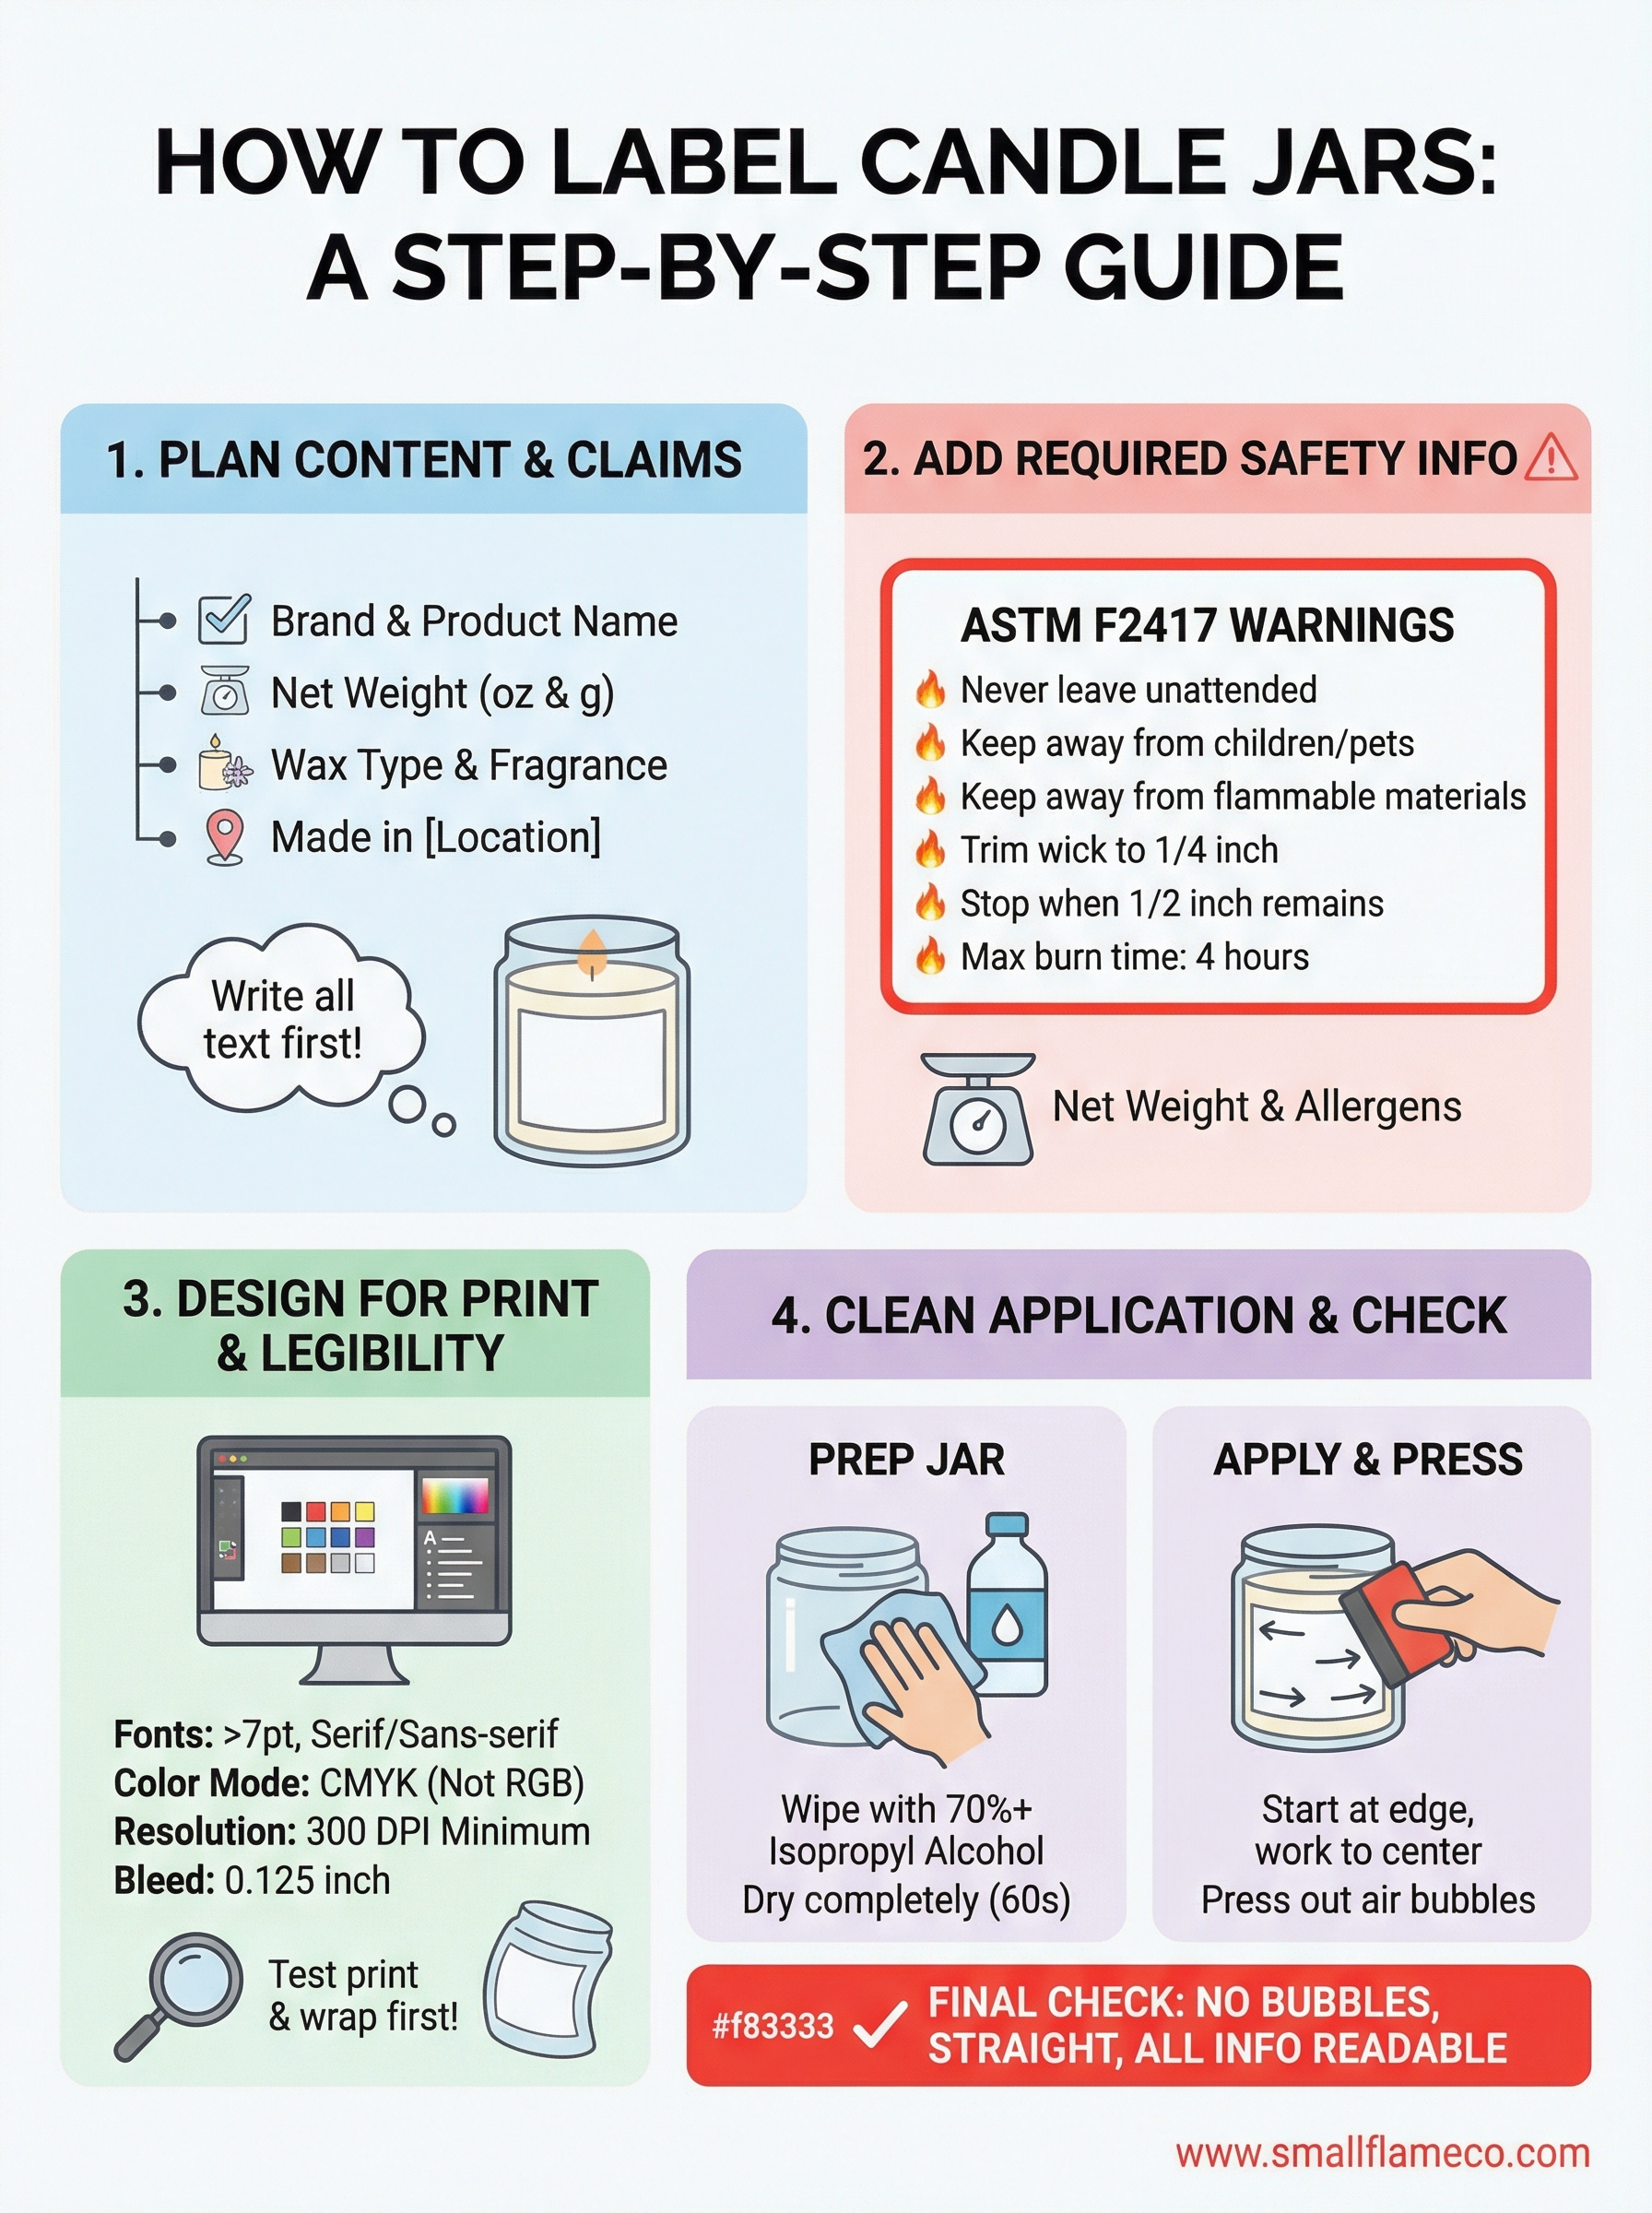
Step 1. Plan your label content and claims
Before you open a design program, write out every word you plan to put on your label as plain text. Planning your content first prevents you from squeezing important details in at the end or realizing mid-layout that your jar doesn't have enough flat surface area. When thinking through how to label candle jars effectively, starting with a complete content list saves you time and leads to cleaner designs.
Define your core label elements
Your label needs to carry specific pieces of information to function properly. Brand name and product name sit at the top of every candle label, and below those you need net weight, fragrance description, and wax type. Use this template before you open any design file:
- Brand name: ___________
- Product/scent name: ___________
- Net weight (oz): ___________
- Wax type: ___________
- Fragrance notes or description: ___________
- Made in [city, state]: ___________
Lock in your content list before opening any design software so your layout decisions serve the words, not the other way around.
Keeping this list consistent across every product you sell prevents errors and makes future label updates faster when your scent lineup changes.
Step 2. Add required info and safety warnings
Candle labels carry legal and safety obligations beyond brand name and scent. When you work through how to label candle jars for sale, you need to meet the requirements outlined in ASTM F2417, the standard that governs candle fire and burn safety in the United States. Skipping this step puts customers at risk and exposes your business to liability.
Required safety warning text
ASTM F2417 mandates specific warning statements on every candle sold in the US. Your label must include all of the following in legible text no smaller than 1/16 inch in height:
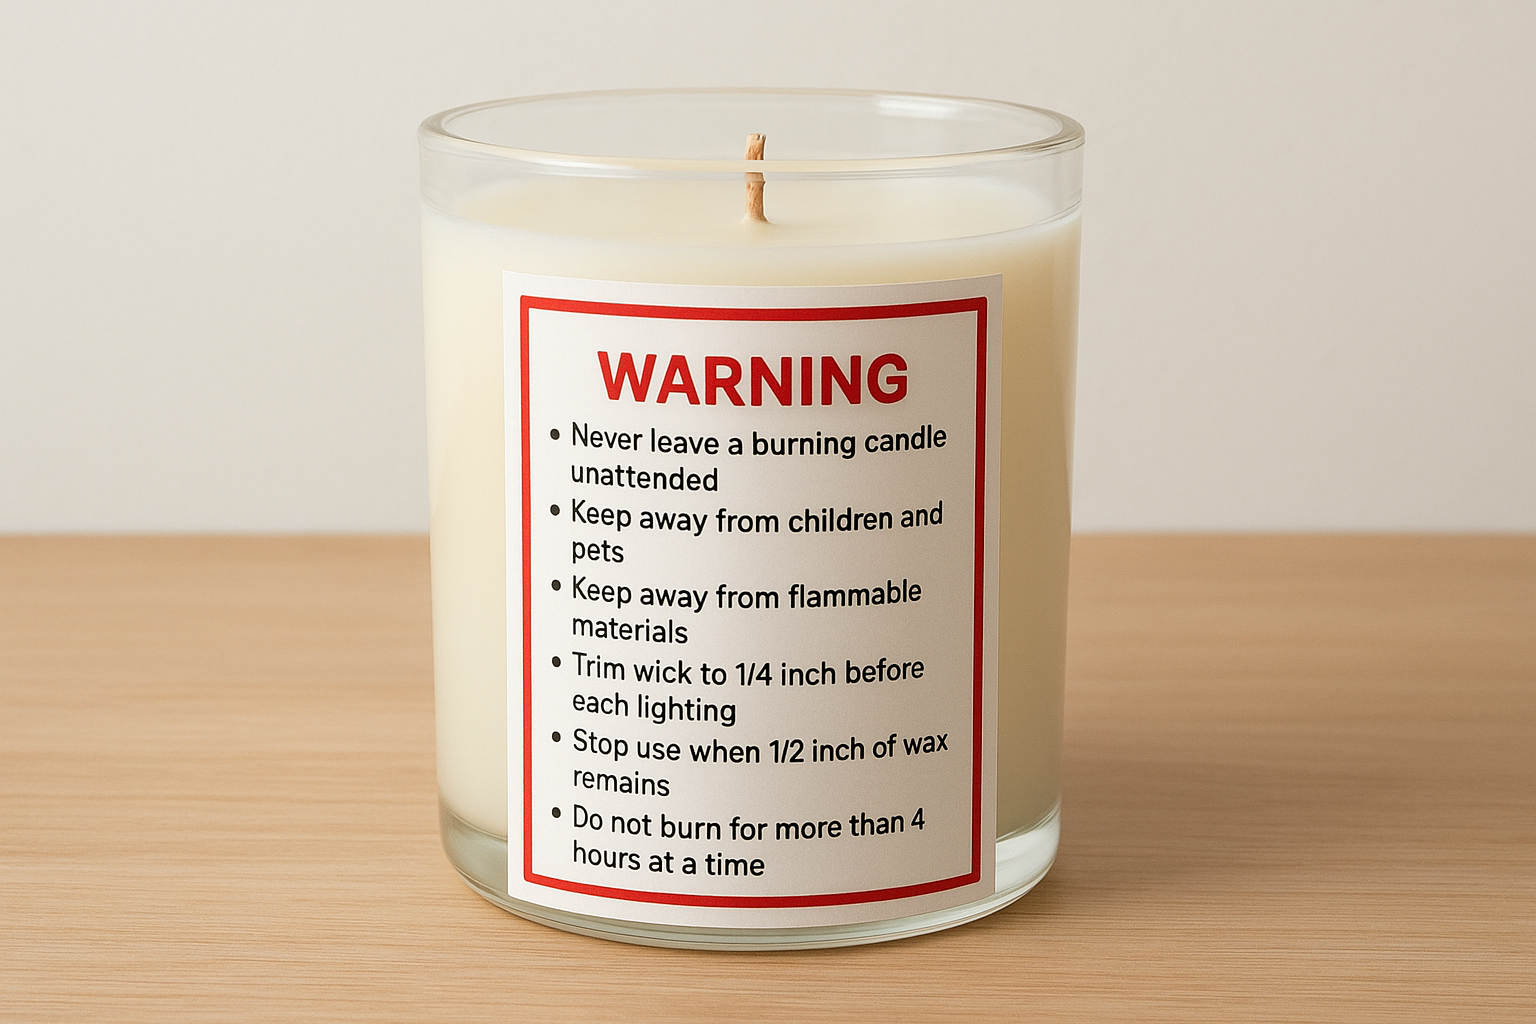
- Never leave a burning candle unattended
- Keep away from children and pets
- Keep away from flammable materials
- Trim wick to 1/4 inch before each lighting
- Stop use when 1/2 inch of wax remains
- Do not burn for more than 4 hours at a time
Place safety warnings where they are impossible to miss, either on the jar's bottom or within a clearly defined box along the side label.
Net weight and ingredient disclosure
Net weight must appear in both ounces and grams to comply with the Fair Packaging and Labeling Act. You should also list your primary wax type and any known fragrance allergens so customers with sensitivities can make informed choices before purchasing.
Step 3. Design a label that prints and reads well
Design decisions that look fine on screen often fall apart on a printed label. When working through how to label candle jars, keep your layout simple so text stays legible after printing, especially on curved glass where label edges wrap and small fonts compress visually. Every element on your label competes for space, so prioritize the most critical information before adding decorative touches.
Choose fonts and colors that survive printing
Serif and sans-serif fonts above 7pt print cleanly on most label stocks, while decorative scripts below that size often blur into illegible smudges. Stick to no more than two typefaces per label to keep the design readable. For color, avoid light text on light backgrounds, and always test your design against both white and clear label stock before committing to a full print run.
Run a proof on actual label stock at 100% scale and check it under different lighting conditions before printing a full batch.
Set up your file for print-ready output
Use this checklist before sending your file to print:
- Resolution: 300 DPI minimum for all images and graphics
- Color mode: CMYK, not RGB
- Bleed: 0.125 inch on all sides
- Fonts: embedded or converted to outlines
- File format: PDF/X-1a or high-resolution PNG
Exporting in the wrong color mode shifts your brand colors noticeably once printed, so convert to CMYK before you finalize anything.
Step 4. Print and apply labels without bubbles
Printing and applying your labels is the last physical step in learning how to label candle jars, and it's where most mistakes happen. Rushing through application or skipping surface prep leads to bubbles, lifted edges, and labels that peel within weeks. Take the same care here that you put into your wax and fragrance work.
Prep your jars before peeling anything
Clean each jar with isopropyl alcohol and a lint-free cloth before you touch a single label. Wipe in one direction rather than scrubbing back and forth, which can leave lint behind. Let the glass dry completely, at least 60 seconds, before applying anything. Any oil, dust, or wax film on the surface will prevent the adhesive from bonding, no matter how well you press the label down.
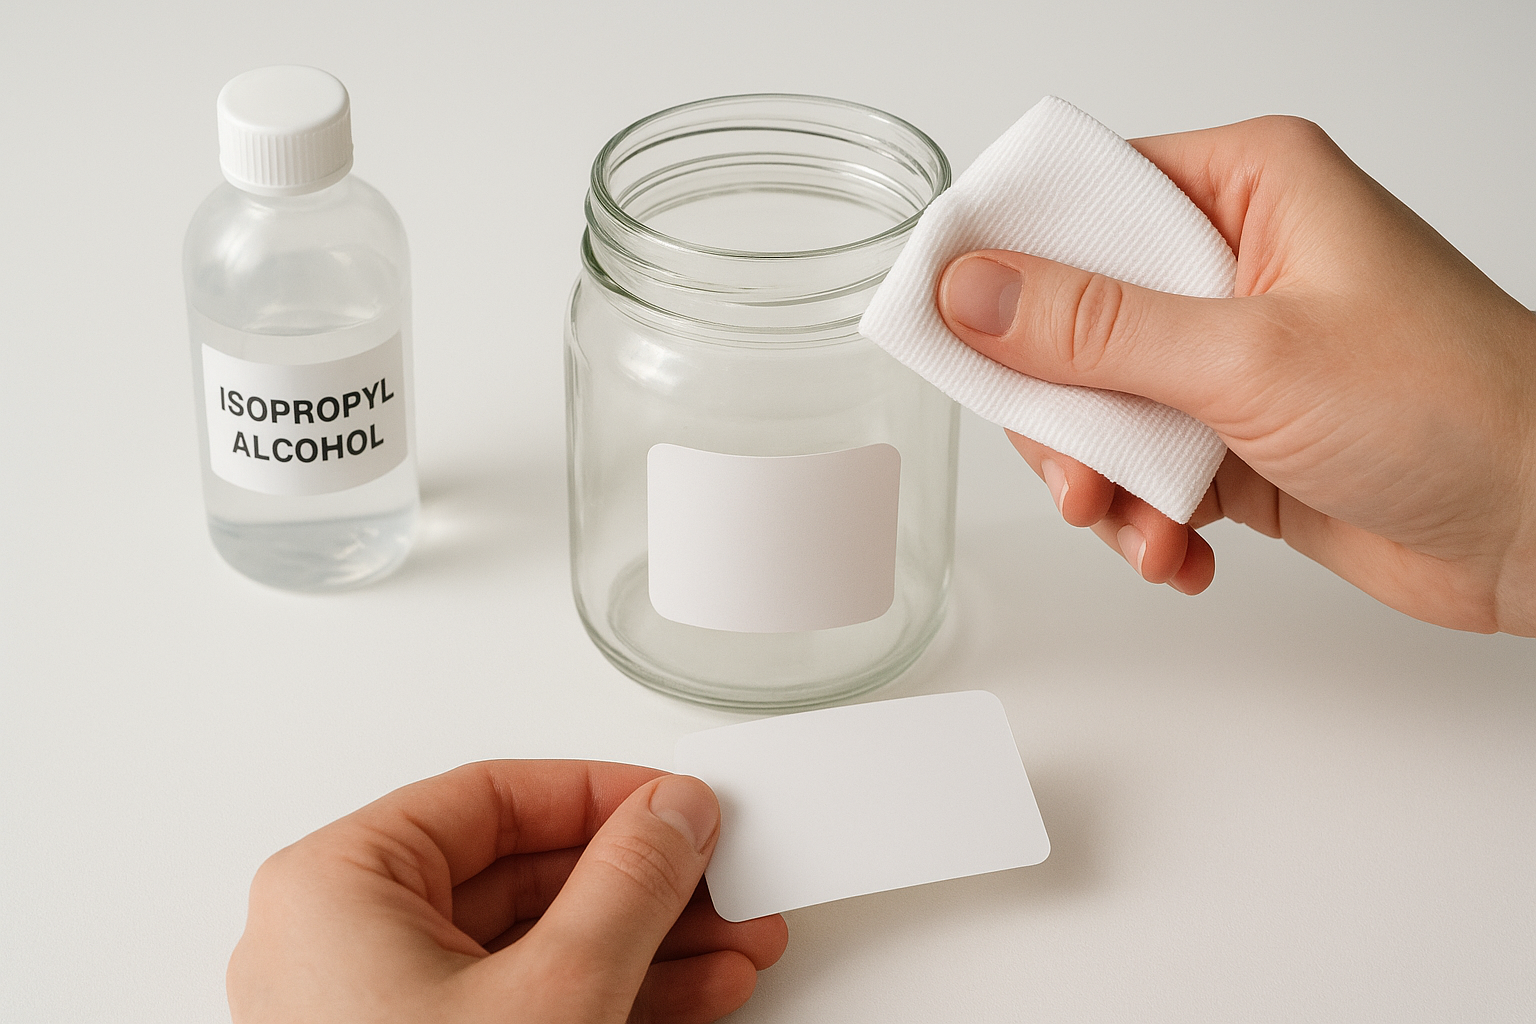
Never apply labels to jars that are still warm from the pour. Cold, dry glass gives you the strongest adhesive bond.
Apply with firm, even pressure
Start at one edge of the label and lay it down slowly across the jar surface rather than pressing the whole label down at once. Use a squeegee or credit card held at a 45-degree angle to push air outward as you go. Work from the center toward the edges on any flat surface to prevent air from getting trapped underneath the material.
Final label check
Before you ship a single jar, run through one last check on your finished labels. Hold each jar at arm's length and confirm the label sits straight, with no visible bubbles or lifted edges. Press any loose corners down firmly and wipe off any adhesive residue with a dry cloth before it attracts dust. A clean, well-applied label tells customers that the same care went into making the candle itself.
Check that every required element is present: brand name, net weight, safety warnings, and wax type should all be readable without squinting. Knowing how to label candle jars correctly means nothing if a key detail gets cut off in the layout or buried in a corner. If you want to see what thoughtful candle labeling looks like on a finished product, browse the Small Flame Candle Co. coconut wax collection for real examples of clean, complete candle packaging done right.