
How To Start Candle Making For Beginners At Home Step-by-Step
Your first homemade candle won't be perfect, and that's completely fine. Candle making for beginners starts with a willingness to get your hands a little waxy and learn as you go. The good news? The basics are surprisingly straightforward, and you don't need a fancy studio or expensive equipment to pour your first candle at the kitchen table.
At Small Flame Candle Company, we've hand-poured thousands of candles across dozens of scent profiles, from nostalgic bakery fragrances to bold novelty blends like Dr Pepper. That hands-on experience has taught us exactly where beginners tend to trip up: choosing the wrong wax, using the incorrect wick size, overheating fragrance oils, or rushing the cooling process. We've made every one of those mistakes ourselves, and we built this guide so you can skip the frustrating trial-and-error phase.
Below, you'll find a complete step-by-step walkthrough covering everything from gathering your supplies to pouring and curing your finished candle. We also included the specific tips and fixes that took us years of pouring to figure out. Whether you're exploring candle making as a new hobby or testing the waters before starting a small business, this guide gives you a clear path from raw materials to a clean, even burn.
Understand candle safety and workspace setup
Before you touch a pot of wax, you need to understand what you're actually working with. Hot wax behaves like hot cooking oil, and it can cause serious burns if it splashes on your skin or ignites when it reaches its flash point. Most beginner accidents happen because people skip the safety fundamentals and jump straight to the fun part. Spending 10 minutes setting up your space correctly keeps both your skin and your workspace in good shape from the very first pour.
Know the fire and heat risks before you start
Wax is flammable above its flash point, and different waxes have different thresholds. Soy wax typically flashes around 350-400°F, while some paraffin blends can flash lower depending on the formulation. Your goal is to melt wax slowly and keep it well below that range, which means you should always use a dedicated thermometer to track temperature rather than guessing by sight or steam. Never walk away from a melting pot on the stove, even for a short break.
Never add fragrance oil to wax that is too hot. Most fragrance oils have a flash point between 170-200°F, and pouring them into overheated wax causes the scent to burn off instantly or, in extreme cases, ignite.
Water and hot wax do not mix. If your wax catches fire and your instinct is to grab a glass of water, resist that impulse entirely, because water causes hot wax to splatter violently and spread the flame further. Instead, keep a metal pot lid nearby to smother any flame, and consider storing a small ABC-rated fire extinguisher in whatever room you use for pouring. That extinguisher also doubles as peace of mind during every session.
Set up your workspace for safe, clean pours
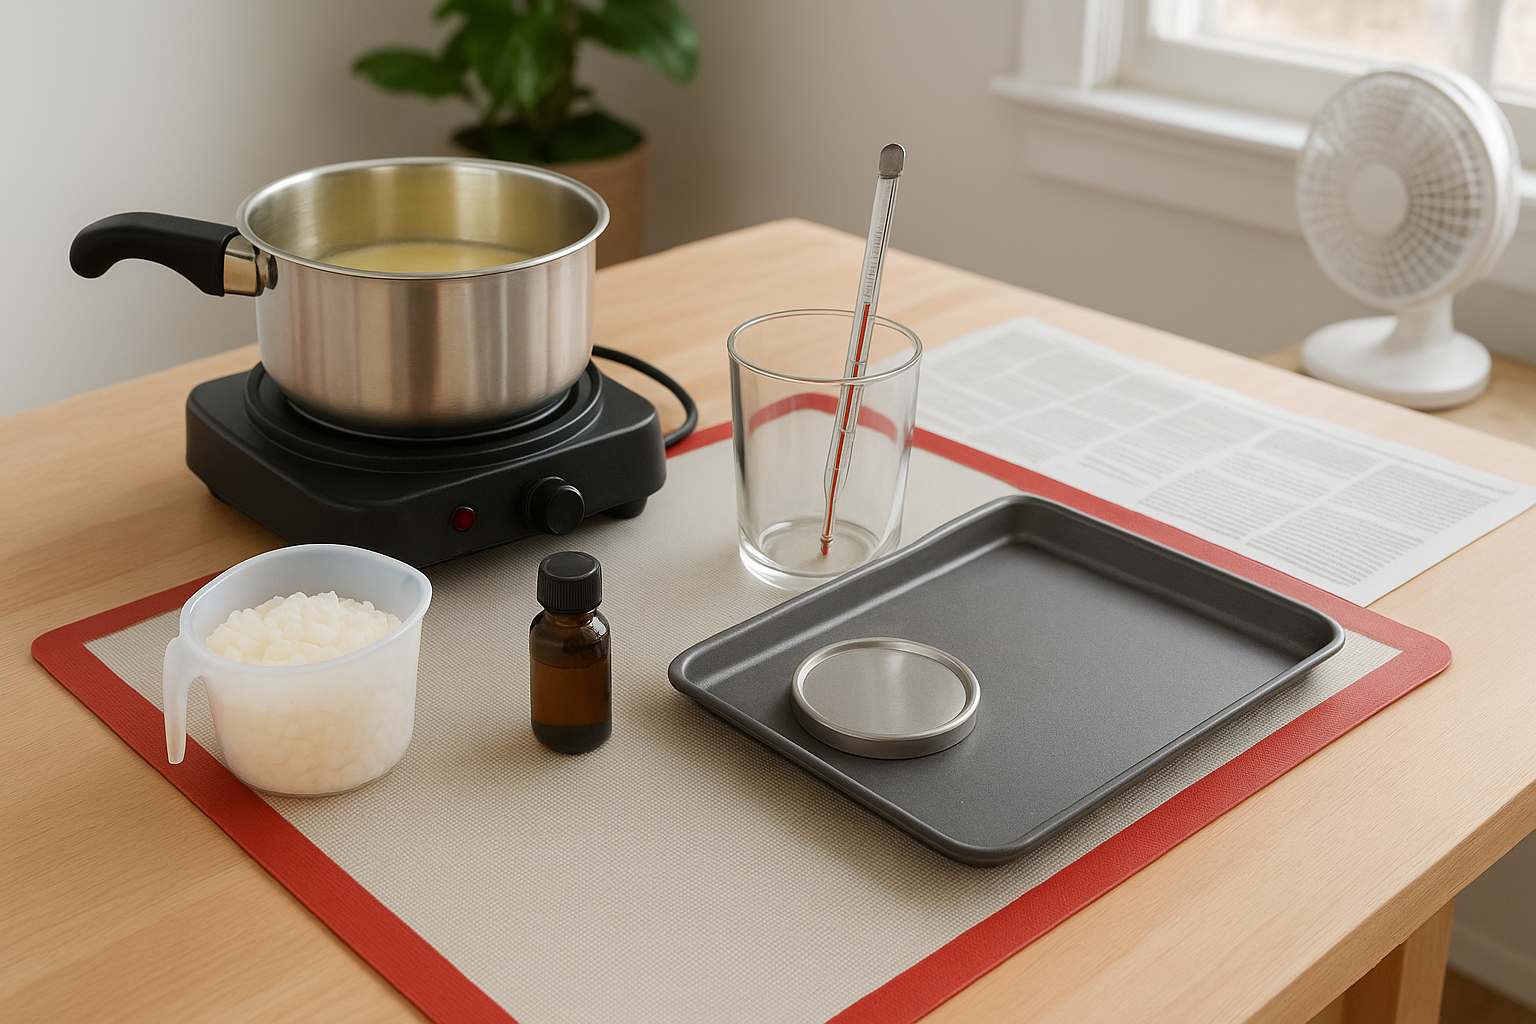
Your workspace setup affects both your personal safety and the consistency of your finished candles. You want a flat, stable, heat-resistant surface as your base, which in practice means protecting your countertop with a silicone mat or several layers of newspaper before anything else. Wax drips and fragrance oil spills are normal during candle making for beginners, so protecting surfaces you care about before starting saves you a lot of frustration.
Here's a straightforward workspace checklist to refer to before every session:
- Heat source: A dedicated double boiler or electric wax melter (avoid placing a single pot directly on a burner)
- Thermometer: A digital or candy thermometer that reads up to at least 250°F
- Surface protection: A silicone mat or newspaper covering your entire pour area
- Ventilation: An open window or a small fan positioned to move vapors away from your face
- Drip containment: A baking sheet or drip tray underneath your candle containers to catch any overflow
- Fire safety: A metal lid within arm's reach to smother flames, with no open water near your wax
- Lighting: Adequate overhead lighting so you can read your thermometer without squinting
Children and pets need to stay completely out of your pouring area while any wax is melting or being transferred. Liquid wax at 170°F causes an immediate burn on contact, and a knocked-over pitcher mid-pour creates both a safety hazard and a cleanup problem that takes far longer to fix than it took to cause. Treat your workspace like a kitchen during active cooking, where the rules are firm and non-negotiable every time.
Ventilation is something beginners consistently underestimate. Fragrance oils and heated wax both release airborne vapors that can cause headaches, eye irritation, or respiratory discomfort during longer sessions, especially in a small kitchen. A cracked window combined with a small fan running at low speed, positioned to pull air away from you rather than across your face, makes the workspace noticeably more comfortable for any session lasting more than 20 minutes.
Choose your wax, wicks, and containers
The three materials that determine whether your candle burns cleanly or becomes a pooling, tunneling mess are wax, wick, and container. Getting these three elements to work together is the most critical skill in candle making for beginners, and the combinations are more straightforward than most people expect. Choosing mismatched components is the single biggest reason first candles fail before they even get lit.
Pick the right wax for your first batch
Your wax choice affects melt point, fragrance throw, and surface finish, so it's worth understanding the basic differences before you buy anything. Soy wax is the most beginner-friendly option because it melts at a lower temperature, holds fragrance well, and cleans up with soap and water. Paraffin produces a stronger hot throw and is widely available, but it requires slightly more precise temperature management. Coconut wax blends produce a clean, creamy finish but cost more per pound.
| Wax Type | Melt Point | Fragrance Load | Best For |
|---|---|---|---|
| Soy (container blend) | 120-125°F | 6-10% | First pours, jar candles |
| Paraffin | 125-145°F | 6-12% | Strong scent throw |
| Coconut blend | 100-115°F | 8-12% | Clean finish, premium look |
For your first batch, buy a pre-blended container soy wax labeled specifically for jar candles. It's formulated to minimize sinkholes and adhesion issues that frustrate beginners.
Match your wick to your container size
Wick size has a direct effect on burn pool depth and whether your candle tunnels or melts evenly across the full surface. A wick that's too small leaves unmelted wax around the edges on every burn. A wick that's too large produces excessive soot, a mushrooming tip, and a dangerously hot jar. Most wick manufacturers publish a sizing chart that matches wick series to container diameter, and you should treat that chart as your starting point rather than guessing.
Cotton core wicks labeled CD or ECO series are the most widely tested options for container soy candles. For a standard 3-inch diameter jar, a CD-18 or ECO-4 gives you a reliable starting point. Always order at least three wick sizes around your estimated size so you can burn test each variation and identify which one gives you a full melt pool in four hours without an excessive flame.
Choose containers that handle heat safely
Your container needs to withstand repeated heat cycles without cracking or warping. Glass jars are the most reliable choice because they're stable, widely available, and easy to monitor for wax pooling from the outside. Avoid thin-walled glasses, wine glasses, or any container not rated for direct heat exposure.
Safe, beginner-friendly container options include:
- Mason jars (wide-mouth pint or half-pint sizes work well for first pours)
- Purpose-made candle tins with straight walls that make wick centering easier
- Apothecary-style glass jars sold at most craft supply stores and rated for candle use
Measure materials and prep your containers
Accurate measuring is where candle making for beginners starts to feel more like a real craft than a casual experiment. Skipping this step or eyeballing your amounts leads to inconsistent burn performance, weak scent throw, and wasted materials. Every material in your batch has a specific ratio, and working from exact weights rather than volume measurements gives you repeatable results from the first pour to the fiftieth.
Calculate your wax and fragrance amounts
The most reliable way to measure wax is by weight in ounces, not by volume, because wax density varies between types and can shift slightly with temperature. Start by filling your container with water and weighing that water in fluid ounces. Then multiply that number by 0.86 to get the approximate wax weight you need to fill it to the same level. This single step accounts for the density difference between water and solid wax.
Fragrance oil gets added as a percentage of your total wax weight, not your total batch volume. Most container soy waxes accept a fragrance load between 6% and 10%. A 6% load works well for lighter scents, while stronger fragrance oils can go up to 10% before they begin seeping out of the wax.
Never exceed your wax manufacturer's recommended fragrance load. Oversaturating the wax prevents the oil from bonding properly and causes leaking, wet spots on the jar wall, and a potential fire hazard at the wick.
Here's a quick reference for a standard 8 oz container candle:
| Material | Calculation | Example Amount |
|---|---|---|
| Wax weight | Container fill oz x 0.86 | 6.9 oz wax |
| Fragrance oil (8%) | Wax weight x 0.08 | 0.55 oz fragrance |
| Dye (if using) | Follow dye manufacturer's rate | Varies by dye type |
Prep your containers before you pour
Clean, dry containers are non-negotiable before any wax goes in. Even a small amount of residual moisture causes bubbling and adhesion problems along the jar wall. Wipe each container with a dry cloth, then let it sit at room temperature for at least an hour if it's been stored somewhere cold. Cold containers cause the wax to contract and pull away from the glass, creating the gap along the edges that makes a finished candle look uneven.
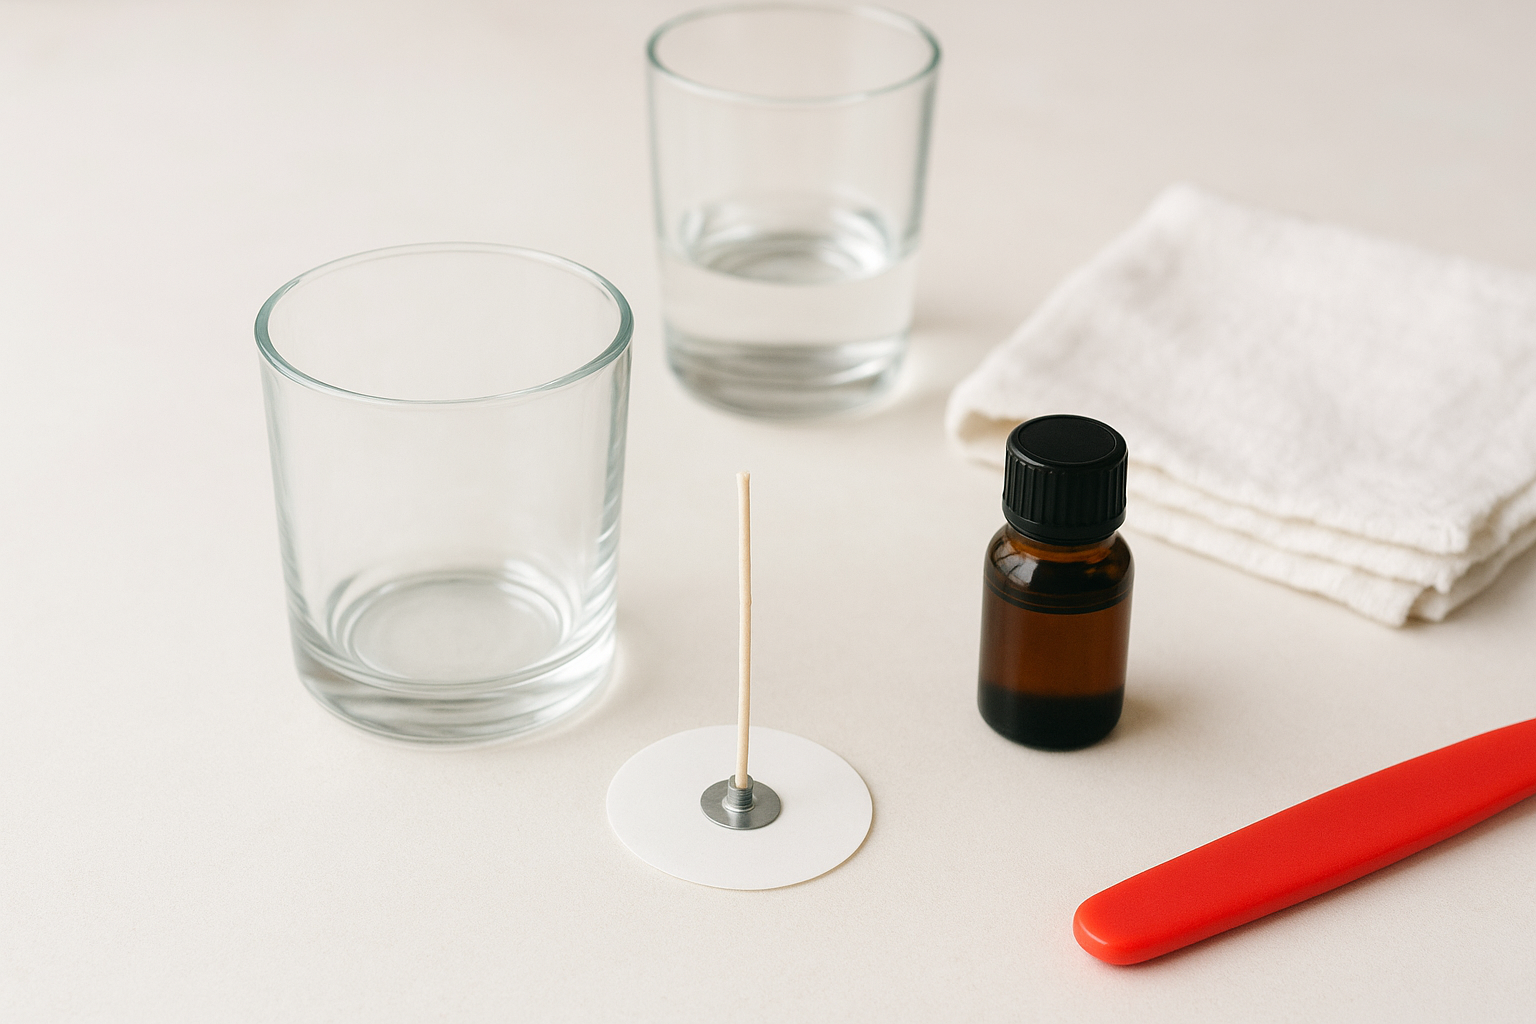
Secure your wick using a wick sticker or a small dot of hot glue on the metal tab at the base, then press it firmly to the center of the container bottom. Use a wick centering bar or two pencils rubber-banded across the container lip to hold the wick perfectly vertical while your wax cools.
Melt wax the right way without scorching
Melting wax sounds simple until you scorch your first batch and end up with a discolored, off-smelling product you can't salvage. Heat control is the core skill that separates a clean, professional result from a ruined pot of wax, and it comes down to two things: the method you use to apply heat and how closely you track the temperature throughout the process. Get these two elements right every time, and your wax will melt evenly without any hot spots.
Use a double boiler to control heat
A double boiler keeps your wax away from direct flame or burner contact, which is the most common cause of scorching in candle making for beginners. Fill your outer pot with two to three inches of water, place your pour pot or inner container inside, and apply medium-low heat. The water acts as a buffer that prevents any part of your wax from getting hotter than the boiling point of water, which gives you a controlled ceiling of around 212°F well below the flash point of any wax you'll work with.
Follow these steps every time you melt a fresh batch:
- Add your measured wax amount to the inner pot before placing it over water
- Set the burner to medium-low and let the water come to a gentle simmer
- Stir the wax every two to three minutes using a dedicated silicone or stainless steel spoon
- Watch your thermometer and never leave the pot unattended once wax starts liquefying
- Remove the inner pot from heat when wax reaches your target melting temperature (typically 170-180°F for soy container wax)
If you don't have a purpose-made double boiler, a large saucepan with a metal or glass pitcher set inside works just as well, as long as the pitcher sits stable without tipping.
Watch temperature milestones as you melt
Your thermometer does more than tell you when the wax is ready to pour. Tracking specific temperature points helps you identify when to add dye, when to pull the wax off heat, and when it's the right temperature for fragrance. Adding fragrance too early, while the wax is still climbing in temperature, causes the scent to degrade before it ever sets.
Here are the key temperature milestones for a standard container soy wax batch:
| Stage | Target Temperature | Action |
|---|---|---|
| Full melt | 170-180°F | Wax fully liquid, remove from heat |
| Dye addition | 160-170°F | Add and stir color thoroughly |
| Fragrance addition | 150-160°F | Add fragrance oil and stir for two full minutes |
| Pour point | 130-140°F | Pour into prepped containers |
Pulling the wax off heat at 170-180°F and letting it cool slightly before adding fragrance preserves the scent molecules and gives you a much stronger cold throw in the finished candle.
Add fragrance and color without ruining the burn
Fragrance oil and candle dye are the two additions that make your candle feel finished, but they're also the two additions that most beginners handle incorrectly. Adding either ingredient at the wrong wax temperature disrupts the chemical bond between oil and wax, which leads to weak scent throw, uneven color distribution, or a wick that clogs and burns poorly. Understanding exactly when and how to add each ingredient is a core skill in candle making for beginners that pays off every single time you pour.
Stir fragrance oil in at the right temperature
The temperature window for adding fragrance oil is 150-160°F, as outlined in the melting section. At this range, the wax is still fully liquid but has cooled enough that the fragrance molecules won't flash off or degrade from heat exposure. Pull your wax off the heat source before you add anything, and let the temperature drop naturally rather than rushing the process by placing the pot on a cold surface.
Always stir your fragrance oil for a full two minutes using a slow, consistent circular motion. Rushing the stir leaves pockets of unmixed oil that cause wet spots on the jar wall and an inconsistent burn.
Once you add the fragrance oil, stir steadily for two full minutes. You want the oil to fully incorporate into the liquid wax rather than sitting in a layer on top. A properly blended batch will look uniform and slightly opaque as it cools rather than showing any separation or sheen on the surface.
Add color without clogging the wick
Candle dye comes in blocks, chips, and liquid form, and each type has slightly different handling. Dye chips and blocks need to be added a little earlier in the cooling process, around 160-170°F, so they have enough time to melt and distribute evenly before the wax cools too far. Liquid dye can go in at the same time as your fragrance oil without any issue.
Use dye sparingly. A small piece of dye block roughly the size of a pea colors a full pound of wax. Adding too much dye clogs the wick with pigment residue and shortens your burn time significantly. Start with less than you think you need, pour a small test amount into a white dish to check the color, and add more only if the result looks too light.
| Dye Type | Add at | Starting Amount for 1 lb Wax |
|---|---|---|
| Dye chips/blocks | 160-170°F | Piece the size of a pea |
| Liquid dye | 150-160°F | 2-4 drops |
Pour, cool, and fix common surface issues
Pouring wax into a container looks like the easiest step in candle making for beginners, but it's the stage where surface problems start. How fast you pour, the temperature of your wax, and how you let the candle cool all determine whether you end up with a smooth, professional-looking surface or a cratered, lumpy mess. The fixes for most common surface issues are simple once you understand what causes them in the first place.
Pour slowly and at the right angle
Hold your pour pot close to the container, roughly one to two inches above the rim, and pour in a slow, steady stream aimed at the center of the container. Pouring from too high or too fast traps air bubbles in the wax that rise and break on the surface before it sets. Keep pouring until the wax reaches about a half inch below the container rim, which leaves room for any secondary pour you may need to fill in sinkholes later.
Pour your wax at 130-140°F. Below that range, the wax starts setting before it fully levels across the container floor, which causes uneven surfaces and adhesion gaps along the glass wall.
Let the candle cool without interference
Once the wax is poured, resist the urge to move the container or speed up cooling by placing it in the refrigerator or near a fan. Rapid temperature changes cause the wax to contract unevenly, which creates deep sinkholes and pulls the surface away from the sides of the jar. Set your container on a flat surface at room temperature between 65-75°F and leave it completely undisturbed for at least four hours.
Fix the three most common surface problems
Surface defects are normal in early batches, and most of them have a straightforward fix. Keep a small amount of leftover wax warm in your pour pot so you have material ready for a second pour before it fully solidifies.
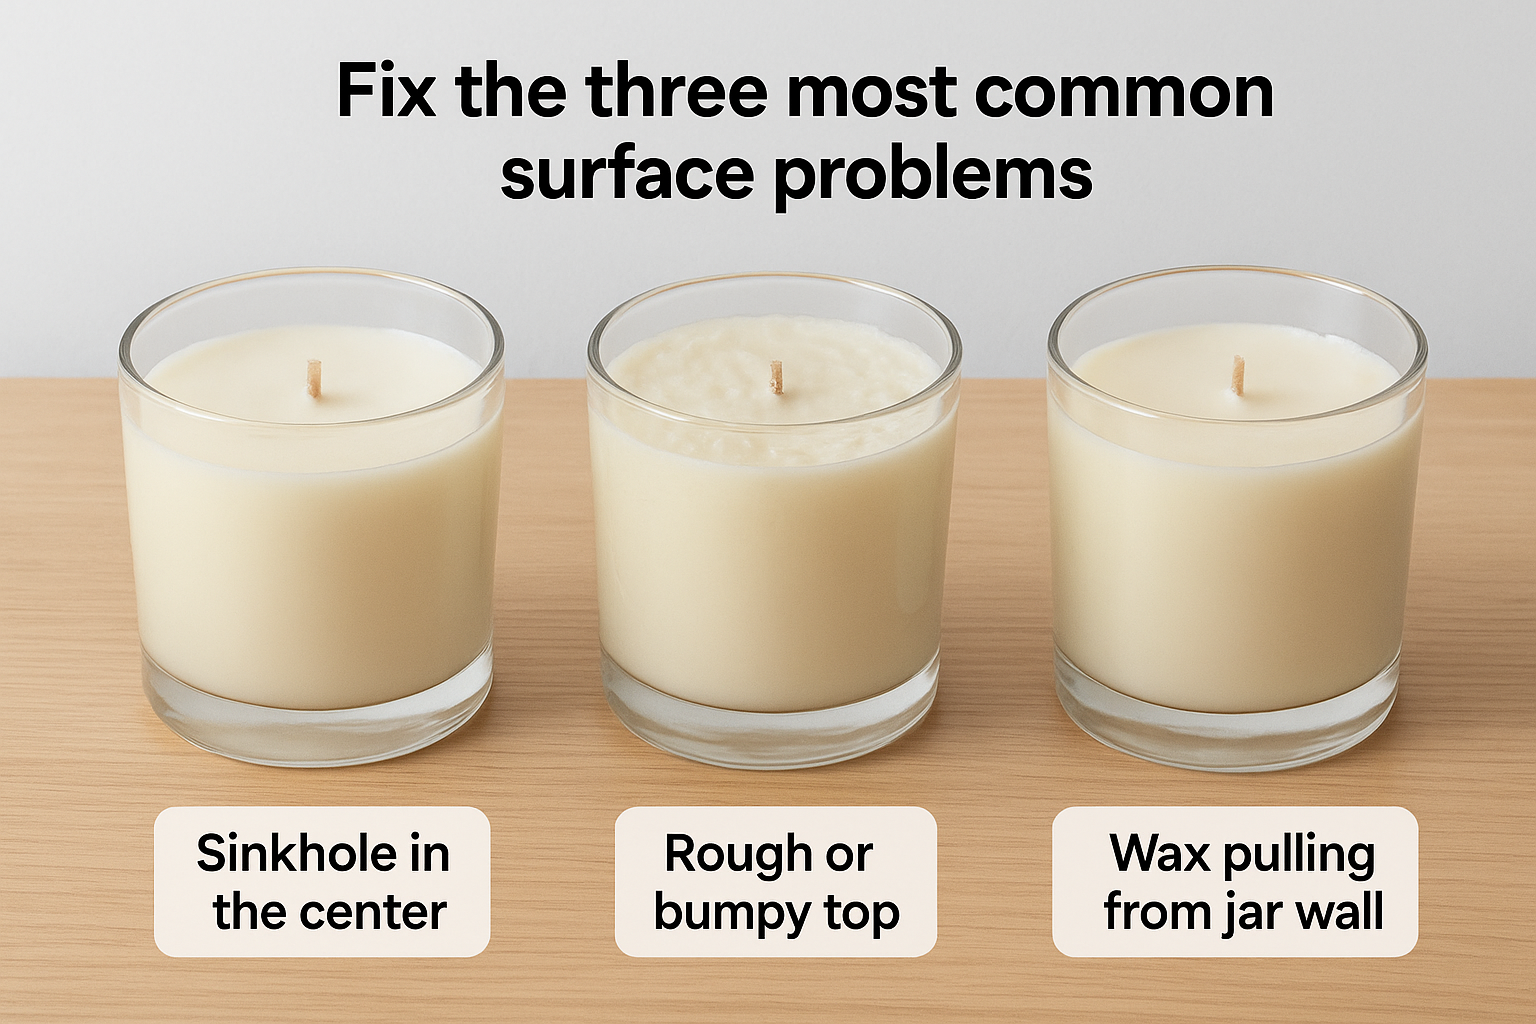
Here are the three issues beginners see most often and how to correct them:
| Surface Issue | Cause | Fix |
|---|---|---|
| Sinkhole in the center | Wax contracts as it cools | Poke relief holes with a skewer, then top with a thin second pour at 130°F |
| Rough or bumpy top | Wax cooled too fast | Use a heat gun on low, moving side to side, to re-melt the surface layer |
| Wax pulling from jar wall | Container was too cold before pouring | Warm your jars to room temperature before the next batch, and pour at the higher end of your range |
A second pour fixes sinkholes entirely when you catch them within 12 hours. Simply reheat your leftover wax to 130°F, poke two or three small holes around the wick with a skewer to release trapped air, and pour just enough wax to level the surface.
Cure, trim, and burn test for best results
Pouring a candle is only part of the process. Curing, trimming, and burn testing are the three finishing steps that determine whether your candle actually performs the way it should, and skipping any one of them produces results that feel inconsistent or disappointing. This is where candle making for beginners often stalls, because a candle that looks finished still needs time and attention before it delivers its best burn.
Let your candle cure before the first burn
After your candle cools completely, it still needs additional time for the fragrance oil to fully bond with the wax. This bonding process is called curing, and it happens at room temperature over several days as the molecular structure of the wax stabilizes around the scent. Lighting a candle before it cures produces a noticeably weaker cold throw and a shorter-lived scent compared to the same candle burned after a proper rest period.
For container soy wax, a minimum cure time of 48 hours works for lighter fragrance loads, but 7 full days gives you the strongest and most consistent scent throw on the first burn.
Store your curing candles in a cool, dry location away from direct sunlight, which can yellow the wax surface and degrade fragrance oil over time. Keep the lid on if your container has one, and resist testing the scent by burning it early.
Trim the wick every time you burn
Your wick length directly controls flame height and soot output on every single burn. Before lighting your candle for the first time, and before every subsequent burn, trim the wick to exactly one quarter of an inch above the wax surface. A longer wick produces a tall, flickering flame that blackens the jar wall and consumes wax unevenly.
Use a wick trimmer or a pair of small scissors to make a clean, flat cut. Remove the trimmed piece from the container entirely before lighting so it doesn't fall into the melt pool and clog the wick.
Run a proper burn test to confirm your wick size
A burn test tells you whether your wick and wax combination actually works before you commit to a full production batch. Light your test candle and let it burn for four hours without interruption. At the end of that session, check these three things:
| Test Criteria | Ideal Result | Problem Sign |
|---|---|---|
| Melt pool width | Reaches edge of container | Wax tunnels around the wick |
| Flame height | 1/2 to 3/4 inch steady | Flickering or flame over 1 inch |
| Wick tip appearance | Small, clean tip | Heavy mushrooming or black carbon |
If your melt pool does not reach the container edge after four hours, move up one wick size and repeat the test. If your flame burns too hot or leaves heavy soot on the jar, drop down one size and test again. Document each result so you build a reliable reference for future batches.

Start making candles with confidence
Candle making for beginners comes down to a small set of repeatable steps: measure accurately, control your heat, match your wick to your container, and give your candle time to cure before the first burn. Every batch you pour teaches you something new, whether it's a surface fix you hadn't tried before or a fragrance combination that performs better than expected. The whole process gets faster and more intuitive with each session you complete.
You don't need to figure out every scent profile from scratch on your own. If you want to see what a professionally hand-poured coconut-soy blend looks and performs like before your next batch, browse the hand-poured candles at Small Flame Candle Co. for real examples of clean burns and strong scent throw. Use those finished candles as a benchmark for your own pours, and let each batch bring you one step closer to the result you're working toward.