
Candle Making Step By Step: Easy DIY Candles For Beginners
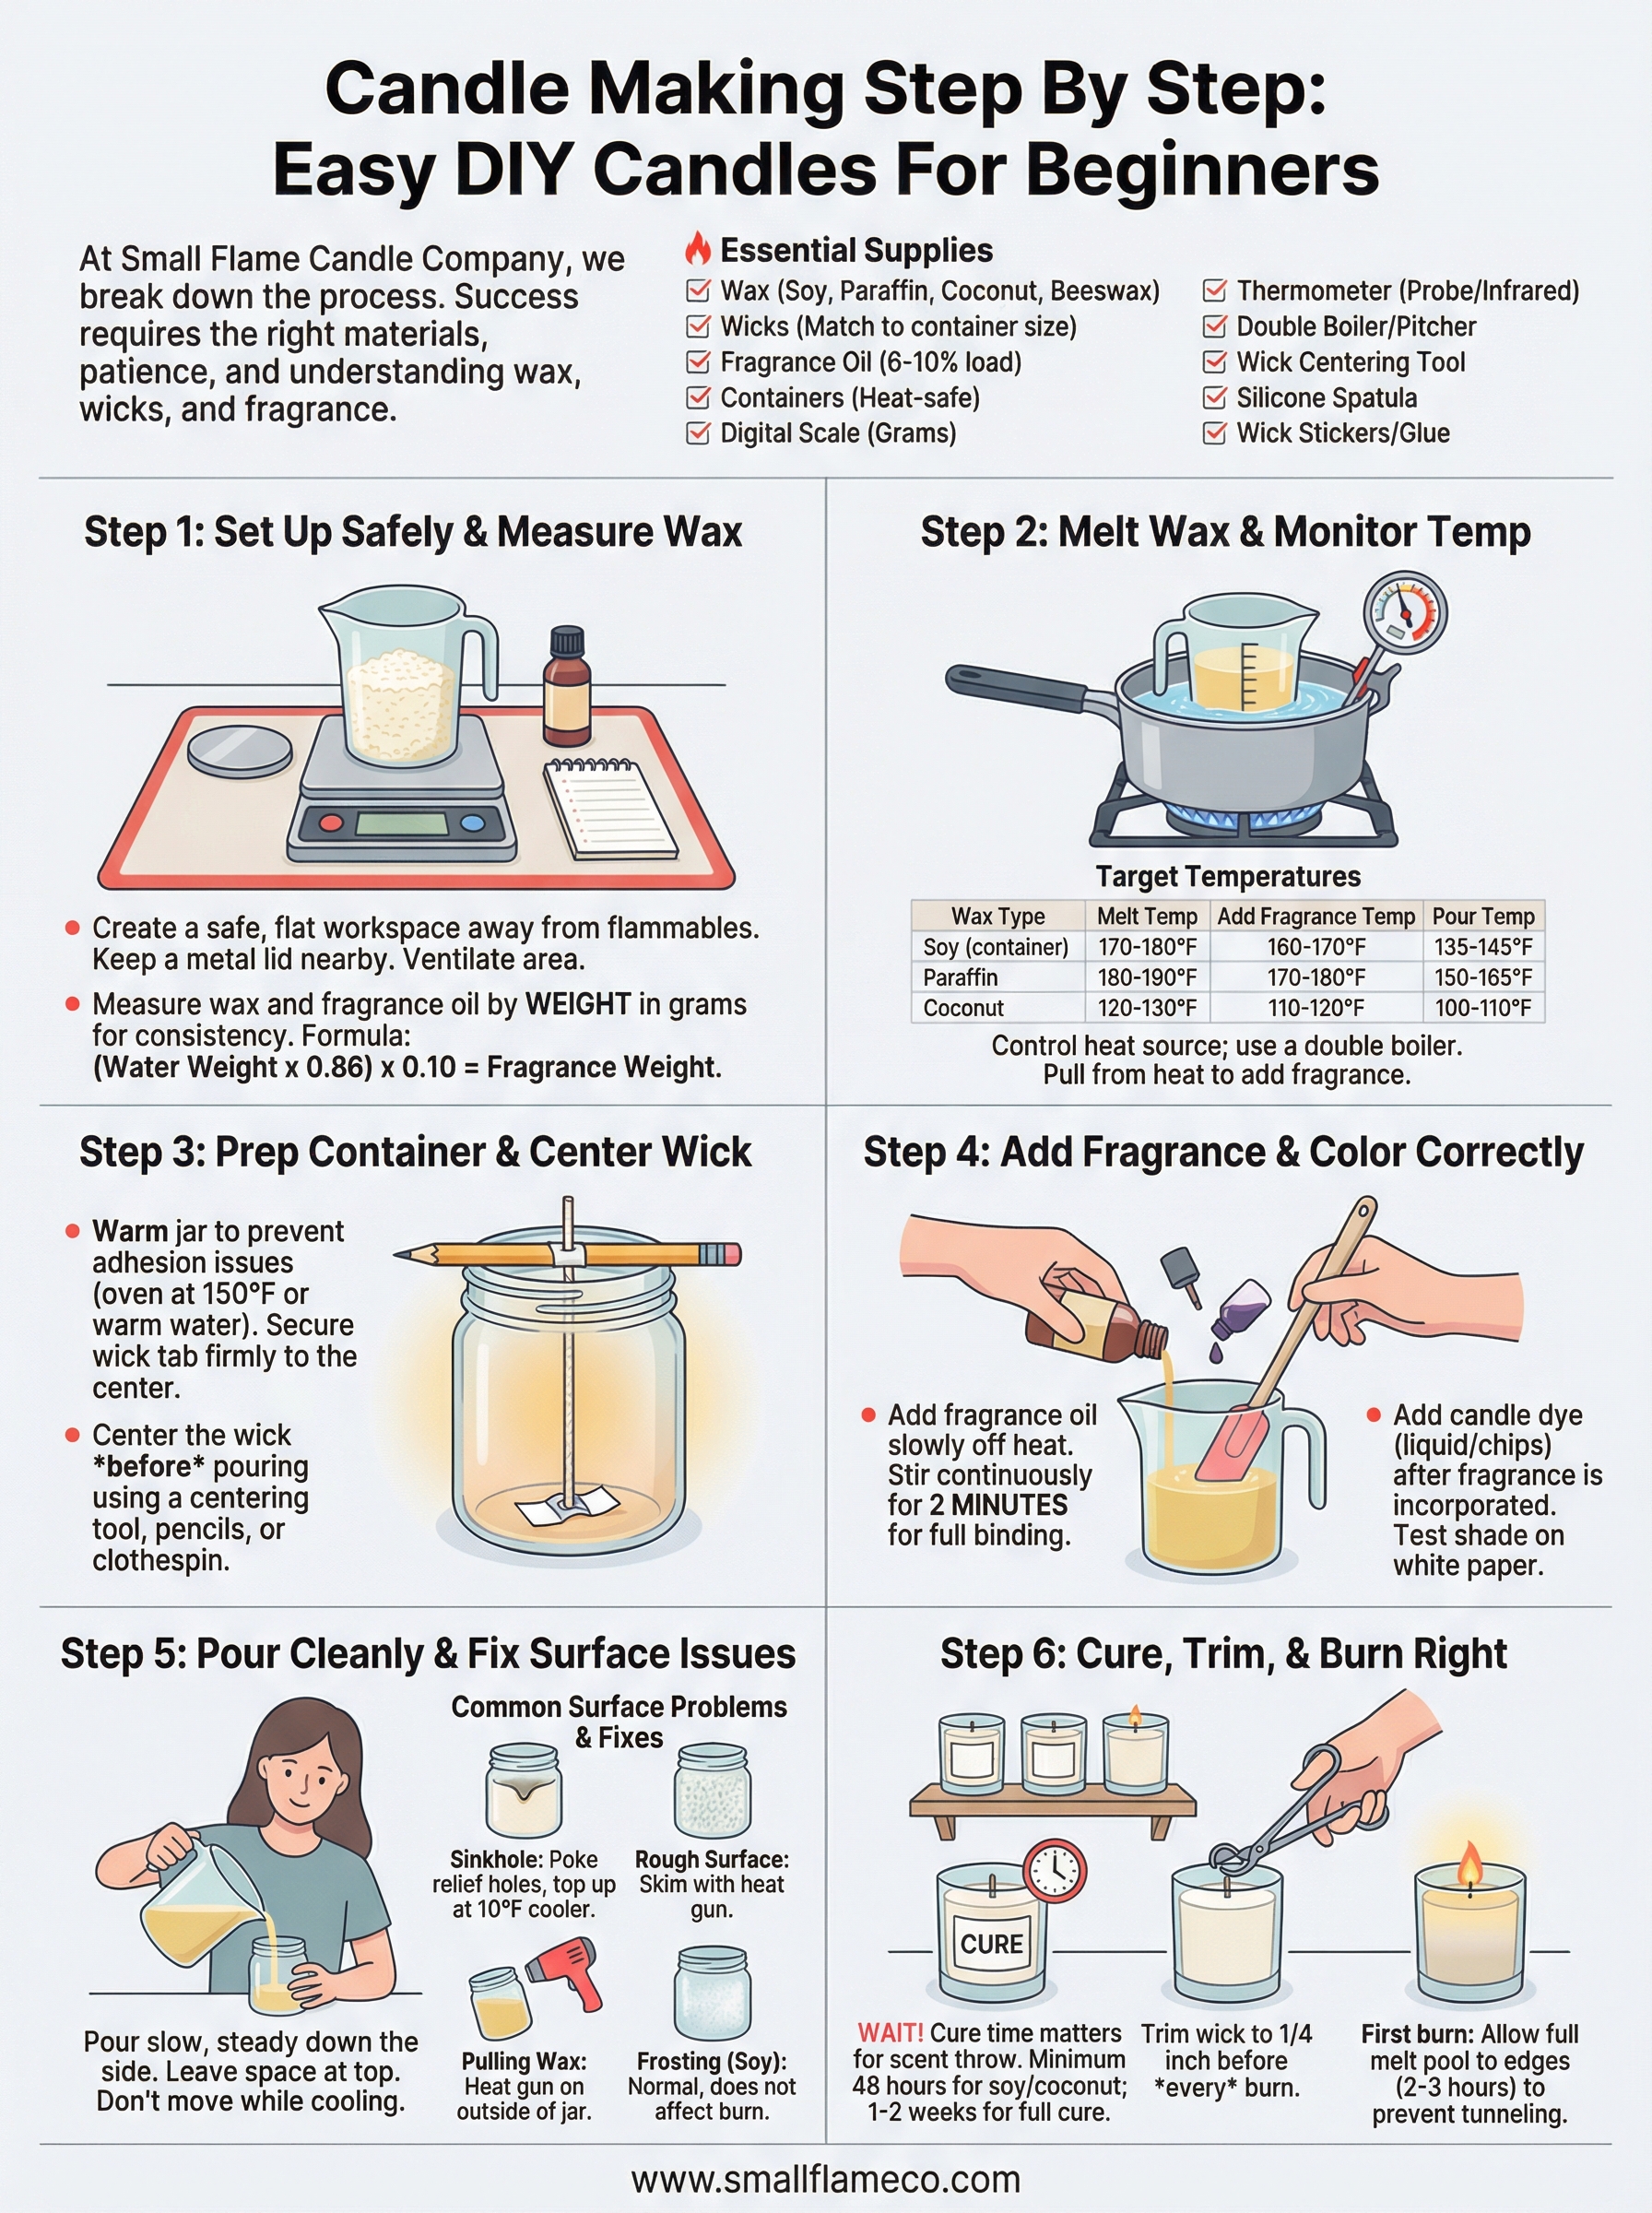
At Small Flame Candle Company, we hand-pour every candle we sell, so we know firsthand that candle making step by step isn't as complicated as it might seem. It does, however, require the right materials, a bit of patience, and an understanding of how wax, wicks, and fragrance actually work together. Skip any of those, and you'll end up with tunneling, weak scent throw, or a wick that drowns itself out after ten minutes.
This guide breaks the entire process down into a clear, beginner-friendly walkthrough. You'll learn exactly what supplies you need, how to prep your workspace, and how to pour candles that burn clean and smell the way you want them to. We've also included tips we've picked up from years of making candles by hand, the kind of practical details that most tutorials leave out.
Whether you want to make candles as a hobby, create handmade gifts, or just understand what goes into the products you buy, you're in the right place. Let's get into it.
What you need and how to choose supplies
Before you buy anything, your supply choices set the ceiling on what your candle can do. Cheap wicks, the wrong fragrance load, or a container that traps heat poorly will create problems no amount of technique can fix. Taking ten minutes to understand your options before placing an order is the most useful thing you can do when you're learning candle making step by step for the first time.
Wax types and which one to start with
Your wax choice determines burn temperature, scent throw, and how forgiving the process is while you're still learning. Soy wax is the best starting point for most beginners because it melts at a low temperature, binds fragrance well, and cleans up with soap and water. Paraffin burns hotter, throws scent more aggressively, and is widely available, but it produces more soot than soy. Coconut wax performs beautifully and burns slowly, though it costs more and is harder to source. Beeswax is natural and burns clean, but it does not hold added fragrance well at standard load rates.
For your first batch, use a container-grade soy wax such as Golden Brands 464 or 444. These are designed specifically for jar candles, tolerate minor temperature variations, and are easy to find through major craft retailers.
| Wax Type | Melt Point | Scent Throw | Best For |
|---|---|---|---|
| Soy (container) | 120-125°F | Moderate to good | Beginners |
| Paraffin | 130-145°F | Strong | Strong scent priority |
| Coconut | 100-107°F | Excellent | Premium or slow-burn candles |
| Beeswax | 144-147°F | Light | Unscented or minimal fragrance |
Wicks, containers, and fragrance oil
Wick selection directly controls how well your candle burns and how much scent it releases into the room. Wicks that are too small produce a narrow, tunneling burn pool, and wicks that are too large cause soot and mushrooming at the tip. Cotton wicks are labeled with sizing codes like CD-18 or ECO-4, and each code corresponds to a container diameter range. Start by matching your wick to your container's diameter using the manufacturer's sizing guide, then plan to test at least two or three sizes before committing to a full batch.
Fragrance oil and container selection round out your core supply list. Most container soy waxes hold between 6% and 10% fragrance oil by weight, and exceeding that ceiling causes the oil to seep out of the wax or produces almost no scent at all. Straight-sided glass jars in the 8oz to 12oz range are ideal starting containers because they're heat-safe, straightforward to wick, and inexpensive.
Tools you need before you pour
You do not need a professional setup to make clean, consistent candles, but a few specific tools prevent the most common beginner mistakes. The most frequently skipped item is a thermometer, and skipping it leads to pours that crack, sink, or fail to stick to the glass.
Gather these before you start:
- Double boiler or a dedicated pour pitcher set inside a pot of simmering water
- Digital kitchen scale for measuring wax and fragrance oil by weight in grams
- Probe or infrared thermometer to track melt and pour temperatures accurately
- Wick centering tool or two pencils taped across the jar mouth to hold the wick upright
- Silicone spatula for folding fragrance oil into the wax evenly
- Heat-safe glass jars as your containers (8oz mason jars are a reliable starting choice)
- Wick stickers or a small dot of hot glue to secure the wick tab firmly to the jar bottom
Step 1. Set up safely and measure wax
Setting up correctly before you touch any wax is the part of candle making step by step that beginners most often rush through. Your workspace and your measurements form the foundation of everything that follows, and small mistakes here create problems you cannot fix once you're mid-pour.
Create a safe workspace
Work on a heat-resistant, flat surface away from anything flammable, such as a kitchen counter or a dedicated craft table with a silicone mat underneath your pour pitcher. Candle wax becomes a fire hazard when it overheats, so never leave melting wax unattended, even for a minute. Keep a metal lid or baking sheet nearby to smother a wax fire if one starts; never pour water on burning wax.
Always work in a ventilated area when melting wax and adding fragrance oil. Open a window or run a fan to avoid breathing concentrated fragrance vapors directly.
Cover your surface with newspaper or a silicone mat before you set anything down, and lay out every tool you need before you turn on any heat. Having everything within arm's reach means you will not need to step away while your wax is actively melting.
Measure your wax by weight
Volume measurements produce inconsistent results because different wax types have different densities. Weighing your wax and fragrance oil in grams on a digital kitchen scale gives you the precision you need to hit your target fragrance load every time.
Use this simple formula before each batch:
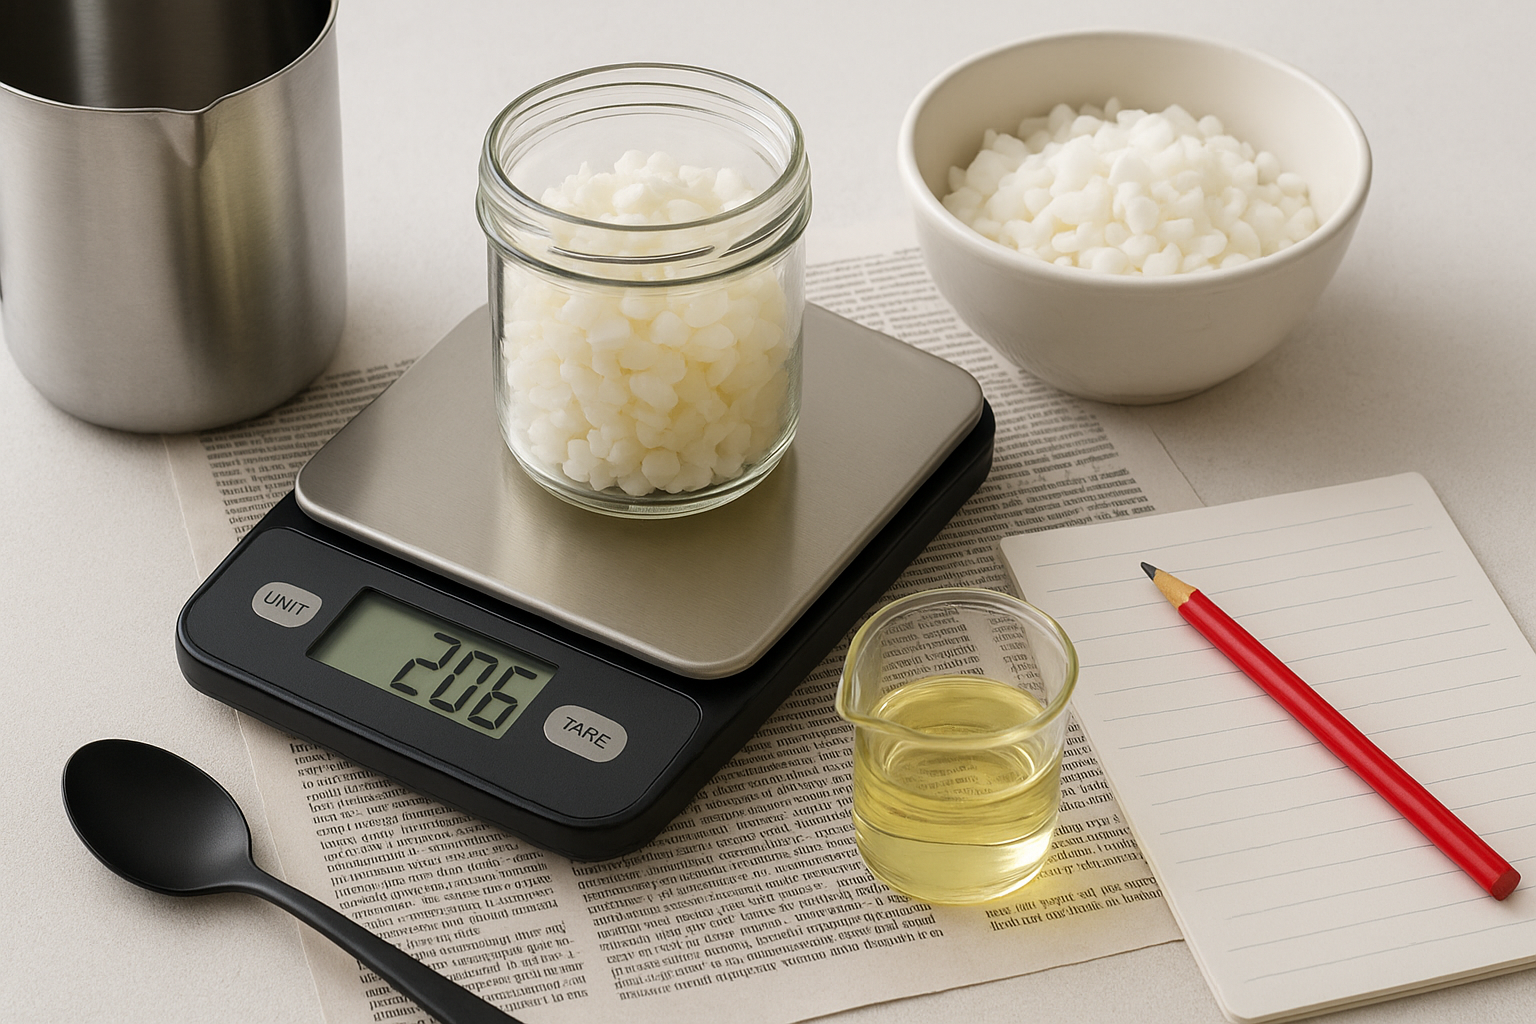
- Fill your empty jar with water, then weigh that water in grams to find your jar's total fill capacity.
- Multiply that number by 0.86 to get your wax weight (wax is lighter than water by that ratio).
- For a 10% fragrance load, multiply your wax weight by 0.10 to get your fragrance oil weight in grams.
For example, if your jar holds 240 grams of water, you need approximately 206 grams of wax and 20 grams of fragrance oil. Writing these numbers on a notepad before you start means you will not need to stop and calculate anything while managing heat and timing at the same time.
Step 2. Melt wax with steady heat and a thermometer
Melting wax correctly is where temperature control separates clean, consistent candles from batches that crack, discolor, or lose scent before they ever leave the jar. The goal during this stage of candle making step by step is simple: bring your wax to the right temperature without overshooting it, then hold it there long enough to add your fragrance oil.
Control your heat source
Set up a double boiler by placing your pour pitcher inside a pot of simmering water over medium-low heat. This indirect heat method prevents hot spots, which are the main cause of scorched or discolored wax. Never melt wax directly on a burner without a buffer layer of water underneath, and never leave the stove while wax is actively melting.
Keep a probe thermometer clipped to the side of your pour pitcher so you can read the temperature without stirring, which lets you catch overheating before it happens.
Your wax will move through three visible stages as it heats: solid, opaque and slightly soft, then fully liquid and clear. Each transition is normal. The key is that you stop adding heat once your wax reaches the liquid stage and hits your target temperature.
Know your target temperatures
Different wax types require different temperature ranges, and pouring too hot or too cold changes the texture, adhesion, and scent throw of your finished candle. Use the table below as your reference for each wax type you're working with.
| Wax Type | Melt Temperature | Add Fragrance At | Pour Temperature |
|---|---|---|---|
| Soy (container) | 170-180°F | 160-170°F | 135-145°F |
| Paraffin | 180-190°F | 170-180°F | 150-165°F |
| Coconut | 120-130°F | 110-120°F | 100-110°F |
Once your wax reaches the fragrance-addition temperature shown in the table, pull the pitcher off the heat immediately. Residual heat in the wax and pitcher will keep everything warm long enough for you to stir in your fragrance oil thoroughly. Letting it cool slightly before adding fragrance also reduces concentrated vapor release, which keeps your workspace more comfortable throughout this part of the process.
Step 3. Prep the container and center the wick
A poorly prepped container causes two of the most frustrating candle problems: wick drift and adhesion failure, where the wax pulls away from the glass wall as it cools. This step in candle making step by step takes less than five minutes, but it directly determines whether your finished candle burns evenly from the first light.
Warm the jar and secure the wick tab
Cold glass causes hot wax to contract quickly on contact, which creates air pockets and wet spots along the sides of the jar. To prevent this, warm your container in one of two ways: run it under warm tap water and dry it completely, or place it in an oven set to 150°F for about five minutes. Your jar should feel warm to the touch, not hot.
Do not skip warming your jar if you're pouring in a room below 65°F. Temperature differences between the wax and the glass are the main cause of adhesion problems in container candles.
Once your jar is warm, secure the wick tab to the center of the jar bottom using either a wick sticker or a small dot of hot glue. Press the tab firmly and hold it for ten seconds, then pull the wick gently to confirm the tab is fully anchored before you move on. A wick that shifts during the pour will produce an uneven burn pool and increased soot on one side of the jar.
Center the wick before you pour
Keeping the wick upright and centered throughout the pour is something many first-time candle makers underestimate. Wax is heavier than it looks when it hits the jar, and even a lightly anchored wick can lean or float off-center.
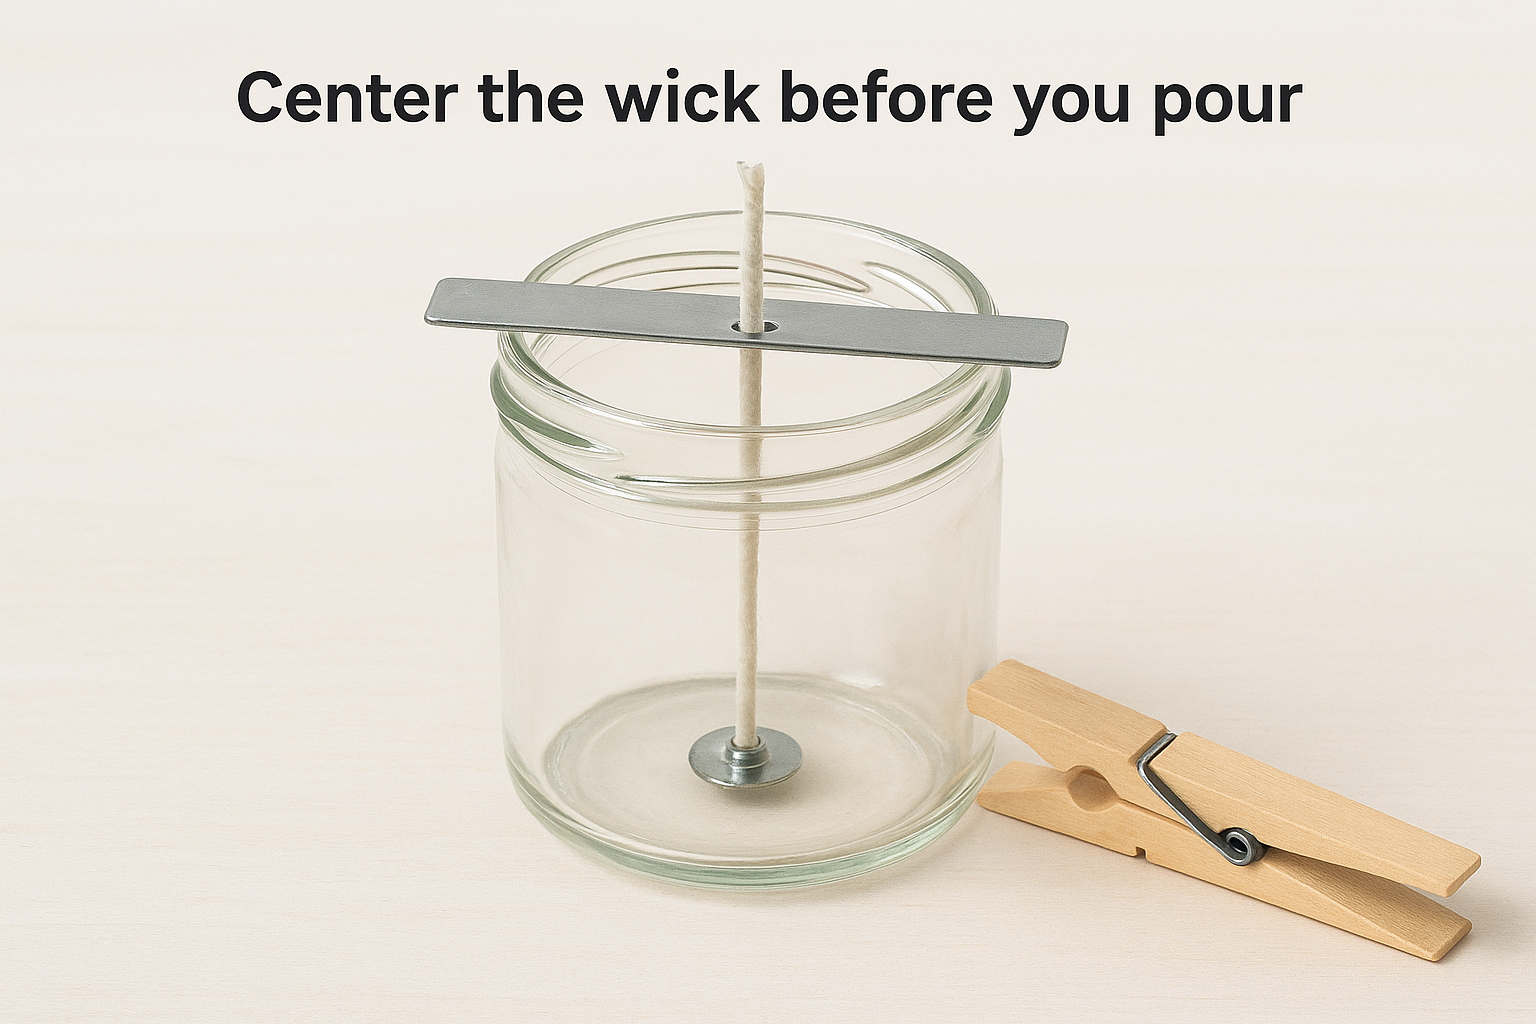
Use one of these methods to hold the wick in position:
- Wick centering bar: A purpose-made metal or wood bar with a center notch that locks the wick in place across the jar mouth
- Two pencils or chopsticks: Tape them parallel across the jar opening and slot the wick between them
- Clothespin: Clip the wick at the jar rim so it hangs straight down through the center
Check that the wick sits directly above the tab on the jar floor before your wax is anywhere near ready to pour. Adjustments become much harder once the wax is in motion.
Step 4. Add fragrance and color the right way
At this point in candle making step by step, your wax is off the heat and sitting at your target fragrance-addition temperature. This is the stage where most batches succeed or fail, because both fragrance oil and colorant need to bind to the wax fully before you pour. Rush either one, and you get separation, weak scent throw, or uneven color streaking through your finished candle.
Stir in fragrance oil the right way
Pour your pre-measured fragrance oil into the wax slowly and in a thin stream, not all at once. A rapid dump of cold fragrance oil drops your wax temperature too fast, which creates binding problems before the oil fully incorporates. Add it gradually while stirring, then stir continuously for a full two minutes using your silicone spatula, working in slow, deliberate circles that reach the bottom and sides of the pitcher.
Uneven stirring leaves pockets of unbound fragrance oil that will seep out of the cooled wax as a greasy film on the surface. Two full minutes of consistent stirring is the minimum, not a suggestion.
Your wax will turn slightly cloudy as the fragrance binds to it, and that is completely normal. Keep stirring until the mixture looks uniform and smooth throughout, with no oily streaks or separation visible on the surface or along the sides of the pitcher. Once it looks consistent, it is ready for color if you plan to use it.
Add candle dye without overloading the wax
Color is entirely optional, but if you want it, liquid candle dye or dye chips are your two best choices for container candles. Never use crayons or craft paint, since both contain binders that clog your wick and produce heavy soot throughout the burn. Liquid dye disperses the fastest, while dye chips melt more slowly but are easier to control in small increments.
Add color only after your fragrance oil is fully incorporated. Drop in a small amount at a time, stir it through, and hold a stirring stick or spoon against a white piece of paper to check the shade before adding more. Color always looks darker in the warm pitcher than it will in the finished, cooled candle, so build up the intensity gradually. One dye chip per 8oz of wax gives you a medium shade, and a second chip deepens it noticeably.
Step 5. Pour cleanly and fix common surface issues
Your wax is mixed, colored, and sitting at the right pour temperature. This is the candle making step by step moment where the entire batch becomes visible, and how you handle the next few minutes directly affects the surface finish, adhesion, and scent throw of every candle in the set. Pour too fast, too hot, or at the wrong angle, and you create problems that take an extra day to fix.
Pour slow and steady at the correct angle
Hold your pour pitcher steady and at a slight tilt, directing the wax stream down the inside wall of the jar rather than straight into the center. Pouring down the wall reduces the air that gets trapped as the wax fills the jar, which cuts down on sinking and surface cracking once it cools. Keep the stream thin and consistent throughout the entire pour rather than dumping and stopping.
Leave roughly half an inch of space at the top of the jar. Filling all the way to the rim leaves no room for a second pour, which you will almost certainly need.
Stop pouring when your wax sits about half an inch below the jar rim, then set the jar on a flat, draft-free surface. Do not move, tilt, or touch the jars while the wax is still liquid. Even small vibrations during cooling create uneven surface texture that is harder to fix than a simple sinkhole.
Identify and fix the most common surface problems
As your candle cools over the next four to six hours, you will likely see one or more surface issues appear. Each one has a direct fix that takes only a few minutes.
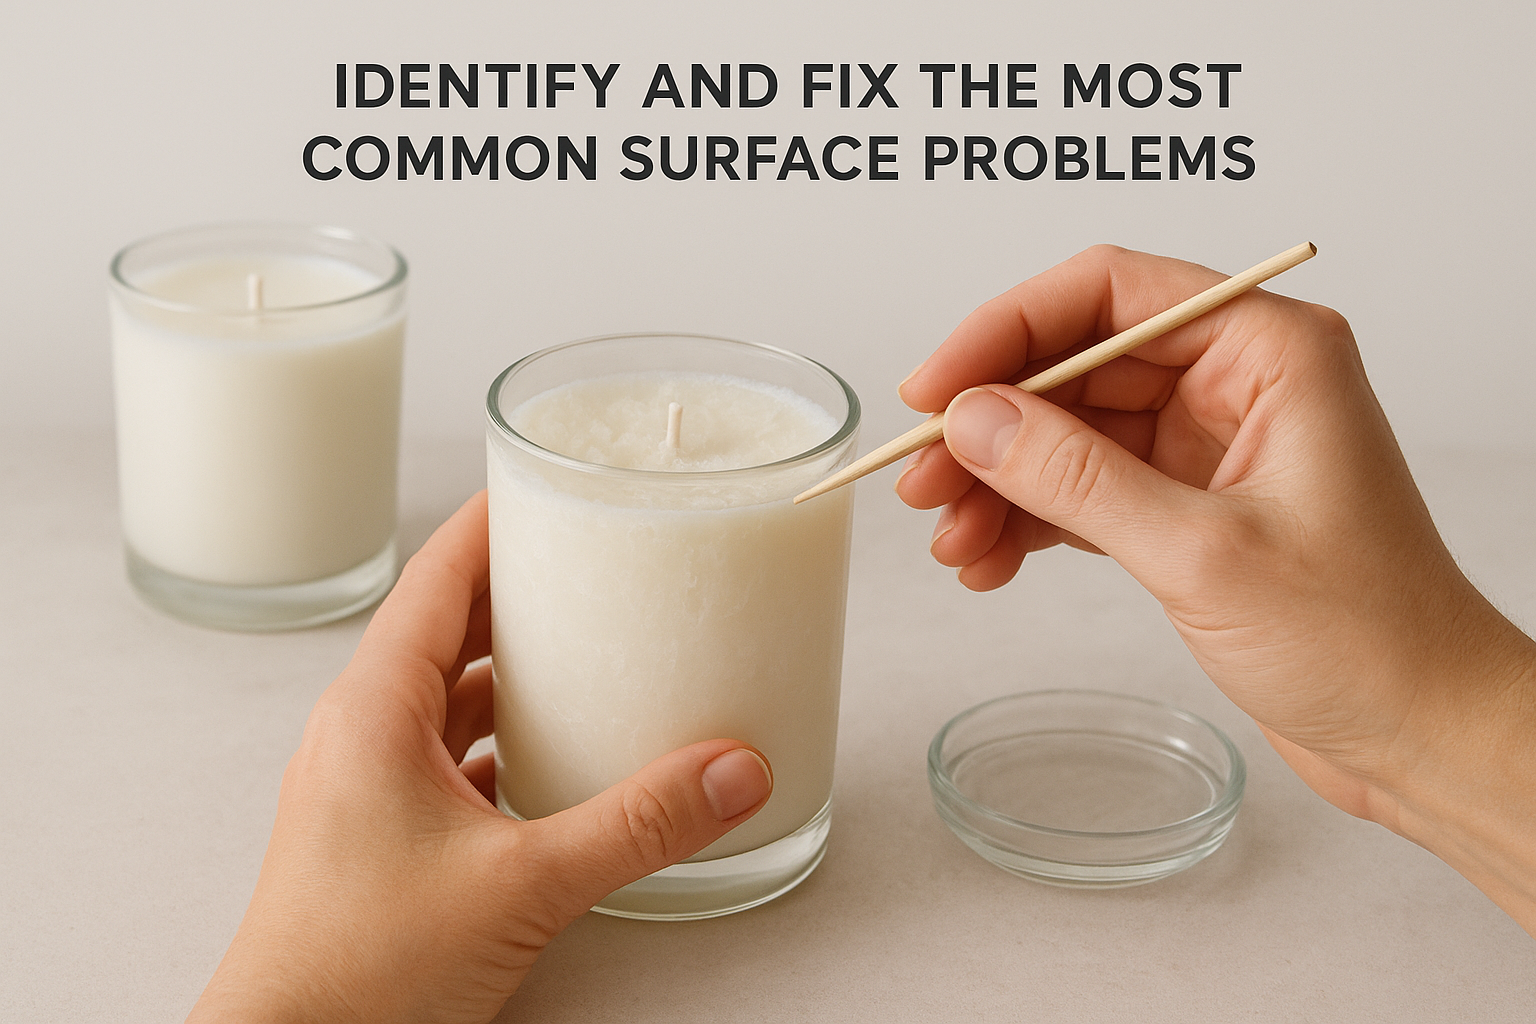
| Problem | Cause | Fix |
|---|---|---|
| Sinkhole in center | Wax contracts around the wick as it cools | Poke relief holes with a skewer, then pour a thin top-up layer at 10°F cooler than your original pour temp |
| Rough or bumpy surface | Poured too cool or cooled too fast in a draft | Skim the surface with a heat gun on low until smooth |
| Wax pulling from glass | Container was too cold at pour time | Use a heat gun around the outside of the jar to re-adhere the wax |
| Frosting or white film | Natural soy wax crystallization | Normal for soy wax; it does not affect burn quality |
Top-up pours work best when your secondary wax sits within ten degrees of your original pour temperature. Going much cooler creates a visible seam between the layers, while going hotter can reopen the sinkhole and pull the wick off-center.
Step 6. Let it cure, trim the wick, and burn it right
The last step in candle making step by step is the one that most beginners skip entirely: waiting. Your candle is not finished the moment it looks solid. The wax and fragrance oil need time to fully bond at a molecular level, and skipping this cure period produces a candle with noticeably weaker scent throw than one that was given the time it needed.
Wait out the cure time
Most container soy candles reach their full scent potential after a minimum of 48 hours, but a full cure takes closer to one to two weeks depending on your fragrance oil and wax combination. During this period, store your candles at room temperature away from direct sunlight, which can cause discoloration and fragrance degradation before you even light them.
A candle tested at 24 hours will almost always disappoint you on scent throw, then surprise you a week later when the same formula performs exactly as expected. Patience here is not optional.
Use this reference to know when your candle is ready:
| Wax Type | Minimum Cure | Full Cure |
|---|---|---|
| Soy (container) | 48 hours | 1-2 weeks |
| Paraffin | 24 hours | 3-5 days |
| Coconut | 48 hours | 1-2 weeks |
Trim the wick and burn correctly
Before every single burn, trim your wick to one quarter inch above the wax surface. A wick left longer than that produces a tall, flickering flame that generates soot, mushrooms at the tip, and burns through your wax too quickly. Use a wick trimmer or small scissors and wipe away any trimmed debris before lighting.
Your first burn matters more than any that follow. Allow the wax to reach a full melt pool that touches the edges of the jar before you extinguish the flame. This first burn sets the memory of the wax, and a shallow melt pool on the first burn causes tunneling that follows the candle for its entire life. For an 8oz jar, expect this to take two to three hours at minimum. From that point on, limit each burn session to four hours and always trim the wick between uses.
You're ready to make your first candle
You now have everything you need to work through candle making step by step from scratch. You know which wax to start with, how to measure fragrance oil by weight, how to control your pour temperature, and why the cure period matters as much as the pour itself. These are the details that separate candles that actually perform from ones that tunnel, lose scent, or look rough straight out of the jar.
Making your first batch will teach you more than any guide can. Take notes on every variable including wax weight, fragrance load, pour temperature, and cure time, so you can repeat what works and fix what does not. If you want to see what a well-made, hand-poured candle looks and smells like before your supplies even arrive, browse the Small Flame coconut wax candle collection for a strong reference point on scent, finish, and burn quality.