
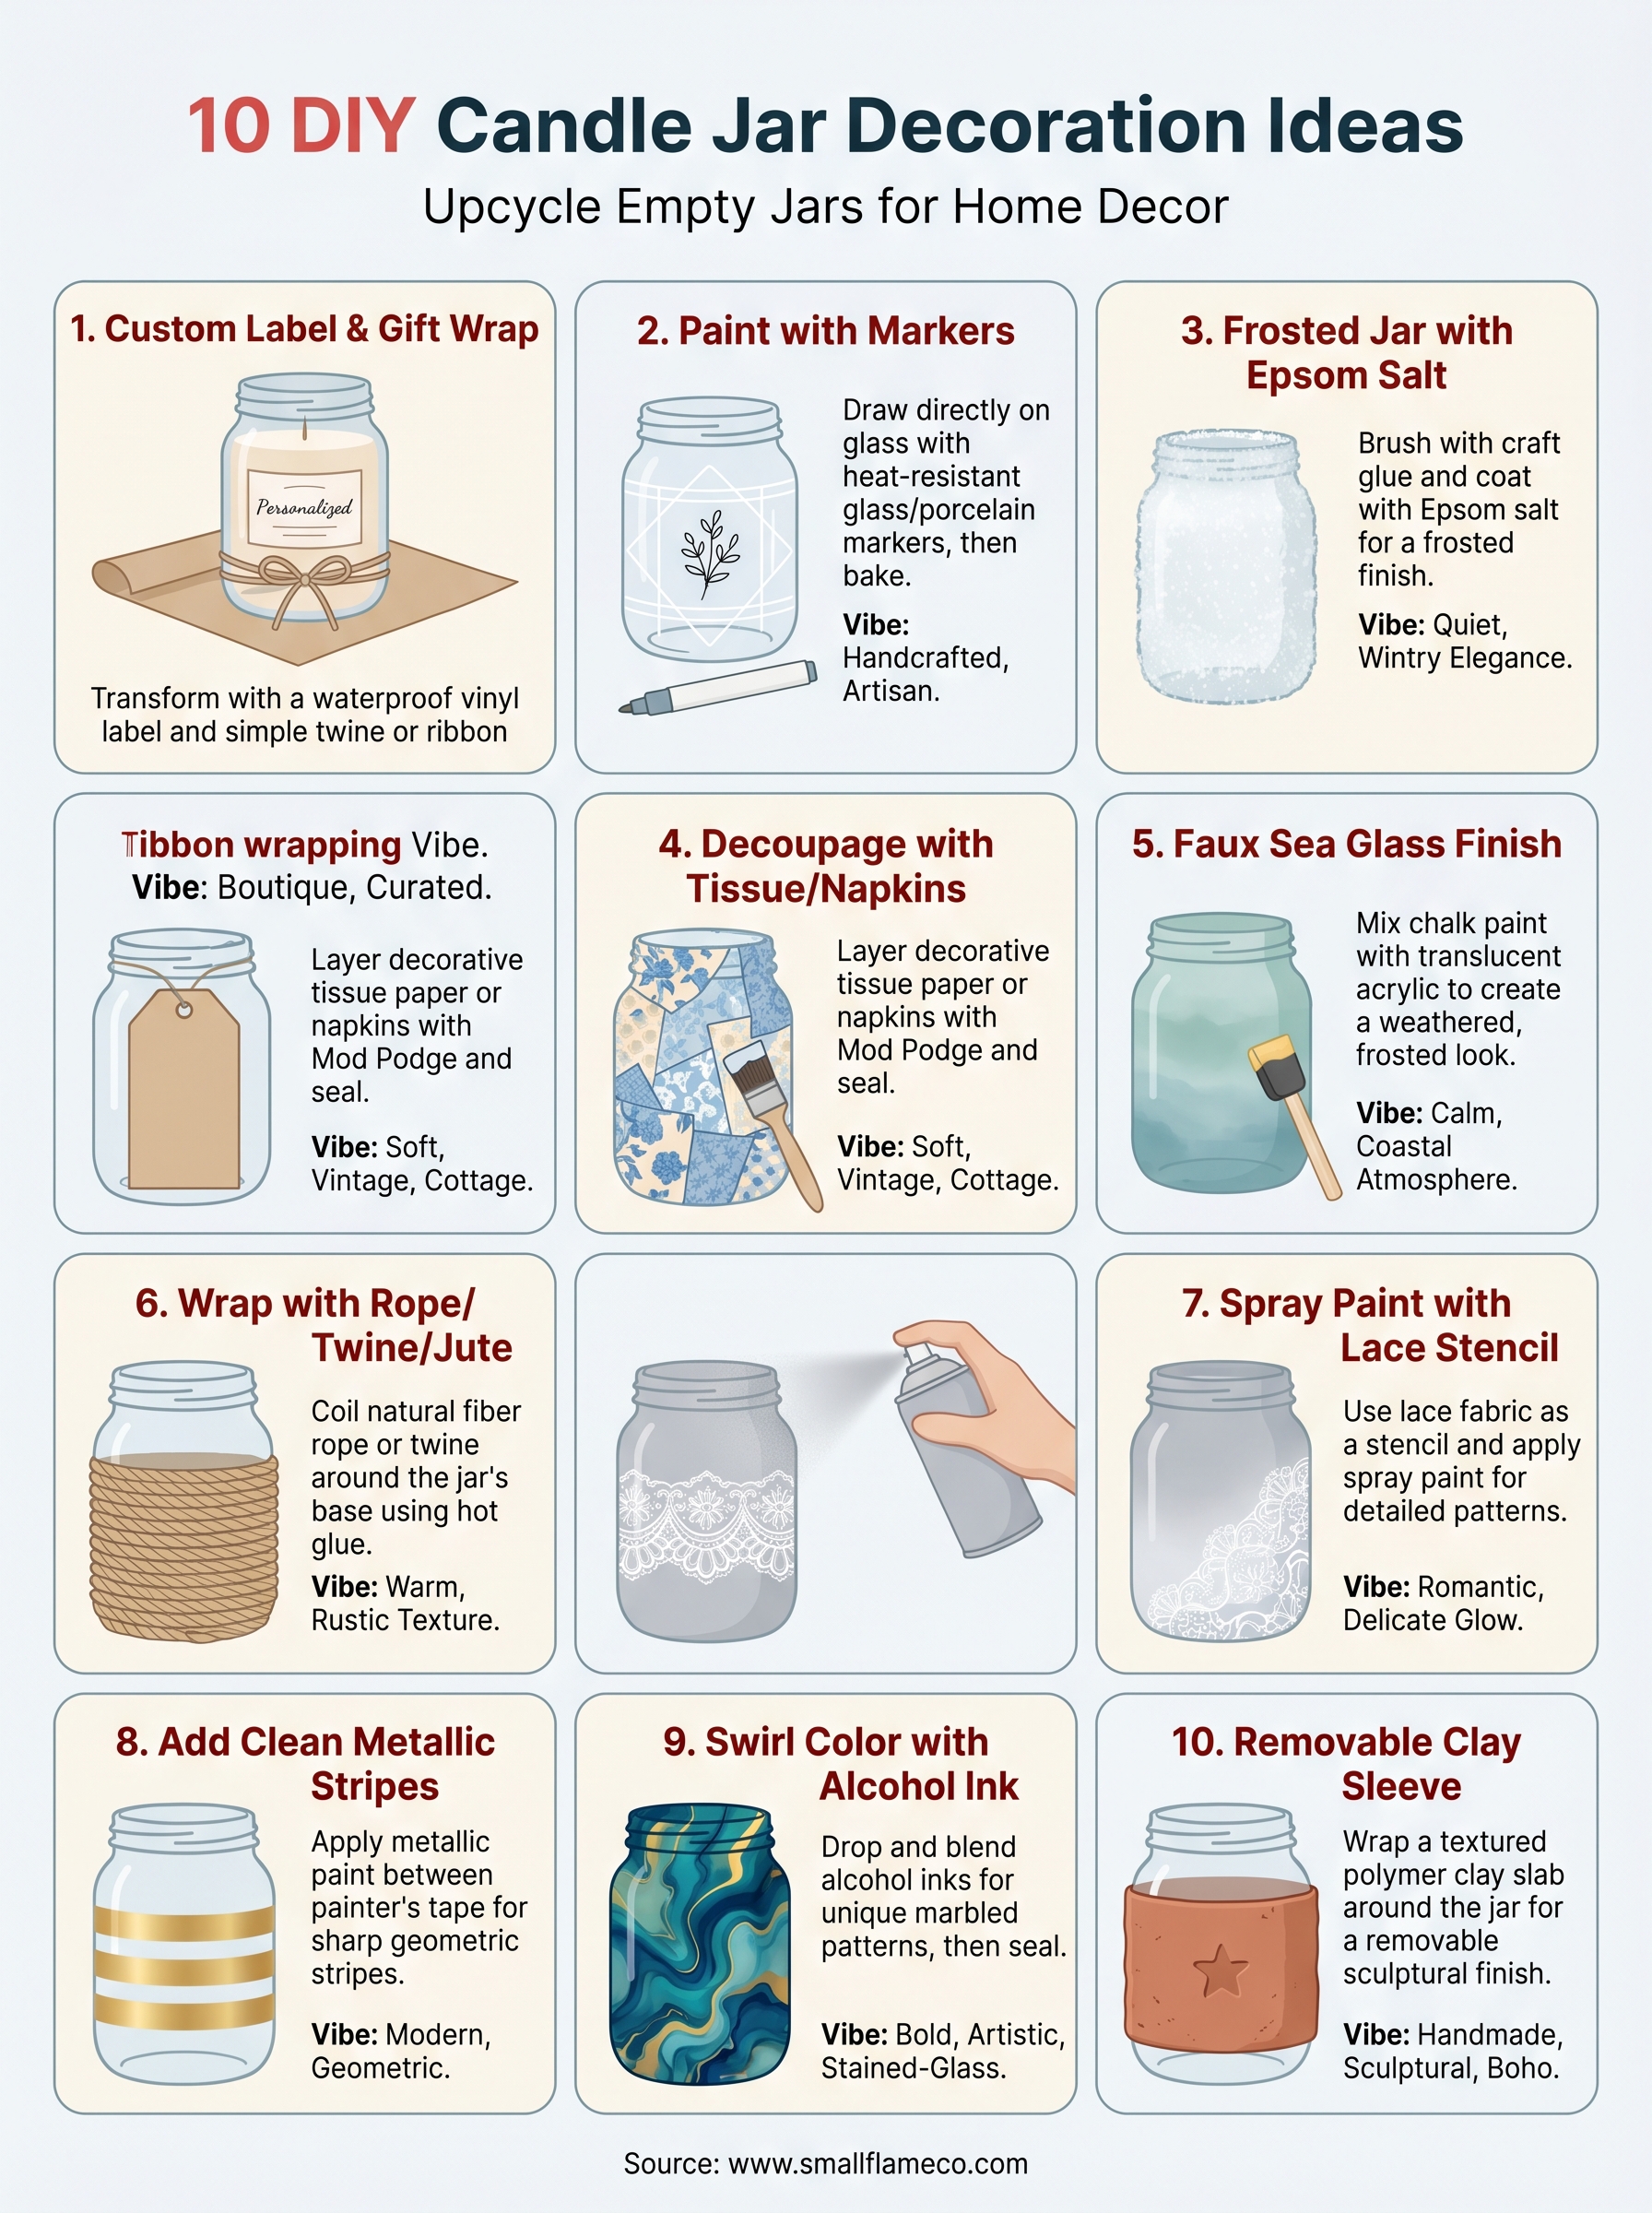
How To Decorate Candle Jars: 10 DIY Ideas For Home Decor
Every hand-poured candle eventually burns down to the last flicker, but that doesn't mean the jar has to end up in the trash. If you've been wondering how to decorate candle jars, you're sitting on a pile of untapped craft potential. Here at Small Flame Candle Company, we pour our candles into sturdy, clean-lined jars that are practically begging for a second life once the wax is gone. It's one of our favorite things about what we do, the jar outlasts the flame.
Decorating candle jars is a low-cost way to add handmade character to your home without a trip to the furniture store. Whether you're upcycling empties from your last candle haul or prepping fresh jars for a homemade gift, a little creativity goes a long way. The materials are simple, the techniques are beginner-friendly, and the results can look like they came from a boutique shelf.
Below, you'll find 10 practical DIY ideas that cover everything from painted finishes and textured wraps to seasonal displays and functional storage. Each one includes straightforward steps so you can pick a project and start this weekend. Grab your empty jars, clear off the kitchen table, and let's put them to good use.
1. Add a Custom Label and Gift Wrap
A custom label transforms a plain jar into something that looks intentional and personal. This technique works whether you're dressing up a candle you poured yourself or giving a finished candle as a gift. It's one of the most accessible ways to tackle how to decorate candle jars with a polished result and almost no learning curve.
The Vibe This Creates and Where It Looks Best
Custom labels give jars a boutique, curated look that fits naturally in a bathroom shelf display, a kitchen windowsill, or a gift basket. Pairing the label with a piece of twine or a small tag adds texture and makes the jar feel like a finished product rather than a craft project.
Supplies That Hold Up to Heat
You need materials that won't warp, peel, or smudge when the candle warms the glass. Stick to waterproof vinyl labels or oil-resistant paper labels printed with a laser printer rather than inkjet, since laser toner holds up better to heat. For wrapping, kraft paper, tissue paper, and satin ribbon are all safe choices that stay away from the flame.
Always position labels on the lower half of the jar so they stay far from the heat source at the rim.
Step-by-Step Approach
- Clean and dry the jar completely before applying anything.
- Print or handwrite your label on waterproof or heat-resistant stock.
- Trim the label cleanly and press it onto the jar, smoothing out bubbles from the center outward.
- Wrap the jar in tissue paper or kraft paper and secure it with ribbon or twine below the jar's shoulder.
Design Variations for Holidays and Everyday Decor
For the holidays, use red and green color palettes, gold foil labels, or a hand-lettered gift tag tied with velvet ribbon. For everyday decor, keep the label minimal with the scent name and a simple border. Seasonal botanical illustrations also print cleanly and give a year-round elevated look.
Time, Cost, and Durability
This project takes under 30 minutes from print to finish. A sheet of 30 vinyl labels runs about two to four dollars, and basic kraft wrap costs less than five dollars for a roll. Labels applied to clean, dry glass last the full life of the candle without lifting.
2. Paint with Glass and Porcelain Markers
Glass and porcelain markers let you draw directly onto the jar and bake the design in permanently. This method of how to decorate candle jars gives you full creative control with minimal mess.
The Vibe This Creates and Where It Looks Best
Painted jars have a handcrafted, artisan feel that suits bohemian interiors, minimalist shelves, and personal gifts. Simple geometric patterns or hand-lettered text translate well to glass and look refined rather than craft-table messy.
Supplies That Hold Up to Heat
You need markers made specifically for glass or ceramics, such as Posca or Molotow glass markers, since standard paint pens peel under heat. These markers cure in a regular oven, which makes the finish significantly more heat-resistant once the candle is burning.
Let the marker ink dry for at least 24 hours before baking to avoid smearing the design.
Step-by-Step Approach
- Wipe the jar down with rubbing alcohol to remove grease.
- Sketch your layout lightly with a chalk marker.
- Trace the design with your glass marker using steady, even strokes.
- Bake the jar at 350°F for 30 minutes, then let it cool inside the oven.
Design Variations for Holidays and Everyday Decor
For the holidays, paint snowflakes, holly leaves, or short phrases like "Warm Wishes." For year-round display, a single thin botanical stem or minimal line work keeps things timeless and clean.
Time, Cost, and Durability
This project takes roughly 45 minutes of active work plus oven time. A glass marker set runs eight to fifteen dollars and covers several jars. Once baked, the design resists chipping through normal daily use.
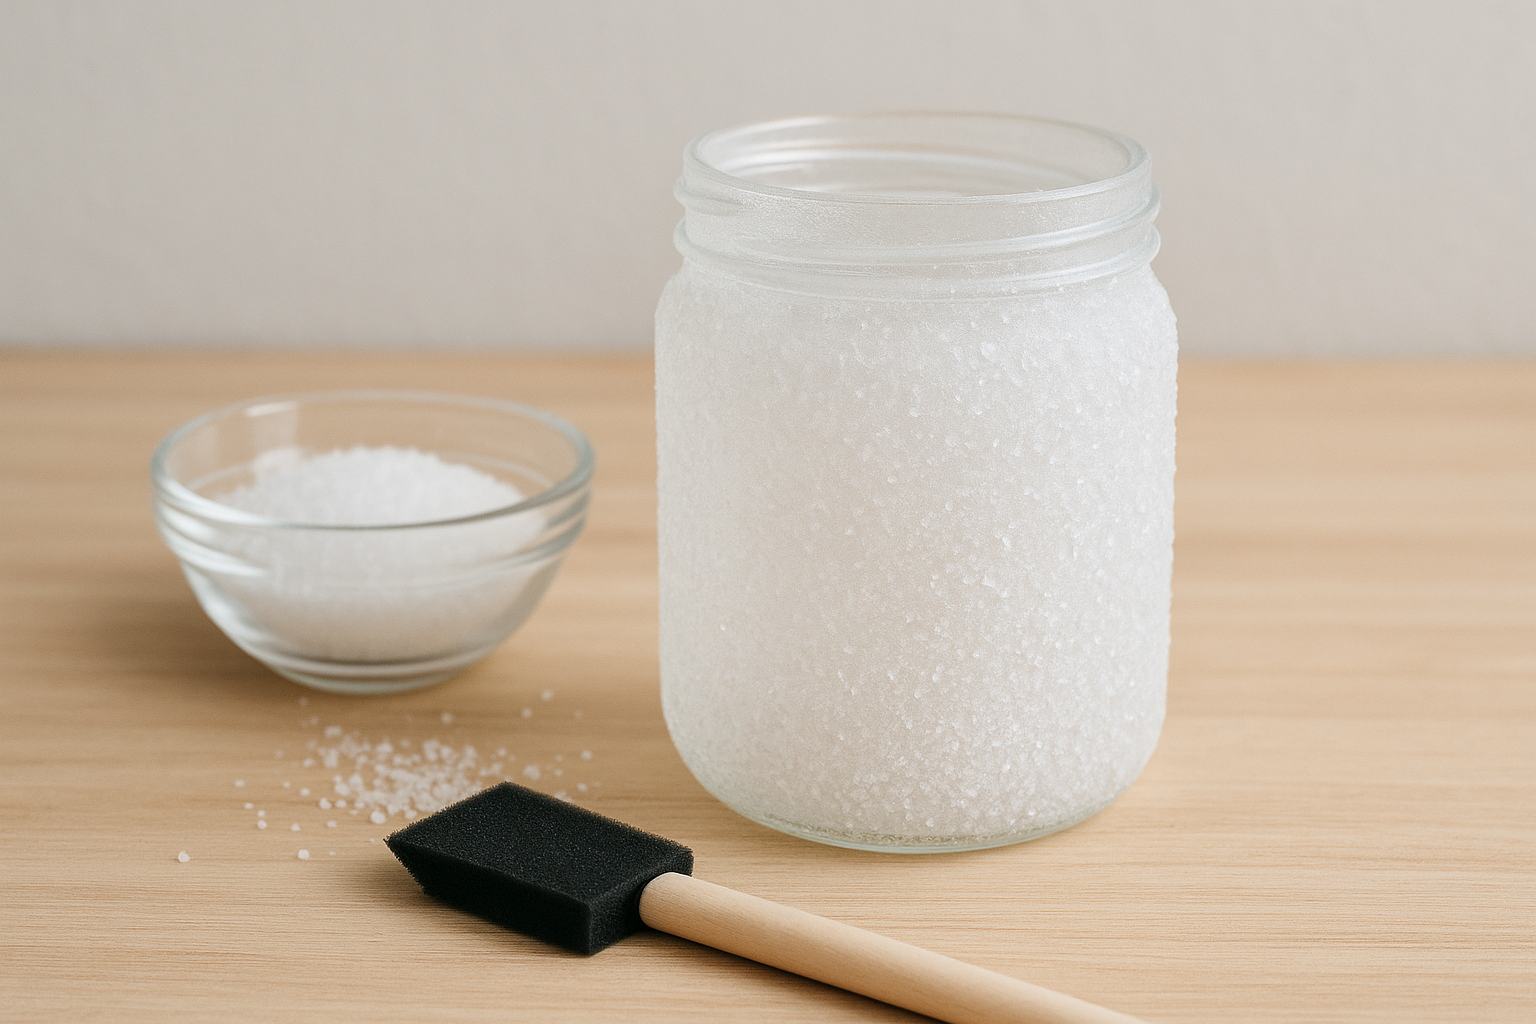
3. Make a Frosted Jar with Epsom Salt
An Epsom salt finish gives glass jars a soft, textured look that mimics expensive frosted glass for almost nothing. This approach to how to decorate candle jars requires only a few craft supplies and delivers a result that looks intentional on any shelf.
The Vibe This Creates and Where It Looks Best
A frosted jar has a quiet, wintry elegance that works especially well in bathrooms, bedroom nightstands, and holiday tablescapes. The scattered salt crystals catch light without being flashy, which makes them a natural fit for calm, neutral-toned interiors.
Supplies That Hold Up to Heat
You need Mod Podge or a clear craft glue, Epsom salt, and a foam brush. Since the salt sits on the outside of the jar, heat from the candle inside does not affect the finish.
Apply the glue in thin, even coats to keep the salt layer uniform and prevent clumping.
Step-by-Step Approach
- Clean and dry the jar thoroughly.
- Brush a thin layer of Mod Podge onto the outside of the jar.
- Pour Epsom salt over the glue, rotating the jar to coat evenly.
- Let it dry completely for two to four hours before displaying or lighting.
Design Variations for Holidays and Everyday Decor
For winter holidays, mix in fine silver or white glitter with the salt for extra sparkle. For everyday use, keep the salt alone for a clean, spa-like finish.
Time, Cost, and Durability
This project takes under an hour to complete. Epsom salt costs about two dollars at most grocery stores. The finish stays intact as long as the jar stays dry and away from moisture.
4. Decoupage with Tissue or Napkins
Decoupage layers decorative tissue paper or napkins onto the outside of a jar using a sealing medium, producing a result that looks far more refined than the effort involved. This take on how to decorate candle jars works on any glass shape and rewards patience over skill.
The Vibe This Creates and Where It Looks Best
Decoupaged jars have a soft, vintage character that fits naturally on a mantel, bookshelf, or dining table centerpiece. Floral and botanical prints lean cottage-style warm, while geometric tissue papers push the look into something more modern and deliberate.
Supplies That Hold Up to Heat
You need Mod Podge (matte or gloss), decorative tissue paper or single-ply napkin layers, a foam brush, and a top sealant. The paper sits on the exterior, so the glass keeps the candle's heat completely separated from the decoupage layer.
Peel napkins down to a single ply before applying so the paper curves smoothly over the glass without bunching.
Step-by-Step Approach
- Wipe the jar with rubbing alcohol and let it dry fully.
- Tear the tissue into small, irregular pieces for a seamless blended edge.
- Brush Mod Podge onto a section of glass, press a tissue piece on top, then brush another coat over it.
- Cover the surface completely, then apply a final sealant coat after two hours.
Design Variations for Holidays and Everyday Decor
For the holidays, use metallic or plaid tissue paper layered with solid color accents to build a festive palette. On everyday shelves, a single botanical napkin pattern on a neutral jar keeps the display calm and uncluttered.
Time, Cost, and Durability
This project takes about one hour of active work plus drying time. Tissue paper and Mod Podge together run under six dollars total. A properly sealed jar holds up well through normal indoor display and light handling.
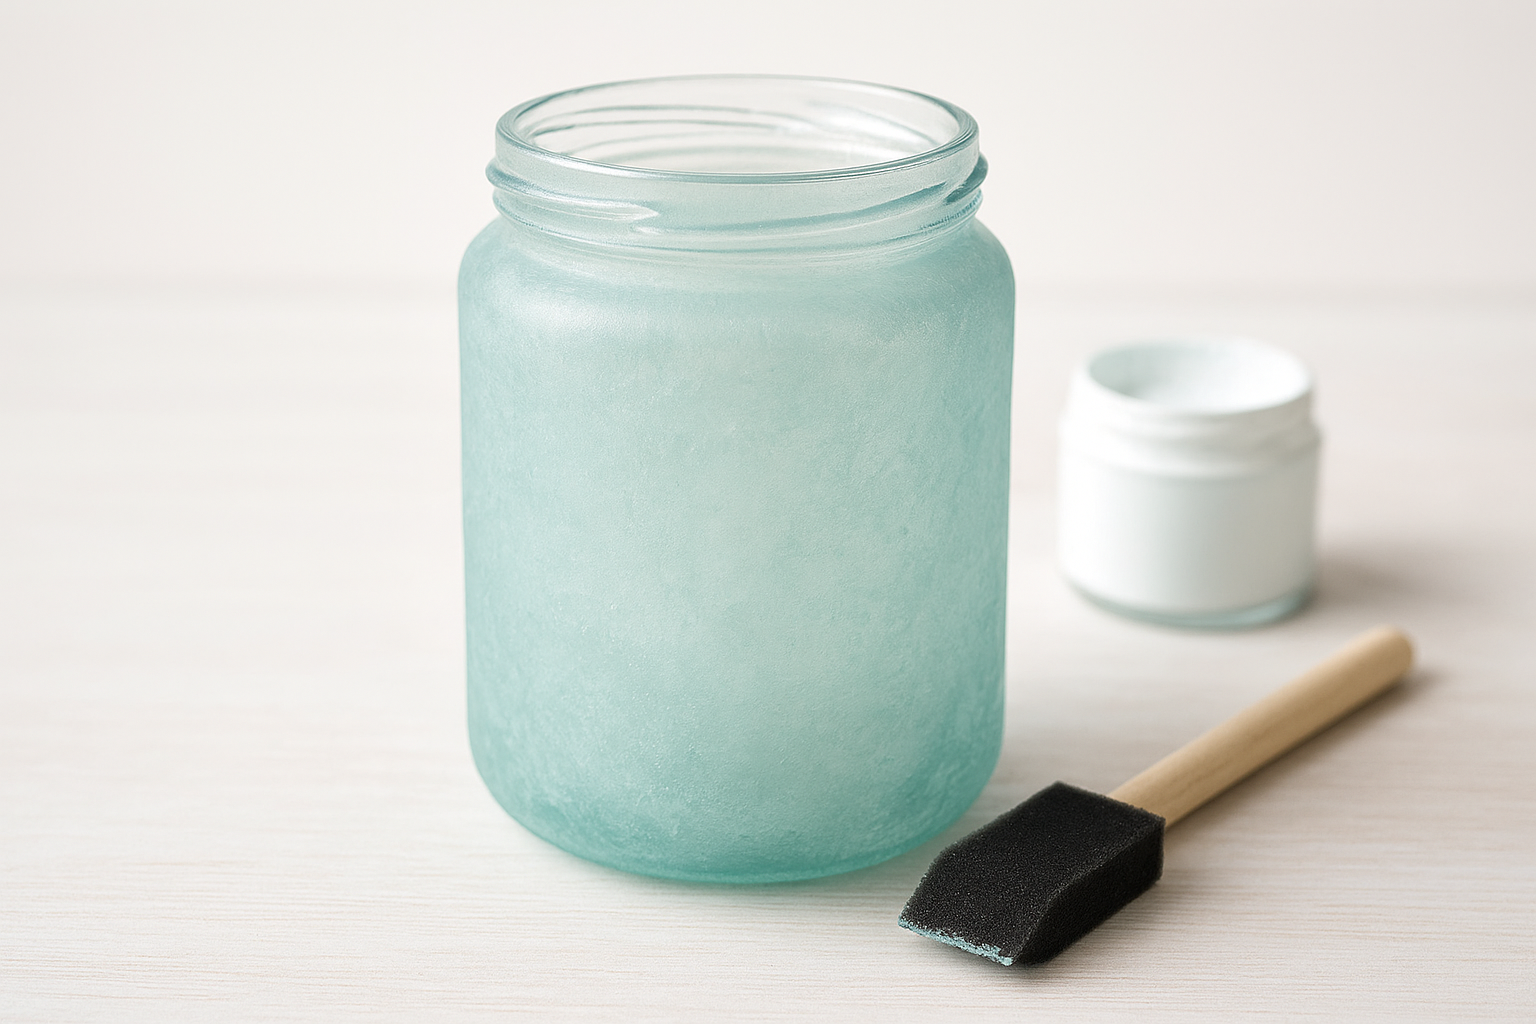
5. Create a Faux Sea Glass Finish
A faux sea glass finish transforms a plain glass jar into something that looks like it came off a coastal shelf. This method of how to decorate candle jars uses a simple paint mix to mimic the soft, weathered look of tumbled beach glass without any actual ocean required.
The Vibe This Creates and Where It Looks Best
Sea glass jars carry a calm, coastal atmosphere that suits bathroom counters, bedroom windowsills, and summer table centerpieces. The muted, frosted color tones feel relaxed and organic rather than loud or overdone.
Supplies That Hold Up to Heat
You need white chalk paint and a translucent acrylic in sea glass blue, green, or teal, along with a small sponge brush and a matte sealant. These paints sit on the exterior of the jar, so the candle's heat inside the glass does not affect them.
Use a matte sealant rather than a gloss finish to preserve the soft, frosted look that makes sea glass distinctive.
Step-by-Step Approach
- Clean the jar with rubbing alcohol and let it dry completely.
- Mix a small amount of white chalk paint into your translucent color to soften it.
- Dab the blend onto the jar with a sponge brush using light, uneven strokes.
- Let it dry fully, then seal with one coat of matte sealant.
Design Variations for Holidays and Everyday Decor
For summer, aqua and seafoam tones keep the look natural and beachy. For winter displays, swap to a deep teal or icy blue to match a cooler seasonal palette.
Time, Cost, and Durability
This project takes roughly 30 to 45 minutes of active work. Chalk paint and acrylic together run under eight dollars. The sealed finish holds up well through regular indoor display as long as the jar stays dry.
6. Wrap with Rope, Twine, or Jute
Wrapping a jar with natural fiber is one of the fastest ways to tackle how to decorate candle jars without any painting or drying time. The material does the visual work for you, and the result looks deliberately styled rather than hastily assembled.
The Vibe This Creates and Where It Looks Best
Rope and jute wraps bring a warm, rustic texture to any jar that pairs well with farmhouse kitchens, wooden shelving, and outdoor entertaining setups. A tightly wrapped jar also holds its own as a standalone centerpiece on a dining table or porch side table.
Supplies That Hold Up to Heat
You need natural jute twine or cotton rope, a hot glue gun, and scissors. Keep the wrap on the lower two-thirds of the jar to stay a safe distance from the rim where heat escapes.
Never bring the twine above the jar's shoulder, since direct heat exposure can cause natural fibers to singe or discolor over time.
Step-by-Step Approach
- Run a thin bead of hot glue along the base of the jar.
- Press the rope end firmly and hold it for a few seconds.
- Work upward in tight, even rows, adding small glue dots every few rotations.
- Cut the rope cleanly and tuck the end under the last row with a final glue dot.
Design Variations for Holidays and Everyday Decor
For fall and winter, tie a cinnamon stick bundle or a sprig of dried eucalyptus under a small bow at the base. For year-round display, solid natural jute with no added embellishment keeps the look clean and versatile across seasonal swaps.
Time, Cost, and Durability
This project takes under 20 minutes from start to finish. A large spool of jute twine costs two to four dollars and wraps several jars. The glued fiber stays firmly in place through regular handling as long as the jar avoids prolonged moisture exposure.
7. Spray Paint with a Lace Stencil
A lace stencil puts detailed, repeating patterns onto a jar in minutes without requiring any artistic skill. This approach to how to decorate candle jars relies on spray paint to do the heavy lifting while the lace handles all the fine detail work for you.
The Vibe This Creates and Where It Looks Best
Lace-stenciled jars carry a romantic, delicate quality that suits bedroom dressers, vanity tables, and formal dining displays. The open pattern lets light pass through when the candle burns, which adds a warm, soft glow to the space around it.
A single jar sitting on a white or wood surface catches enough ambient light to make the lace pattern visible even when the candle is not lit.
Supplies That Hold Up to Heat
You need lace fabric or lace ribbon, spray paint rated for glass or metal, rubber bands, and a clear sealant. Keep all painted layers on the exterior of the jar so heat from the flame stays separated from the finish.
Work outdoors or in a well-ventilated area and hold the can at least eight inches from the jar for an even coat.
Step-by-Step Approach
Follow these steps in order for a clean result:
- Clean the jar with rubbing alcohol and let it dry fully.
- Wrap the lace around the jar and secure it with rubber bands.
- Apply two light coats of spray paint, letting each dry for five minutes.
- Remove the lace carefully and let the jar cure for one full hour before sealing.
Design Variations for Holidays and Everyday Decor
For the holidays, gold or deep red spray paint over a fine lace pattern gives a rich, festive result. For everyday display, a matte white or soft gray finish stays subtle enough to rotate between seasons without redecorating.
Time, Cost, and Durability
This project takes roughly 30 to 45 minutes of active work plus curing time. A can of spray paint runs four to seven dollars and covers several jars. A sealed finish holds up well through regular indoor display with no touch-ups needed.
8. Add Clean Metallic Stripes with Tape
Tape masking is one of the cleanest ways to explore how to decorate candle jars without requiring a steady hand or any painting experience. You use the tape as a barrier, apply metallic paint between the lines, and peel it back to reveal sharp, professional-looking stripes underneath.
The Vibe This Creates and Where It Looks Best
Metallic stripes give jars a modern, geometric feel that fits well on a minimalist shelf, a styled nightstand, or a living room coffee table. The shimmer from gold or silver paint catches light naturally without overwhelming the rest of the space.
Supplies That Hold Up to Heat
You need painter's tape, metallic acrylic paint or gold leaf paint, a small foam brush, and a clear sealant. All painted surfaces stay on the exterior, so the candle's heat inside the jar does not reach the finish.
Use painter's tape rather than regular masking tape since it pulls off cleanly without lifting the paint underneath.
Step-by-Step Approach
- Clean the jar with rubbing alcohol and let it dry.
- Apply parallel strips of painter's tape at even intervals around the jar.
- Brush metallic paint over the exposed glass sections with smooth, even strokes.
- Let the paint dry for 15 minutes, then peel the tape back slowly at a low angle.
Design Variations for Holidays and Everyday Decor
For the holidays, use gold and copper together for a warm, festive tone. For year-round display, a single band of matte silver near the base keeps the jar understated and versatile.
Time, Cost, and Durability
This project takes under 30 minutes of active work. Painter's tape and metallic acrylic together cost roughly five to eight dollars. A sealed finish stays crisp through regular indoor handling without chipping.
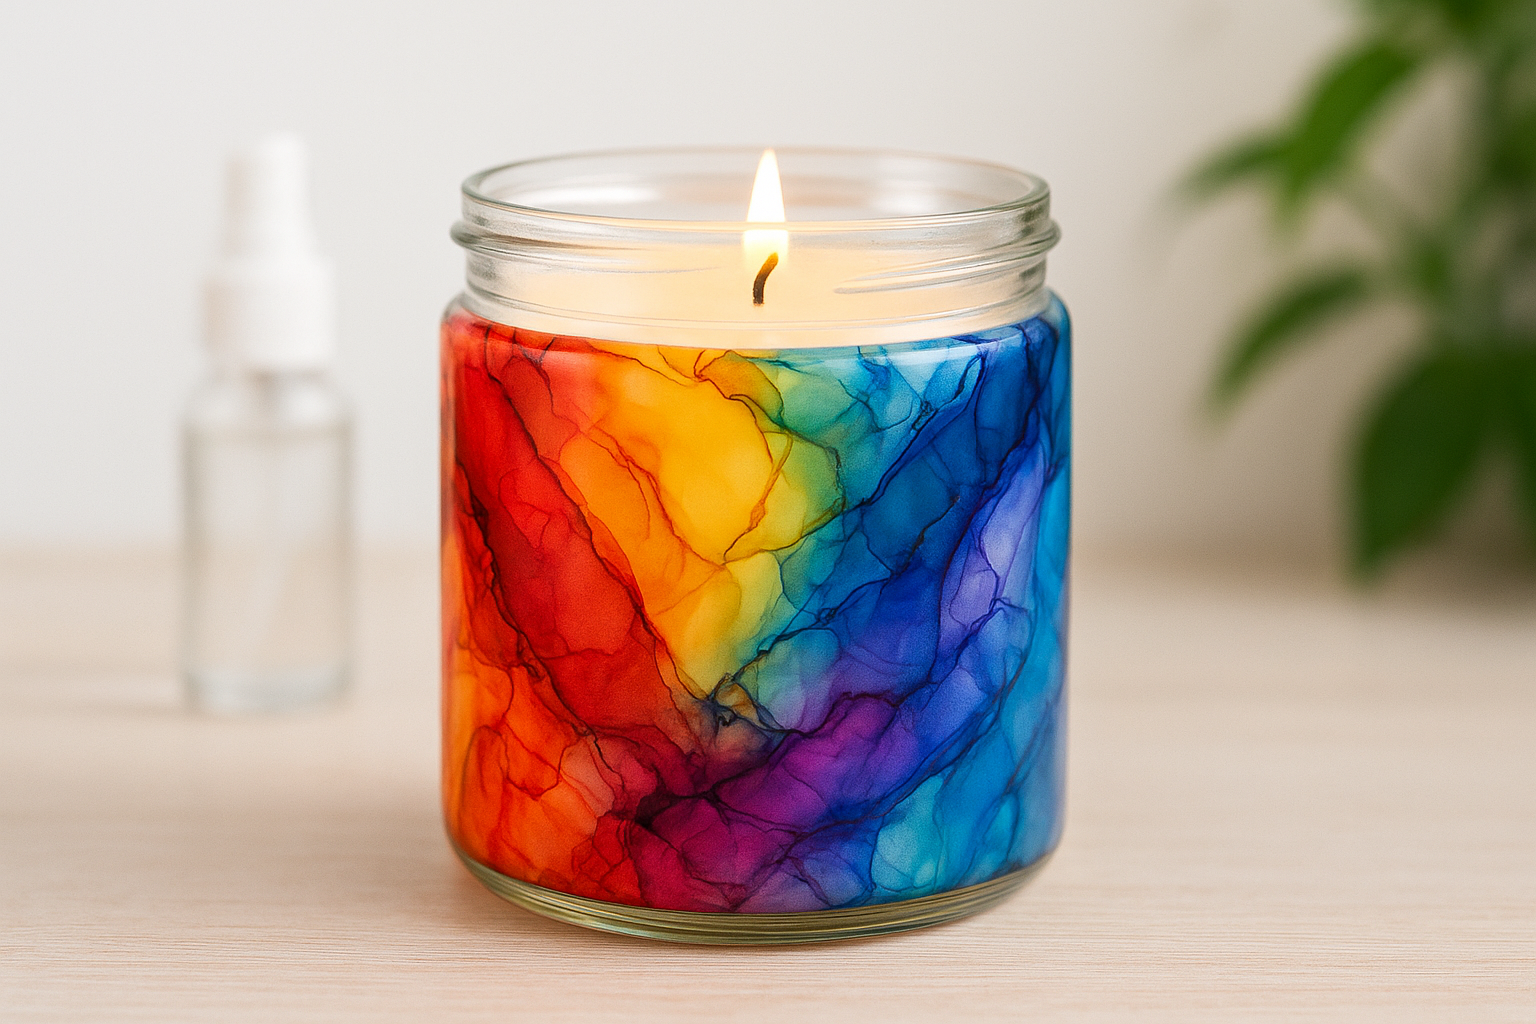
9. Swirl Color with Alcohol Ink
Alcohol ink gives you a fluid, marbled pattern that you can't replicate with a brush or stamp. This is one of the more visually striking ways of how to decorate candle jars because no two finished pieces ever look exactly the same.
The Vibe This Creates and Where It Looks Best
Alcohol ink jars read as bold, artistic pieces that hold their own on a bookshelf, a styled desk, or a modern living room display. The swirling color pools and translucent layers create a stained-glass effect that becomes even more dramatic when a lit candle glows through the finished jar.
Supplies That Hold Up to Heat
You need alcohol-based inks, 91% isopropyl alcohol in a small spray bottle, a shallow tray to work over, and a UV resin or gloss sealant. The ink bonds to the exterior glass surface, so the candle's heat inside stays completely separated from the finish.
Seal the finished design with UV resin or a spray gloss coat to lock the ink in place and prevent streaking over time.
Step-by-Step Approach
- Clean the jar with rubbing alcohol and dry it fully.
- Drop two or three ink colors directly onto the glass surface.
- Spritz lightly with isopropyl alcohol to spread and blend the colors.
- Let it dry for 30 minutes, then apply a sealant coat.
Design Variations for Holidays and Everyday Decor
For the holidays, deep red, gold, and navy produce a rich, jewel-toned result. For year-round display, soft blues and greens keep the look calm and contemporary.
Time, Cost, and Durability
This project takes roughly 45 minutes of active work. A starter alcohol ink set runs ten to fifteen dollars and covers multiple jars. The sealed finish resists fading and moisture through regular indoor use.
10. Cover with a Removable Clay Sleeve
A polymer clay sleeve wraps around a jar like a custom-fitted jacket, giving you a textured, sculptural finish that you can remove and reuse on a different jar whenever you want a change. This is one of the most flexible approaches to how to decorate candle jars because the clay never permanently bonds to the glass.
The Vibe This Creates and Where It Looks Best
Clay sleeves produce a handmade, sculptural quality that suits modern boho shelves, ceramic-heavy displays, and artisan gift presentations. A flattened slab with pressed texture reads as intentional and studio-crafted in a way that paint alone rarely achieves.
Supplies That Hold Up to Heat
You need air-dry or oven-bake polymer clay, a rolling pin, texture stamps or lace fabric for pressing patterns, and a craft knife for trimming. Since the sleeve sits against the exterior, the candle's heat inside stays separated from the clay layer at all times.
Keep the clay sleeve thin, roughly three to four millimeters, so it does not trap heat against the glass surface.
Step-by-Step Approach
- Roll the clay into an even, thin slab slightly taller than the jar's midsection.
- Press a texture stamp or lace piece firmly across the surface.
- Wrap the slab around the jar, trim the seam cleanly, and let it hold the jar's shape while drying.
- Slide it off once dry and cure it flat or on the jar per the clay's instructions.
Design Variations for Holidays and Everyday Decor
For the holidays, press star or snowflake stamps into the clay before it sets. For everyday display, a neutral, linen-textured slab in white or terracotta blends with nearly any shelf styling.
Time, Cost, and Durability
This project takes roughly one hour of active work plus drying time. A small clay block runs three to six dollars. The finished sleeve lasts indefinitely with dry indoor storage between uses.
Your Next Jar Project
Now you have ten solid options for how to decorate candle jars, ranging from five-minute tape projects to sculptural clay sleeves you can reuse season after season. Each technique on this list uses affordable, easy-to-find materials, and most of them take under an hour from setup to finished result. Pick one that matches your current shelf styling and start there.
Once your jars are ready to fill, you'll want quality candles worth saving the containers for. Small Flame Candle Co. hand-pours every candle in a coconut-soy wax blend using toxin-free fragrance oils, and the clean-lined jars are built to look good long after the wax is gone. Browse the full coconut wax candle collection to find your next favorite scent, and start building a stash of jars worth decorating.