
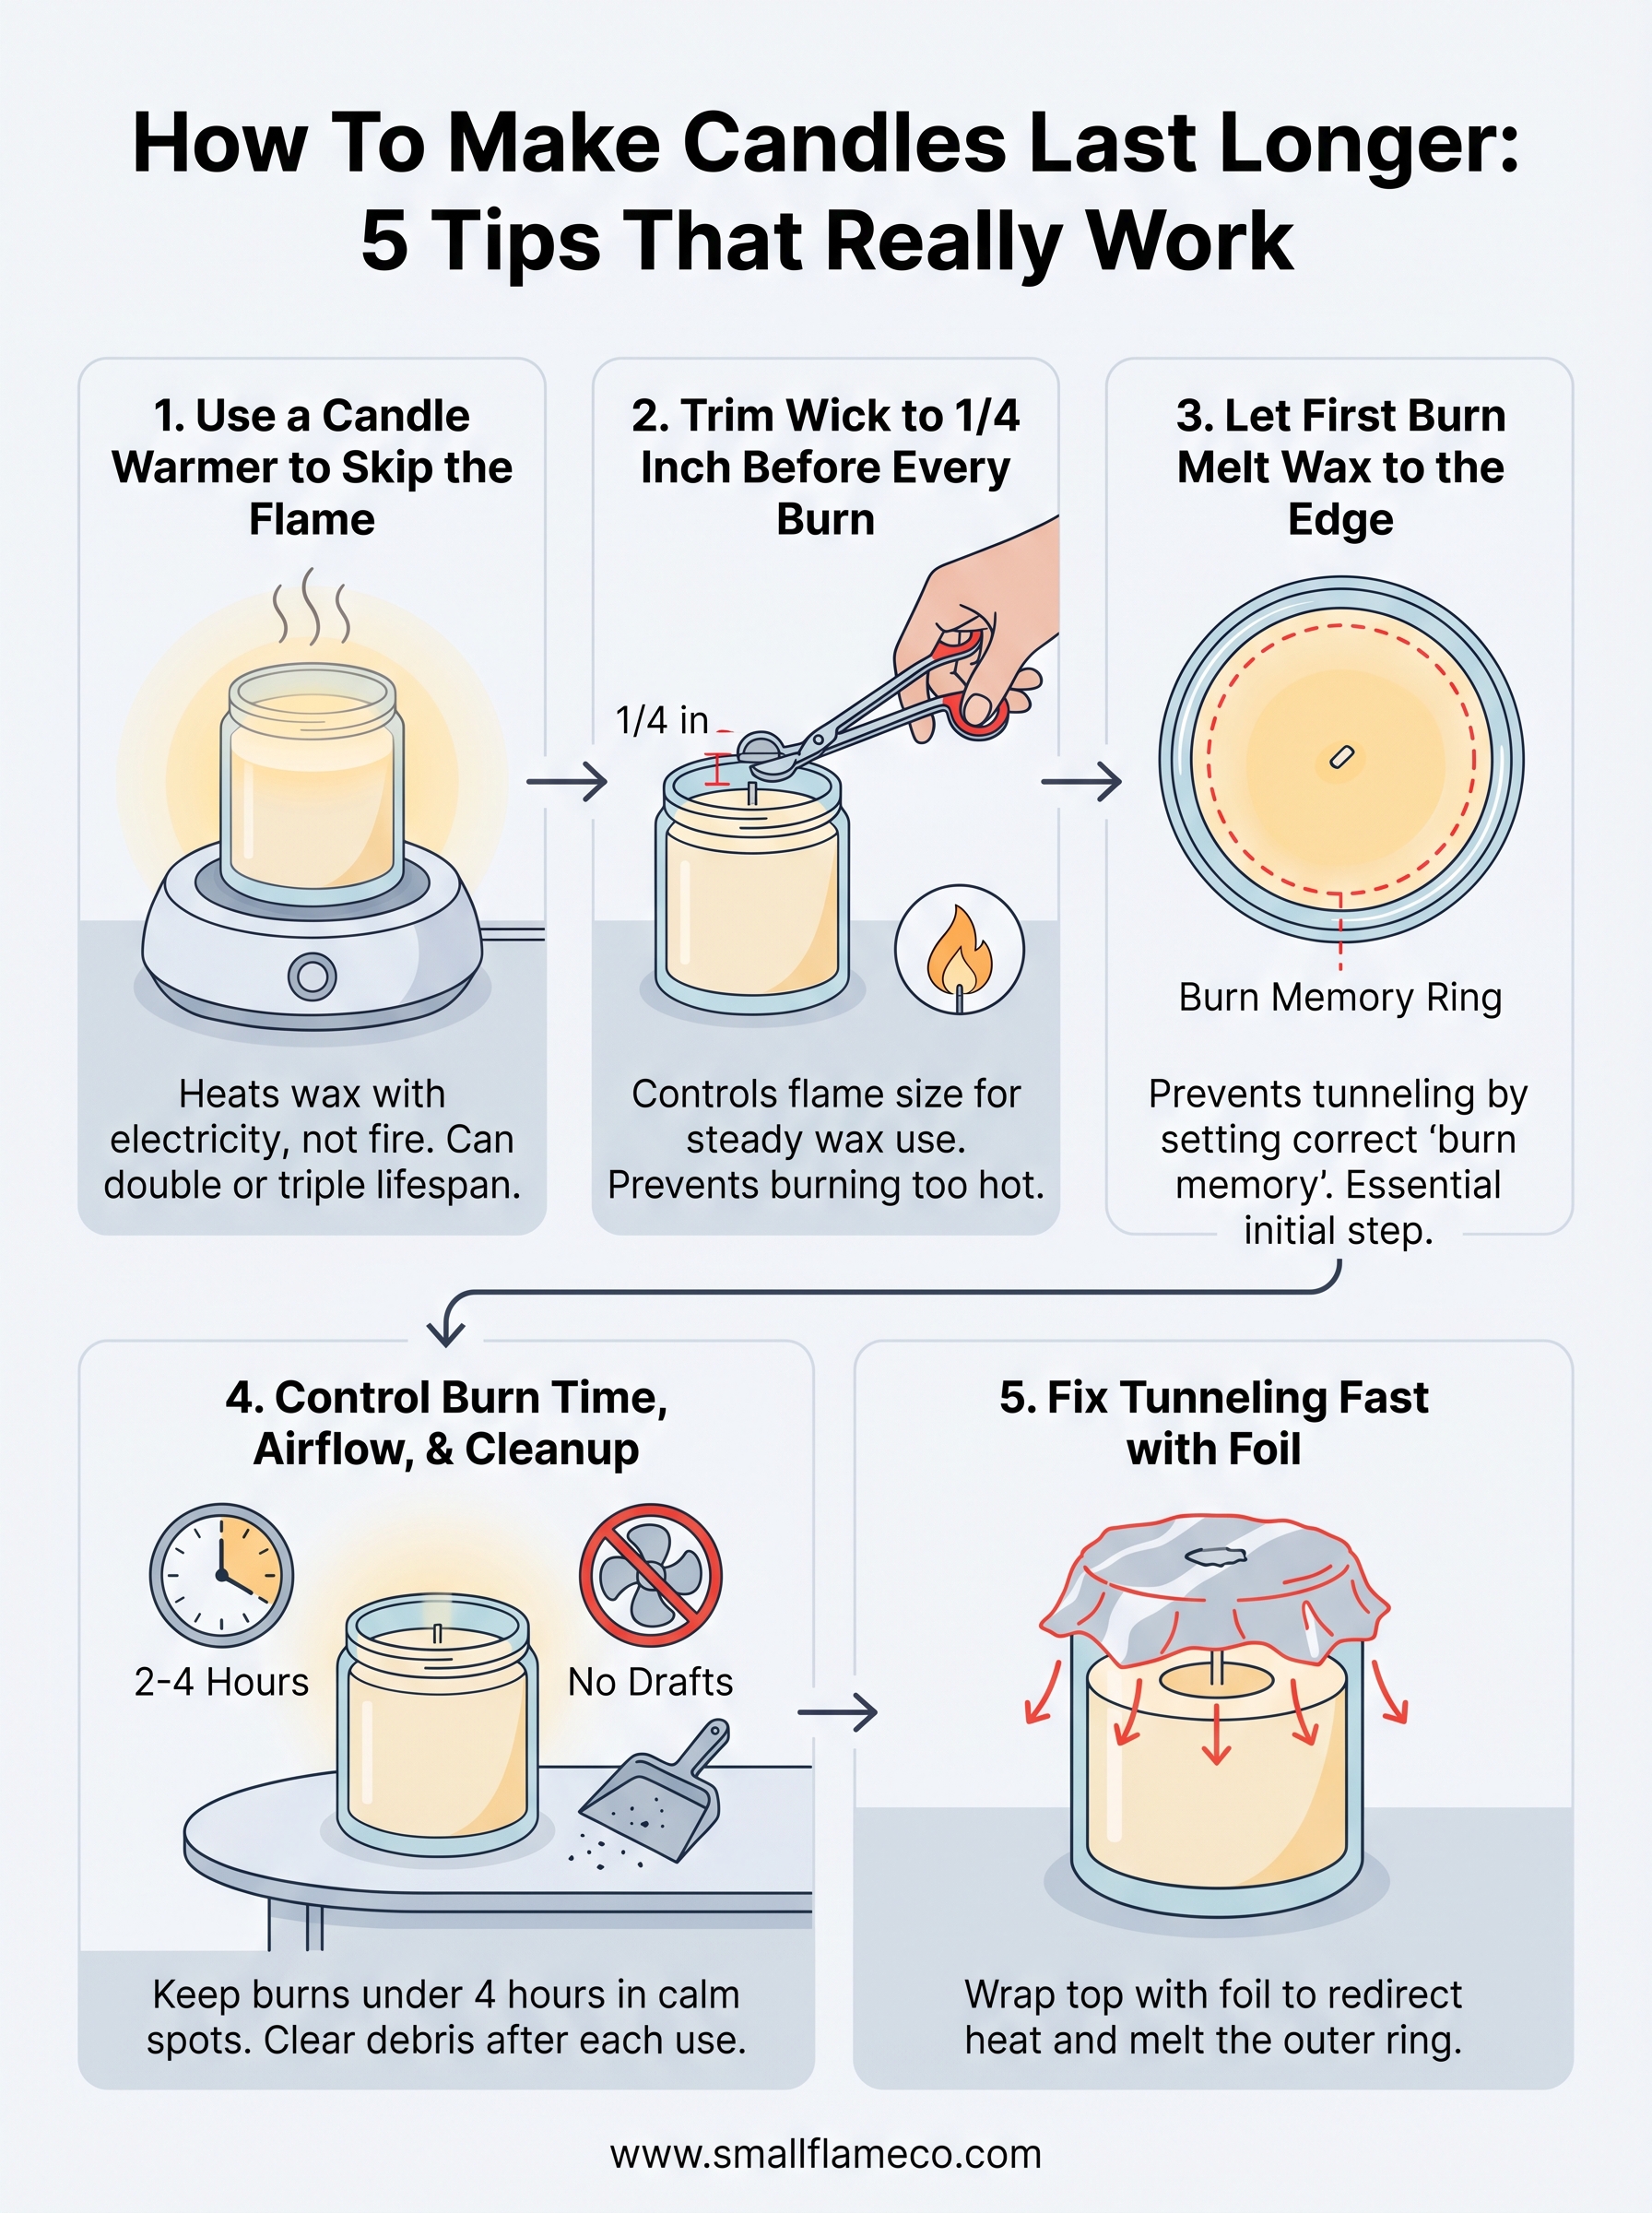
How To Make Candles Last Longer: 5 Tips That Really Work
You spent good money on a candle you love, and then it burns down in what feels like two evenings. If you've ever wondered how to make candles last longer, you're not alone. It's one of the most common questions we hear from customers at Small Flame Candle Company, and the answer usually comes down to a few simple habits most people skip.
The truth is, how you burn a candle matters just as much as how it's made. We hand-pour every candle we sell, so we know firsthand how wax type, wick length, and burn patterns affect longevity. A well-cared-for candle can give you significantly more burn time, sometimes hours more, than one that's just lit and forgotten on a shelf. Small changes in routine make a real difference.
Below, you'll find five practical tips we stand behind, each one tested on our own products. Whether you're burning through a favorite scent from our collection or working with candles from somewhere else entirely, these methods will help you get the most out of every pour.
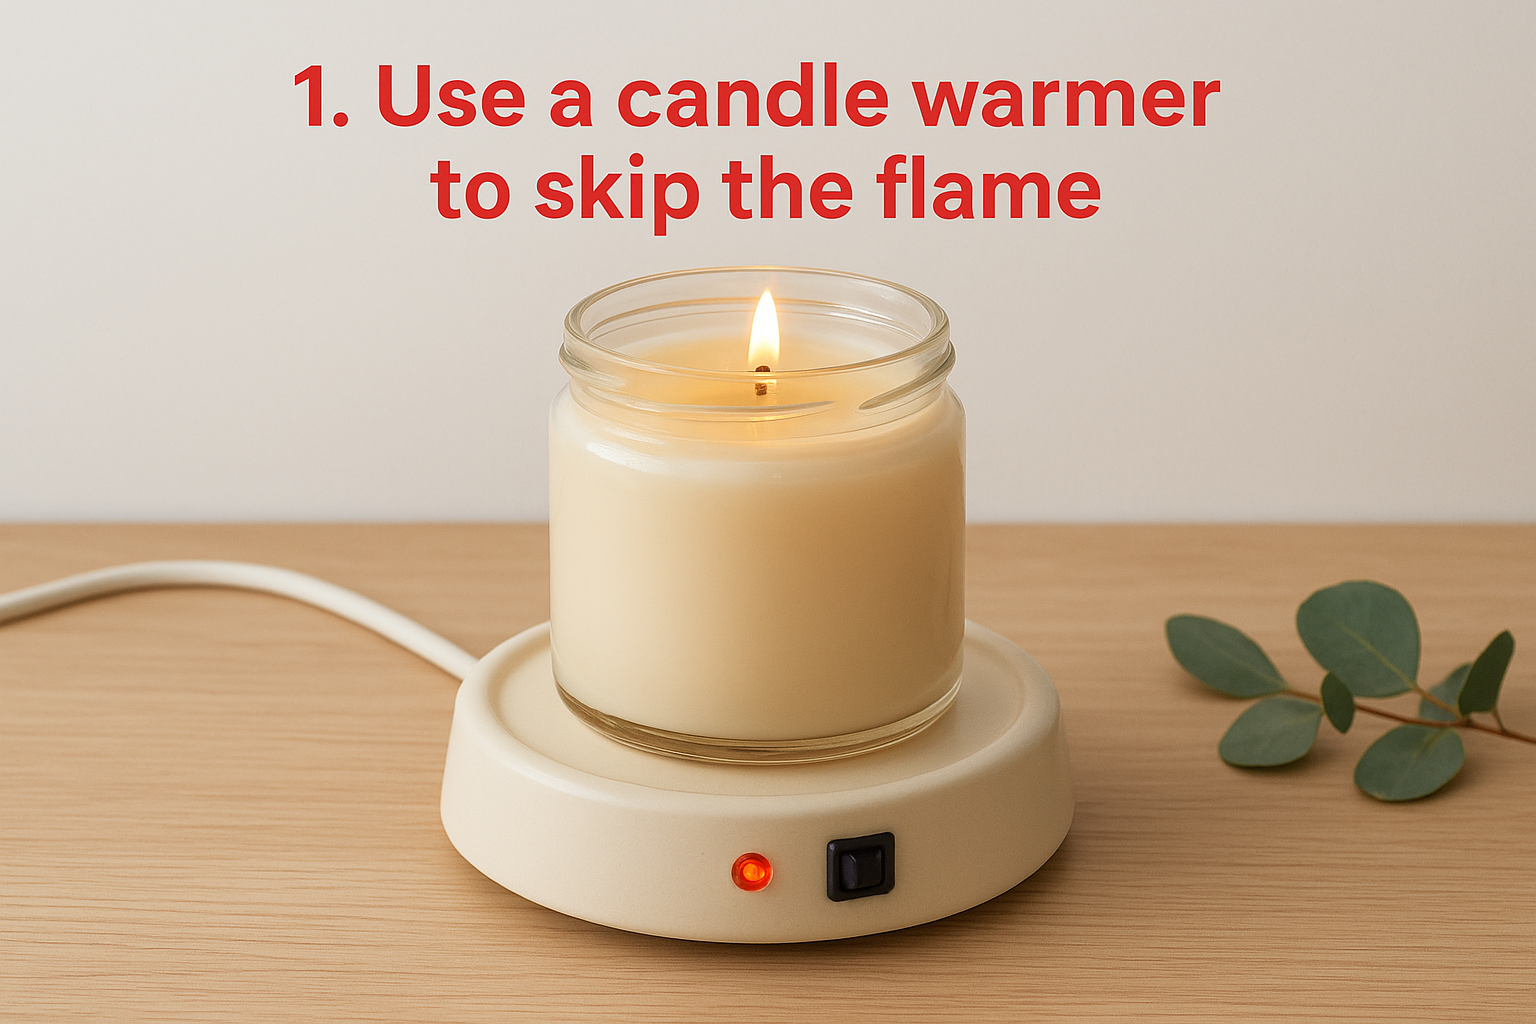
1. Use a candle warmer to skip the flame
A candle warmer heats your wax using electricity instead of fire, which means you get the scent without burning through any wax at all. This single switch can double or triple how long your candle lasts, making it one of the most effective answers to how to make candles last longer.
Why this works
When a candle burns with a flame, it consumes both the wax and the wick at the same time. A warmer melts the wax slowly and evenly using low heat, releasing fragrance without destroying the candle's structure. Your wax stays intact, and you get hours of scent throw with almost no material loss.
A candle used exclusively on a warmer can last up to three times longer than one burned with a flame.
How to do it
Place your candle on a plate-style or bulb-based warmer designed for jar candles, then turn it on and let the wax melt gradually. You'll notice the fragrance within 10 to 15 minutes. Follow this order for best results:
- Set the warmer on a flat, stable surface
- Center the candle jar on the warming plate
- Run it for no more than eight hours per session
Safety notes
Warmers still get hot, so keep them on a heat-safe surface and away from children or pets. Never leave a warmer running unattended overnight or place it near flammable materials like curtains or paper.
Troubleshooting and FAQs
If your candle produces little scent on a warmer, the wax may be too thick or dense to melt at that temperature. Switching to a higher-wattage or fan-style warmer usually solves the issue and improves fragrance distribution.
Tools and cost
A reliable electric candle warmer typically runs between $10 and $30. Small Flame carries both Edison bulb warmers and fan warmers that pair well with our hand-poured candle collection.
2. Trim and re-center the wick before every burn
A long or off-center wick burns too hot and too fast, which chews through wax faster than it should. This quick step is one of the simplest ways to make candles last longer every single use.
Why this works
An oversized flame pulls more wax than necessary, shortening the candle's total burn time. Keeping the wick at 1/4 inch controls the flame and keeps wax consumption steady.
Trimming your wick to 1/4 inch before every burn can add several hours of total burn time to a single candle.
How to do it
Use wick trimmers or small scissors to cut the wick before each lighting. If the wick has shifted, reposition it gently while the wax is still soft but not fully liquid.
Safety notes
Always trim when the wax is cool and solid. Cutting over liquid wax drops debris into the pool, which clogs the wick and causes uneven burning.
Troubleshooting and FAQs
If your wick keeps leaning, the wax likely hardened while the wick was still displaced. Use a toothpick to nudge it back before the wax sets completely.
Tools and cost
A wick trimmer costs around $8 to $12 and lasts for years. Regular scissors work in a pinch but make it harder to reach deep into a jar candle.
3. Let the first burn melt wax to the edge
The first burn you do sets the behavior for every burn after it. If the wax doesn't reach the outer edges on that initial session, the candle builds a memory ring and tunnels inward from that point on, wasting wax along the walls.
Why this works
Candle wax has burn memory, meaning it follows the same melt pattern it formed the first time. Letting the wax pool all the way to the edge on burn one trains it to melt evenly on every session that follows.
Skipping a full edge-to-edge melt on the first burn is the most common reason candles tunnel and burn out early.
How to do it
Burn your candle until the entire top surface is liquid before putting it out. For most candles, this takes two to four hours depending on the jar's width. Don't cut the session short.
Safety notes
Cap every burn at four hours per session, including the first one. If your jar feels hot to the touch or the flame grows unusually tall, extinguish it right away.
Troubleshooting and FAQs
If tunneling has already started, cover the top loosely with aluminum foil and burn for one hour. The reflected heat softens the hardened wax ring along the edges and resets the melt pool.
Tools and cost
This tip costs nothing extra. A phone timer keeps you on track without hovering over the candle all evening.
4. Control burn time, airflow, and cleanup
How you manage each session directly affects how long your candle lasts. Burning too long, placing candles near drafts, and leaving debris in the wax quietly shorten burn life without you noticing.
Why this works
Excess heat and unsteady airflow cause wax to burn faster and unevenly than it should. Keeping sessions short and your candle in a calm, sheltered spot produces a steady flame and a controlled melt pool.
How to do it
Stick to two to four hours per session and burn your candle away from fans, open windows, and vents. After each session, remove any wick trimmings or match debris from the cooled wax surface before you relight.
Burning in a draft can increase wax consumption significantly, making airflow control one of the most overlooked ways to make candles last longer.
Safety notes
Keep your candle on a stable, flat surface throughout every session. Avoid high-traffic areas where a brush from a person or pet could tip the jar.
Troubleshooting and FAQs
If your flame flickers constantly, move the candle to a calmer location. A steady flame means even burning and a longer, better-smelling session overall.
Tools and cost
You need nothing extra for this tip. A phone timer handles session tracking at zero added cost.
5. Fix tunneling and other burn problems fast
Tunneling happens when wax builds up along the sides of the jar while a hollow channel forms down the middle. Once it starts, your candle burns out faster and wastes a significant portion of wax, but fixing it is straightforward.
Why this works
Tunneling traps usable wax against the jar walls, cutting your total burn time short. Redirecting heat back toward those walls remelts the wax and restores an even melt pool, giving you back hours you would have otherwise lost.
How to do it
Wrap the top of the jar loosely with aluminum foil, leaving a small opening above the wick. Burn it for about one hour, then remove the foil carefully and check that the edges have softened.
This foil method is one of the most effective and least-known answers to how to make candles last longer.
Safety notes
Use heat-resistant gloves when removing the foil, since the jar gets hot. Never seal the foil completely, as the wick needs adequate airflow to stay lit safely.
Troubleshooting and FAQs
If one session doesn't fully resolve the tunnel, repeat the foil method. Deep tunneling may need two or three sessions before the wax fully levels out.
Tools and cost
You only need standard aluminum foil, which most households already have. A pair of kitchen tongs makes removing the hot foil safer and easier at zero added cost.
A simple routine that makes every candle last
These five tips work best when you treat them as connected habits rather than one-time fixes. Trim your wick to 1/4 inch before every burn, let the first session run fully to the edges, keep individual burns under four hours, shield the flame from drafts, and address tunneling the moment you notice it. Good candle care takes less than two minutes per session once you know what to look for, and the payoff in burn time is significant.
Knowing how to make candles last longer gets easier once the routine sticks. You spend less replacing candles, enjoy more scent from every jar, and waste far less wax over time. If you want a candle that rewards this kind of attention, our hand-poured coconut wax candles are made with a clean-burning coconut-soy blend and lead-free cotton wicks built for a steady, even burn from the first light to the last.