
Candle Making 101: How To Make Coconut Wax Candles At Home
Coconut wax is one of the cleanest-burning, most fragrant bases you can work with, and once you learn how to make coconut wax candles, you'll understand why so many candlemakers (ourselves included) gravitate toward it. At Small Flame Candle Company, we hand-pour every candle we sell, and coconut wax blends are a cornerstone of what we do. That hands-on experience is exactly what shaped this guide.
Making your own candles at home isn't complicated, but the details matter. The wrong pour temperature or an off fragrance ratio can mean tunneling, weak scent throw, or a wick that drowns itself out. This guide covers the specifics, melting points, fragrance load percentages, wick selection, and cure times, so you can skip the trial-and-error phase and get a quality candle on your first try.
Below, we'll walk through everything from gathering your supplies to pouring and curing your finished candle. Whether you're picking up candle making as a hobby or testing the waters before starting a small business, this step-by-step breakdown gives you a clear path from raw wax to a candle worth lighting.
What to know before you start
Before you start learning how to make coconut wax candles, it helps to understand what makes coconut wax distinct from paraffin or soy. Coconut wax is noticeably softer than most wax types, which means it behaves differently during the pour and cooling process. Going in with a clear picture of the material saves you from a batch of ruined candles and a lot of frustration.
Why coconut wax behaves differently
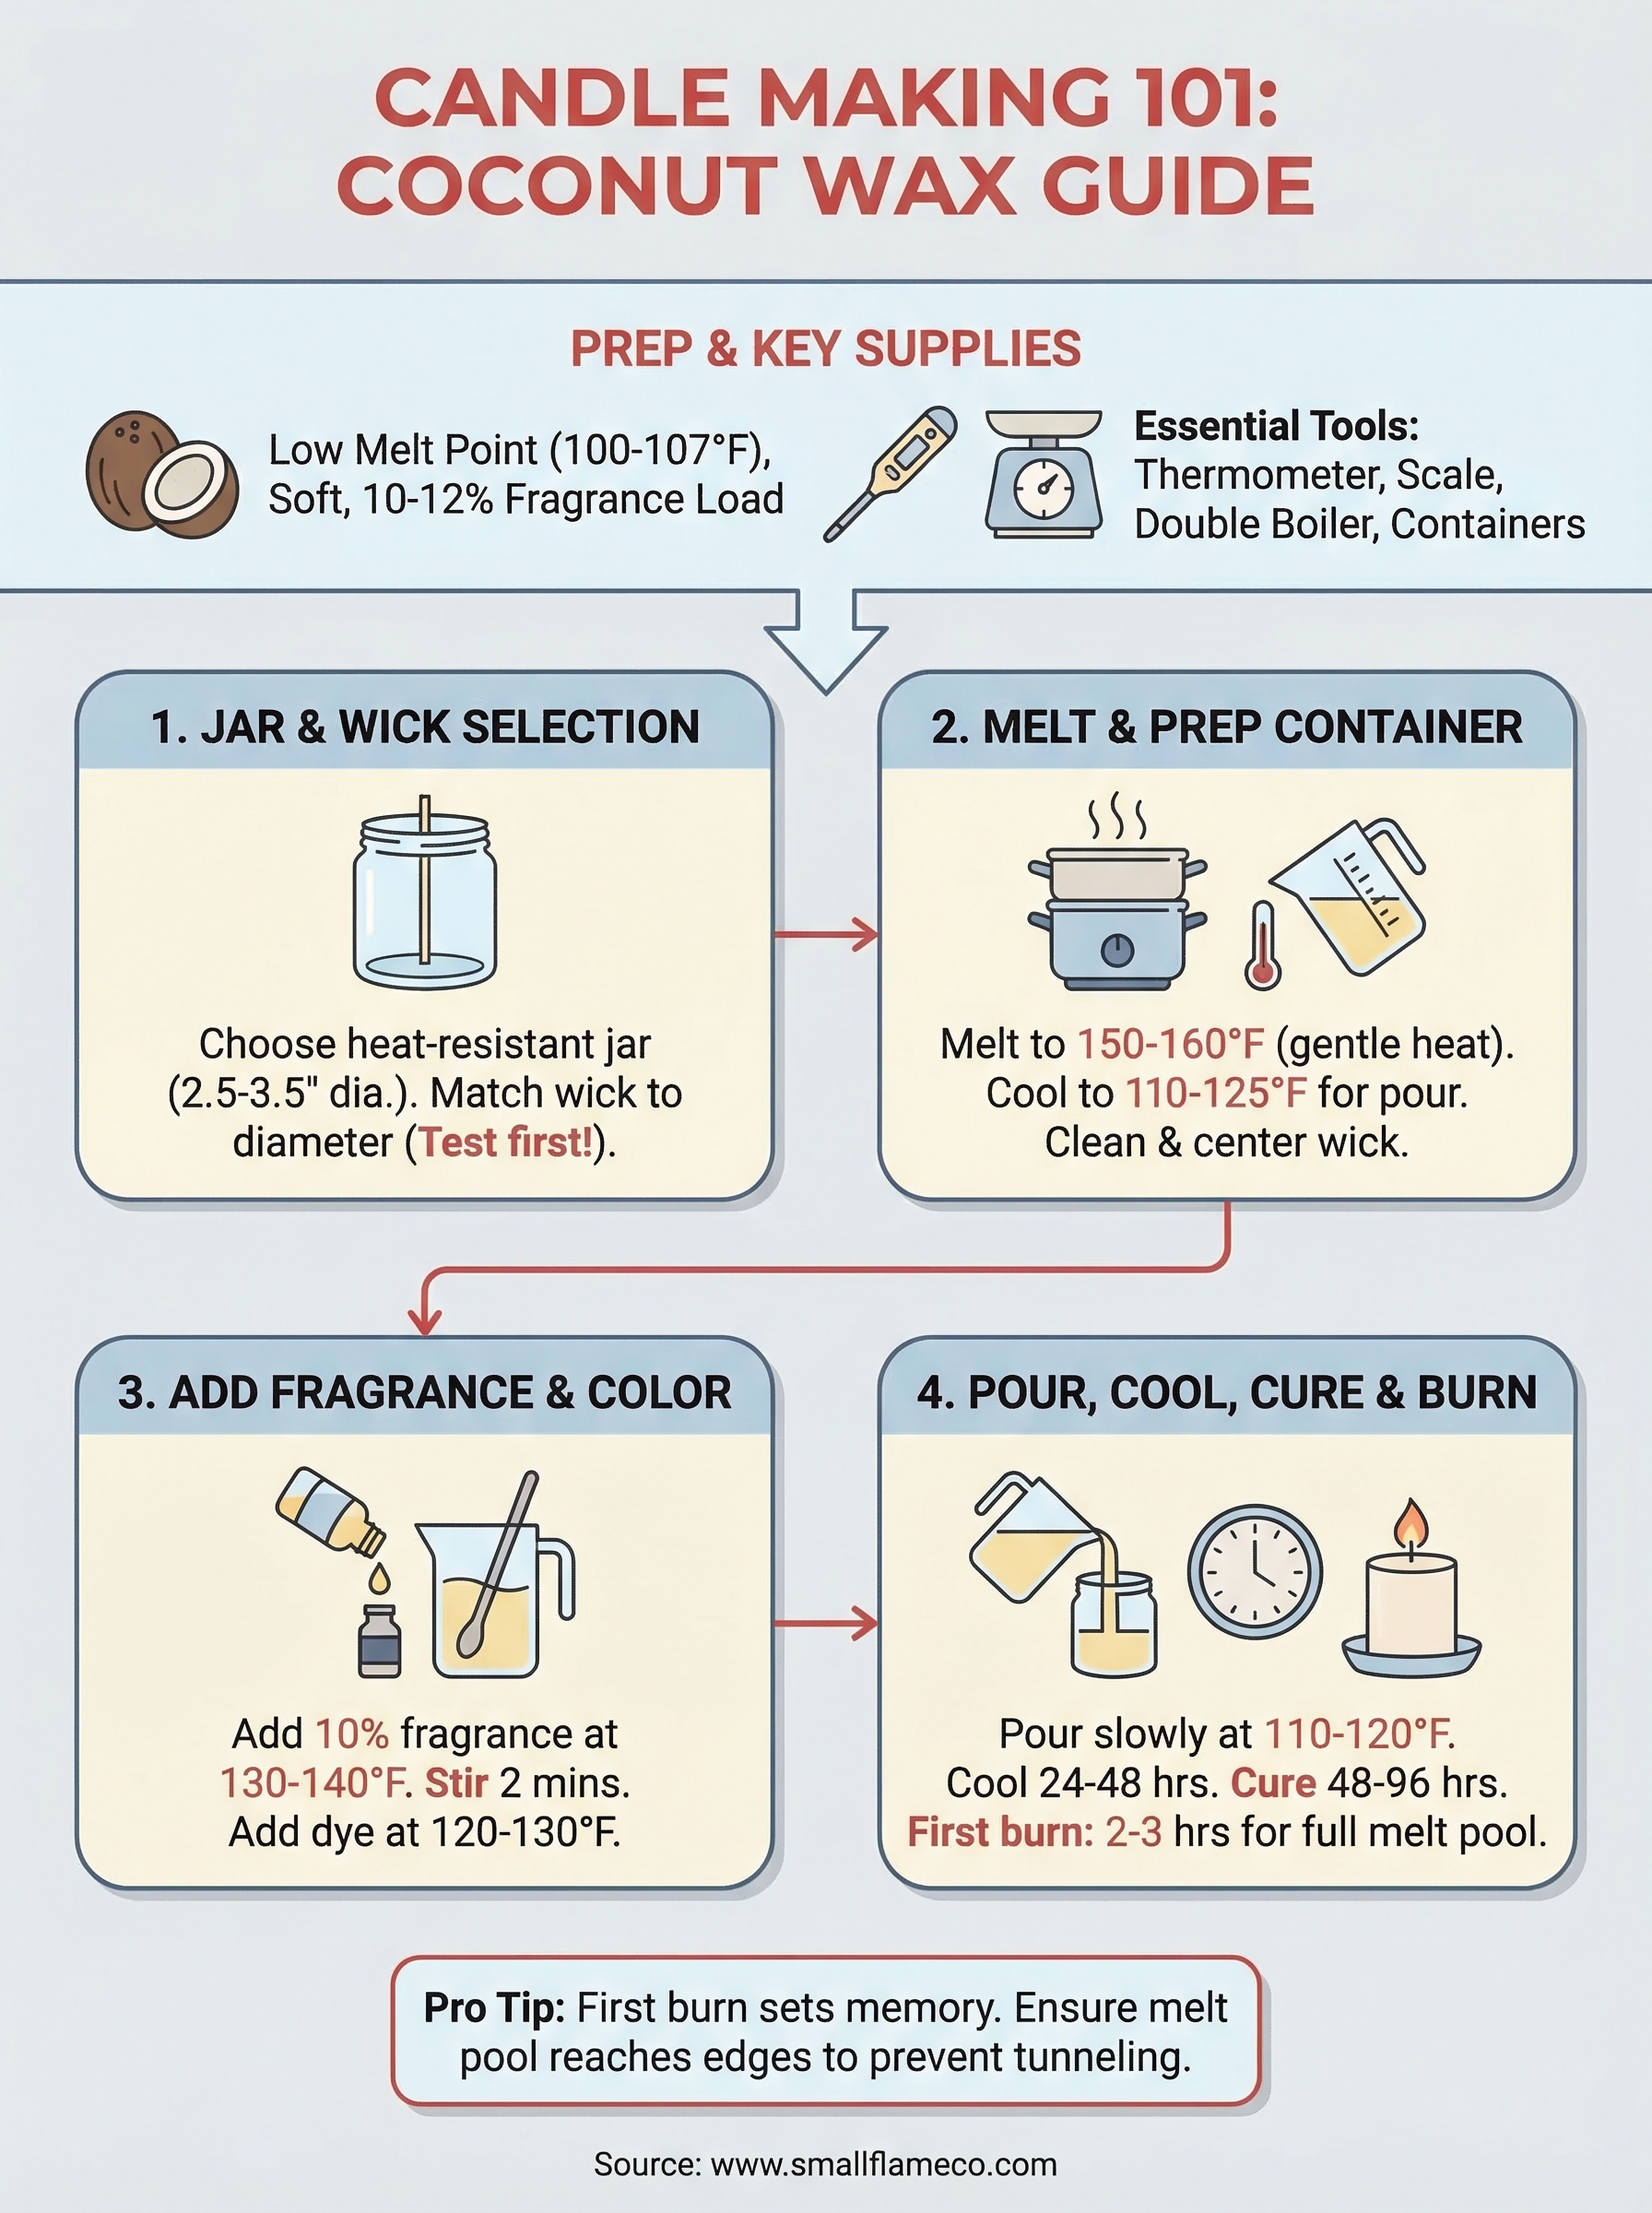
Coconut wax has a low melting point, typically between 100°F and 107°F (38°C to 42°C), which is significantly lower than paraffin (around 130°F to 150°F). That soft structure is what gives coconut wax candles their creamy texture and smooth tops, but it also means the wax is more sensitive to temperature swings during and after the pour. If your room is cold or drafty, your candle surface can crack or pit even with a technically correct pour.
Coconut wax holds fragrance exceptionally well, with a typical load capacity of 10% to 12% by weight, which is higher than most soy wax formulas.
Because coconut wax is so soft, it is almost always sold as a blend rather than 100% pure. A common formulation mixes coconut wax with a small percentage of paraffin or beeswax to improve structure and help the candle hold its shape in warmer rooms. If you purchase a pre-blended coconut wax, check the blend ratio on the product listing before you buy so you know exactly what you are working with.
Supplies you need before your first pour
Getting your supplies organized before you start saves time and prevents mid-pour scrambling that leads to mistakes. Every item on the list below plays a direct role in your results, so avoid skipping or substituting anything until you have a few successful batches behind you.
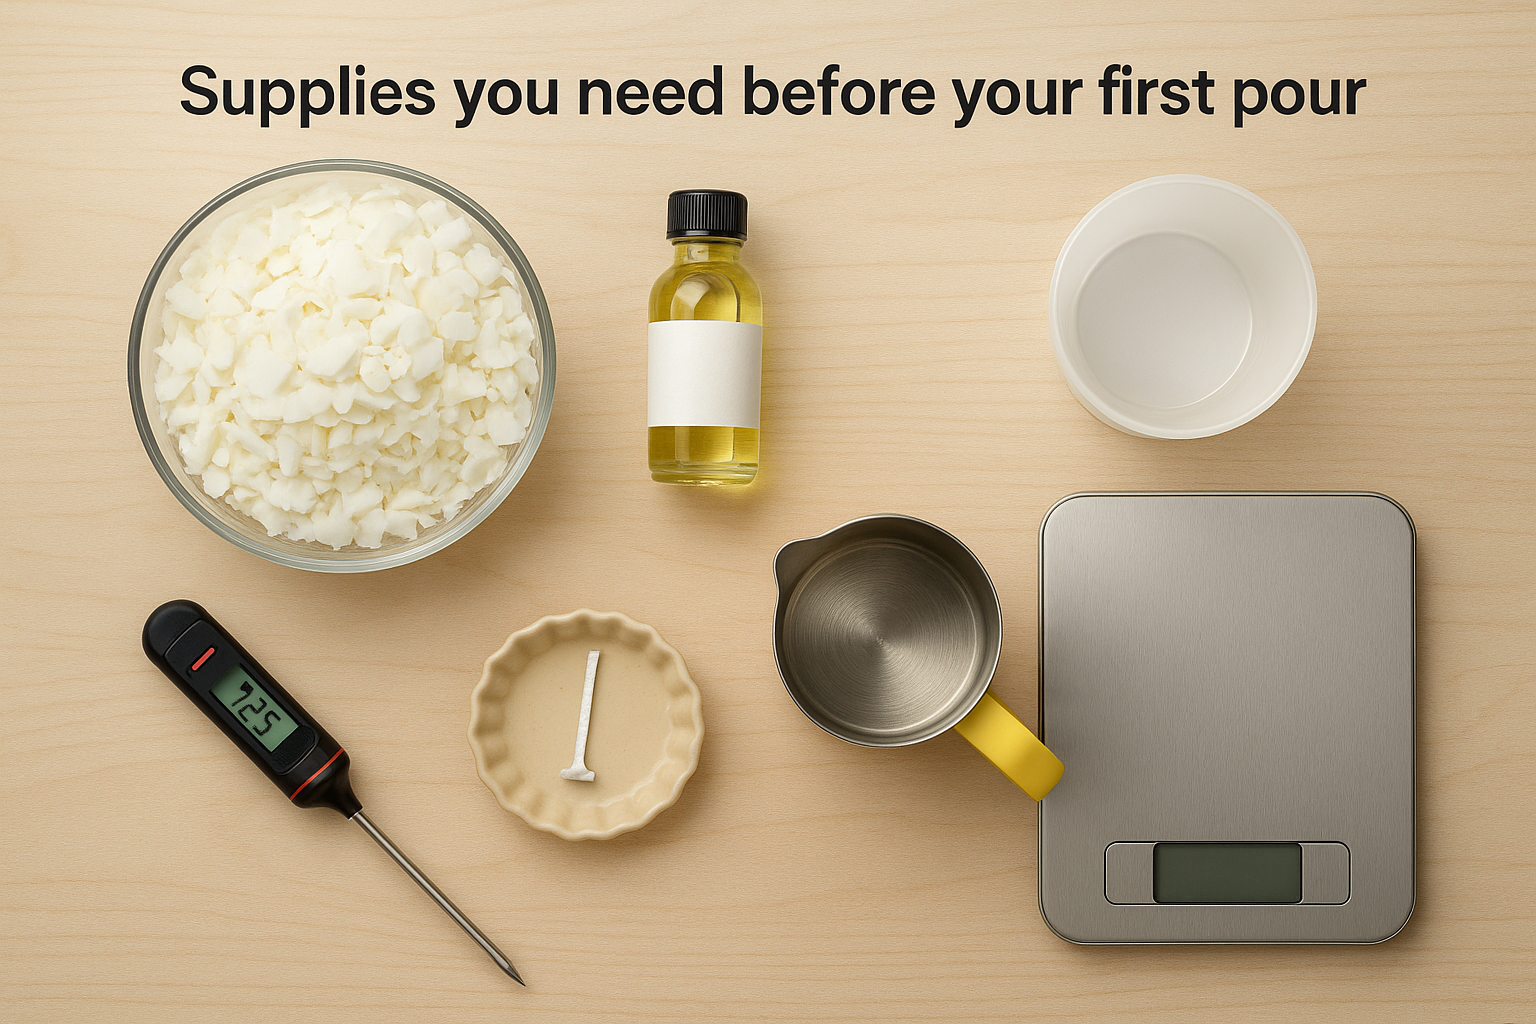
| Supply | Details |
|---|---|
| Coconut wax or blend | 400g to 500g covers a standard 8 oz jar |
| Fragrance oil | Candle-rated, not essential oil |
| Pre-tabbed wicks | Cotton or wood, sized to your container diameter |
| Double boiler or pouring pitcher | Heat-safe, used inside a pot of simmering water |
| Digital kitchen thermometer | Accurate to 1°F minimum |
| Kitchen scale | Measures in grams |
| Wick centering tool | Or two pencils taped across the container |
| Containers | Heat-resistant glass or tin |
| Isopropyl alcohol | For cleanup |
You do not need expensive equipment to get a quality result. [A digital thermometer and a gram-accurate kitchen scale](https://www.smallflameco.com/s/stories/candle-making-supplies-near-me) are the two tools that have the most direct impact on your candle's performance. Everything else on the list is inexpensive or something you likely already own.
Temperature and fragrance load basics
Two numbers matter most when you work with coconut wax: your pour temperature and your fragrance load percentage. Pour temperature for coconut wax typically falls between 110°F and 125°F. Pouring too hot causes sinkholes and poor adhesion to the container walls. Pouring too cold causes the wax to seize before it settles evenly, leaving a lumpy surface.
Your fragrance load should sit at 10% of your total wax weight. For a 400g batch of wax, that equals 40g of fragrance oil. Going above 12% risks fragrance pooling or separation on the surface. Going below 8% produces a candle with weak scent throw that underdelivers on the first burn.
Step 1. Choose the right jar and wick
Your container and wick choices have more impact on your candle's performance than almost any other variable. A jar that's too wide or made from the wrong material can crack under heat, and an undersized wick will cause tunneling and a weak melt pool no matter how well you execute every other step in learning how to make coconut wax candles.
Pick a container that works with coconut wax
Coconut wax burns at a lower temperature than paraffin, but your container still needs to handle sustained heat through multiple burn cycles. Heat-resistant glass and metal tins are the two safest choices. Straight-sided glass jars, mason jars, and standard candle tins all work reliably. Avoid ceramic containers without a heat-rated glaze and never use plastic of any kind.
Container diameter matters more than height when it comes to wick sizing, because the melt pool needs to reach the jar walls within two to three hours of the first burn.
Stick with containers between 2.5 and 3.5 inches in diameter for your first batch. That range is the most forgiving for wick selection and gives you consistent, predictable results as you work through your process. A standard 8 oz straight-sided glass jar sits right in that range and is easy to source.
Match your wick to the container diameter
Wick sizing is where most beginners run into trouble. Each wick series is designed for a specific wax type and diameter range, so a wick that performs well in soy will often underperform in a coconut blend. Cotton wicks work reliably across most coconut wax formulas. Wood wicks produce a wider melt pool and pair particularly well with coconut wax, but they require more precise sizing to avoid flameout or excessive soot.
Use the table below as your starting reference for cotton wicks in coconut wax blends:
| Container Diameter | Recommended Cotton Wick |
|---|---|
| 2.0 to 2.5 inches | CD-12 or ECO-6 |
| 2.5 to 3.0 inches | CD-16 or ECO-10 |
| 3.0 to 3.5 inches | CD-20 or ECO-14 |
Always test your wick before committing to a full batch. Light your test candle, let it burn for two to three hours, and check that the melt pool reaches the jar wall. If the wick mushrooms or produces black soot, size down one step. If the melt pool stays narrow and doesn't reach the edges, size up.
Step 2. Melt the wax and set up the container
With your jar and wick selected, the next step in learning how to make coconut wax candles is melting the wax without overheating it. Coconut wax is heat-sensitive, and pushing the temperature above 180°F risks degrading the wax structure and reducing its ability to bind with fragrance later. Keep your heat source low and controlled from the start, and the rest of this step stays straightforward.
Set up your double boiler correctly
A double boiler setup protects the wax from direct heat, which matters because coconut wax scorches easily at high temperatures. Fill a medium saucepan with two to three inches of water and set it over medium-low heat. Place your heat-safe pouring pitcher or metal bowl inside the pot, making sure the bottom clears the water surface so the wax heats from steam, not direct contact.
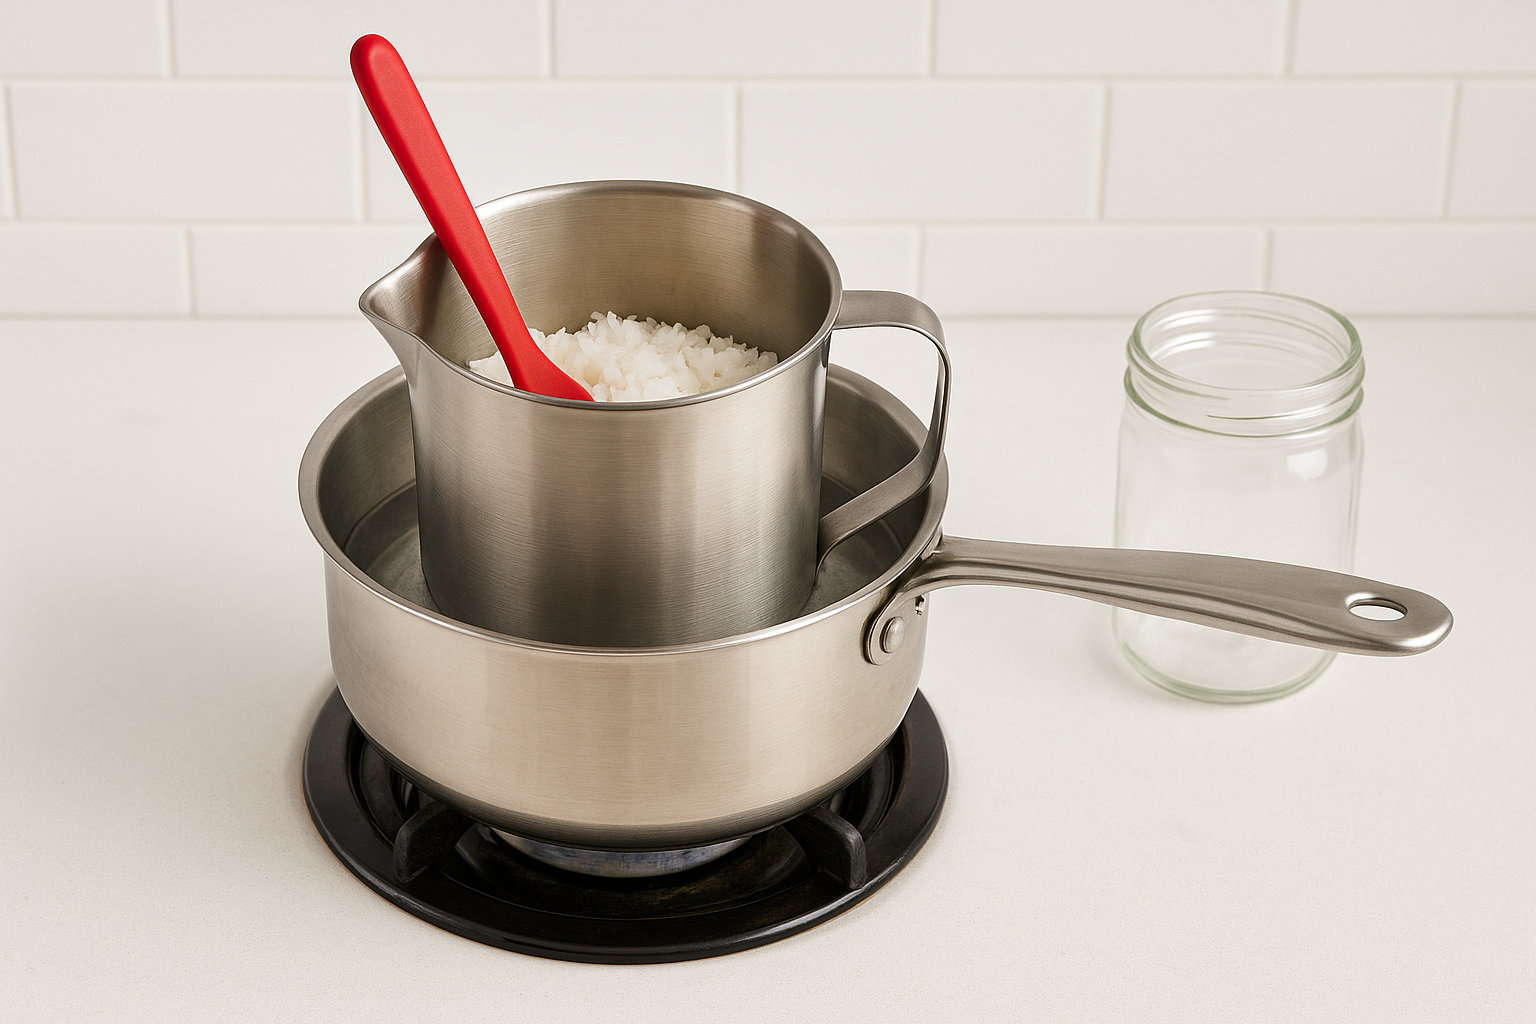
Never melt candle wax directly in a pan over a burner. Direct heat causes uneven temperature spikes that are hard to control and create a genuine fire risk.
Add your measured wax to the pitcher and stir gently every few minutes as it melts. Target a melt temperature of 150°F to 160°F for coconut wax, then remove the pitcher from heat once the wax is fully liquid. Let the temperature drop to your pour range of 110°F to 125°F before you add fragrance in the next step.
Prep your container while the wax melts
While the wax heats up, use the time to set up your container and secure your wick. Wipe the inside of your jar with a clean cloth to remove any dust or moisture. Moisture inside the jar is one of the most common causes of adhesion problems and uneven burn surfaces, so don't skip this.
Thread your pre-tabbed wick through your centering tool and position it over the jar so the metal tab sits flat on the bottom. If you're using two pencils taped across the top, thread the wick between them and pull it snug. A centered wick that sits straight produces a level melt pool and prevents the flame from burning closer to one side of the jar. Your container should be fully ready before the wax reaches pour temperature so you are not rushing the setup when timing matters most.
Step 3. Add fragrance and color the right way
This is the step in learning how to make coconut wax candles where most batches either succeed or fall apart. Adding fragrance at the wrong temperature or eyeballing your measurements instead of weighing them are the two mistakes that produce weak scent throw, fragrance separation, and oily pools on your finished candle's surface. Precision in this step pays off in every single burn.
Measure and add fragrance oil at the right temperature
Wait until your melted wax cools to between 130°F and 140°F before you add fragrance oil. At this temperature, the wax is still fully liquid and accepts fragrance well, but cool enough to avoid burning off the volatile top notes that give your scent its character. Pouring fragrance into wax above 150°F is one of the most common reasons finished candles smell flat despite using a quality fragrance oil.
Weigh your fragrance oil on your gram scale rather than measuring by volume. A 10% fragrance load on a 400g wax batch means exactly 40g of fragrance oil, and a kitchen scale gets you there accurately every time.
Use a candle-rated fragrance oil, not an essential oil. Essential oils evaporate quickly at candle temperatures and deliver inconsistent scent throw. Once you have your measured fragrance ready, pour it into the wax slowly and stir for two full minutes. A slow, consistent stir binds the fragrance into the wax rather than leaving it suspended near the surface where it can pool.
Add color without wrecking the wax
Candle dye chips and liquid candle dye are the two reliable options for coloring coconut wax. Avoid crayons and craft store paints because their pigments clog wicks and cause uneven burns. Add your colorant after the fragrance is fully incorporated, while the wax temperature stays between 120°F and 130°F.
Start with less color than you think you need. A single dye chip colors roughly 1 pound of wax. For a pastel tone, cut that chip in half. Stir the color in for one full minute and check the shade against a white piece of paper, since the wax will appear lighter once it solidifies. Build the color up gradually rather than adding too much at once and trying to dilute it back down.
Step 4. Pour, cool, cure, and do the first burn
The final steps in how to make coconut wax candles are where your earlier preparation either pays off or reveals gaps. Pouring at the right temperature and giving the candle enough cure time before you light it are the two decisions that determine whether you get a clean melt pool and strong scent throw, or a tunneled candle that underperforms from the first burn.
Pour slowly and avoid disturbance
Pour your wax into the prepared container in a slow, steady stream aimed at the center of the jar. Pouring too fast traps air bubbles that leave small craters on the surface once the wax cools. Keep your pour temperature between 110°F and 120°F for coconut wax blends, and fill the container to about half an inch below the rim. That gap gives the wax room to settle and prevents overflow during the melt pool stage.
Once you pour, set the candle on a flat, level surface in a room-temperature space, away from drafts, air vents, and windows. Moving the candle before it fully sets causes sinkholes and uneven surfaces.
Let it cool and cure fully
Coconut wax needs 24 to 48 hours to cool completely at room temperature. Resist the urge to speed up the process in a refrigerator or freezer. Rapid cooling causes the wax to contract too quickly, which pulls it away from the container walls and cracks the surface. Once the candle is solid and at room temperature, trim the wick to 1/4 inch and move into the cure phase.
Curing means waiting before you burn. A coconut wax candle needs at least 48 hours of cure time after reaching room temperature, though 72 to 96 hours produces a noticeably stronger scent throw. During curing, the fragrance oil finishes binding into the wax structure. Cutting cure time short is the single most common reason homemade candles smell weak on the first burn.
Do the first burn right
Your first burn sets the memory of the wax. Burn the candle for two to three hours on the first use so the melt pool reaches the edge of the container before you extinguish it. Stopping short causes permanent tunneling on every subsequent burn. Before you light, run through this quick checklist:

- Wick trimmed to 1/4 inch
- Candle placed on a heat-safe, level surface
- No flammable material within 12 inches
- Room free of strong drafts that could destabilize the flame
Fix common coconut wax candle problems
Even when you follow the steps in how to make coconut wax candles closely, problems can still surface on your first few batches. Most issues trace back to a small number of variables: temperature, fragrance load, or wick size. Identifying the symptom tells you exactly which variable to adjust before your next pour.
Sinkholes and cracked surfaces
Sinkholes form when the wax contracts unevenly during cooling, pulling the center down and leaving a pit around the wick. Cracked surfaces happen for the same core reason: the outer wax solidifies before the inner mass, and the tension splits the top. Both problems are more common with coconut wax than harder waxes because its low melting point makes it especially sensitive to temperature fluctuations in the room.
If your room temperature drops below 65°F while the candle cools, move future pours to a warmer space or insulate the candle loosely with a folded towel to slow surface cooling.
Fix sinkholes by pouring a small top-off layer of remelted wax once the first pour fully sets. Heat your reserved wax to around 115°F and pour just enough to fill the divot. A cracked surface usually means your pour temperature was too high, so drop your next pour temperature by 5°F and check whether the problem resolves.
Weak scent throw
If your candle smells faint during burning, three causes cover the majority of cases: fragrance added too hot, fragrance load below 8%, or insufficient cure time. Check your process notes against each one before you adjust your formula.
| Problem | Likely cause | Fix |
|---|---|---|
| Faint cold throw | Fragrance added above 150°F | Add fragrance at 130°F to 140°F |
| Faint hot throw | Fragrance load too low | Increase to 10% by weight |
| Weak on first burn | Cure time under 48 hours | Wait 72 to 96 hours before burning |
Tunneling and drowning wicks
Tunneling means your wick is too small for the container diameter, and the melt pool never reaches the jar walls. A drowning wick means the opposite: the melt pool is too deep and the flame pulls wax faster than it can burn. Size your wick up one step to fix tunneling, and size down to fix a drowning or sooty flame.
Always run a dedicated test burn of two to three hours before committing to a full batch. Record the wick series, container size, and burn results in a simple log so you build a reference you can rely on for every future pour.
Final checks before you light it
Now that you know how to make coconut wax candles from start to finish, a quick pre-light check protects everything you put into the process. Trim your wick to exactly 1/4 inch before every burn, not just the first. A wick that's too long produces excess soot and a flame that burns through wax faster than the melt pool can sustain, which shortens your candle's total burn time significantly.
Run through this checklist before lighting your finished candle:
- Wick trimmed to 1/4 inch
- Candle fully cured (72 to 96 hours minimum)
- Container placed on a heat-safe, level surface
- No flammable material within 12 inches of the flame
Your candle is ready to use once it clears every point above. If you want to see what a well-crafted coconut wax candle delivers without the DIY process, browse the hand-poured coconut wax candles at Small Flame Candle Company and find a scent worth burning.