
How To Prevent Candle Tunneling (And Fix It) Every Time
You lit your favorite candle, walked away, and came back to find a narrow hole burning straight down the middle, wax clinging to the sides like it forgot what its job was. That ring of untouched wax isn't just frustrating; it's wasted money and lost burn time. If you've ever searched how to prevent candle tunneling, you already know the problem cuts deeper (literally) than it looks.
Tunneling happens for specific, fixable reasons. The good news is that a few simple habits can stop it before it starts, and if your candle has already tunneled, there are reliable ways to rescue it. We pour every candle at Small Flame Candle Company by hand and test burn times obsessively, so we've seen what works and what doesn't firsthand.
This guide covers why candles tunnel, the maintenance steps that prevent it, and proven fixes like the aluminum foil method to reclaim wax you thought was gone for good. No guesswork, just what actually works.
What candle tunneling is and why it happens
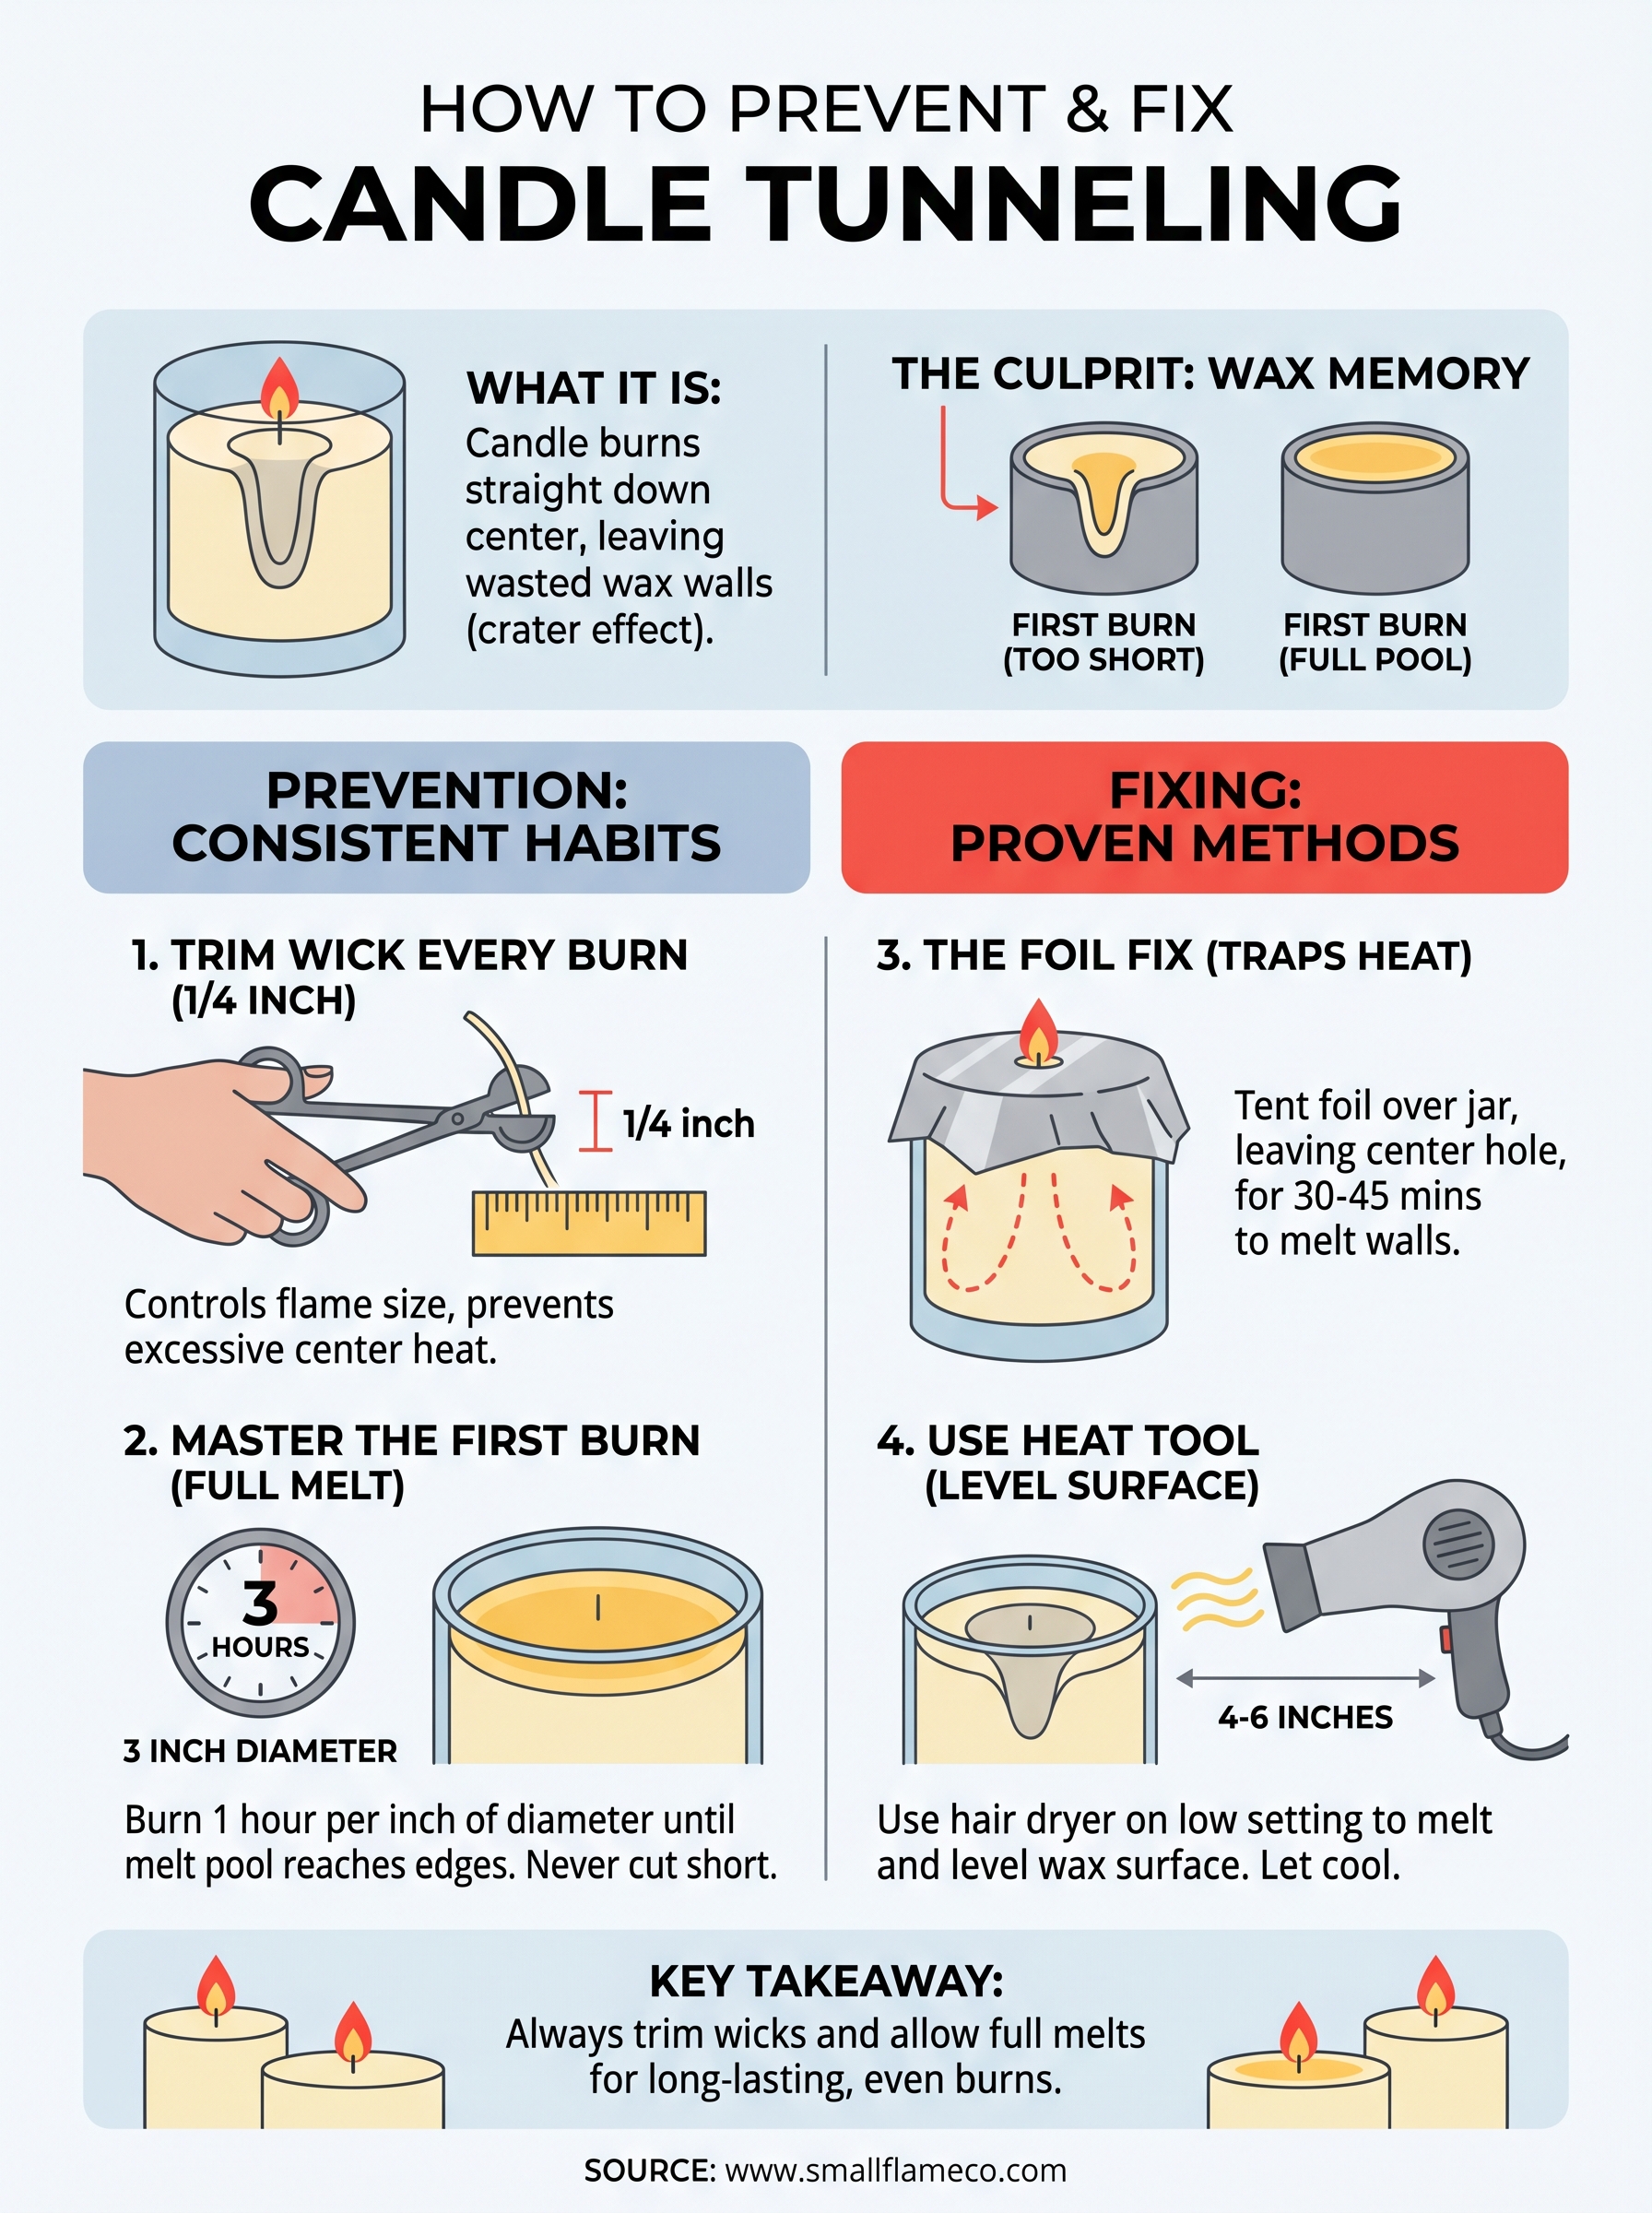
Candle tunneling is what happens when a candle burns straight down through its center, leaving a thick wall of unused wax around the edges. Instead of a clean, level melt pool, you get a crater. That wasted wax on the sides is fragrance you paid for and never got to enjoy. Understanding what causes it is the first real step toward knowing how to prevent candle tunneling before it ever starts.
How wax memory works against you
Candle wax has a physical property that most people don't know about: wax memory. The first time you burn a candle, the wax melts out to a certain diameter and then solidifies at that diameter when you extinguish the flame. Every subsequent burn, the candle tends to follow that same melt boundary. If your first burn is too short and the melt pool only reaches halfway to the edge, that shallow ring becomes the permanent pattern for every burn after it.
The first burn sets the melt boundary your candle will follow for its entire life, so getting it right once matters more than any fix later.
The conditions that make tunneling worse
A few specific habits speed up tunneling once it starts. Burn time is the biggest factor: cutting a burn session short before the wax melts edge to edge locks in a narrower melt pool each time. Wick condition plays a large role too. A wick that is too short struggles to generate enough heat to pull wax from the outer edges, so it takes the path of least resistance straight down. Drafts from open windows or air vents also push the flame sideways, creating uneven heat distribution across the surface. Cold wax temperatures before you light the candle can compound all of these problems at once.
Step 1. Prep your candle for an even burn
Preparation before you light the candle matters more than most people realize. Two quick steps taken before every burn lay the groundwork for an even melt pool and directly address how to prevent candle tunneling from becoming a repeated problem.
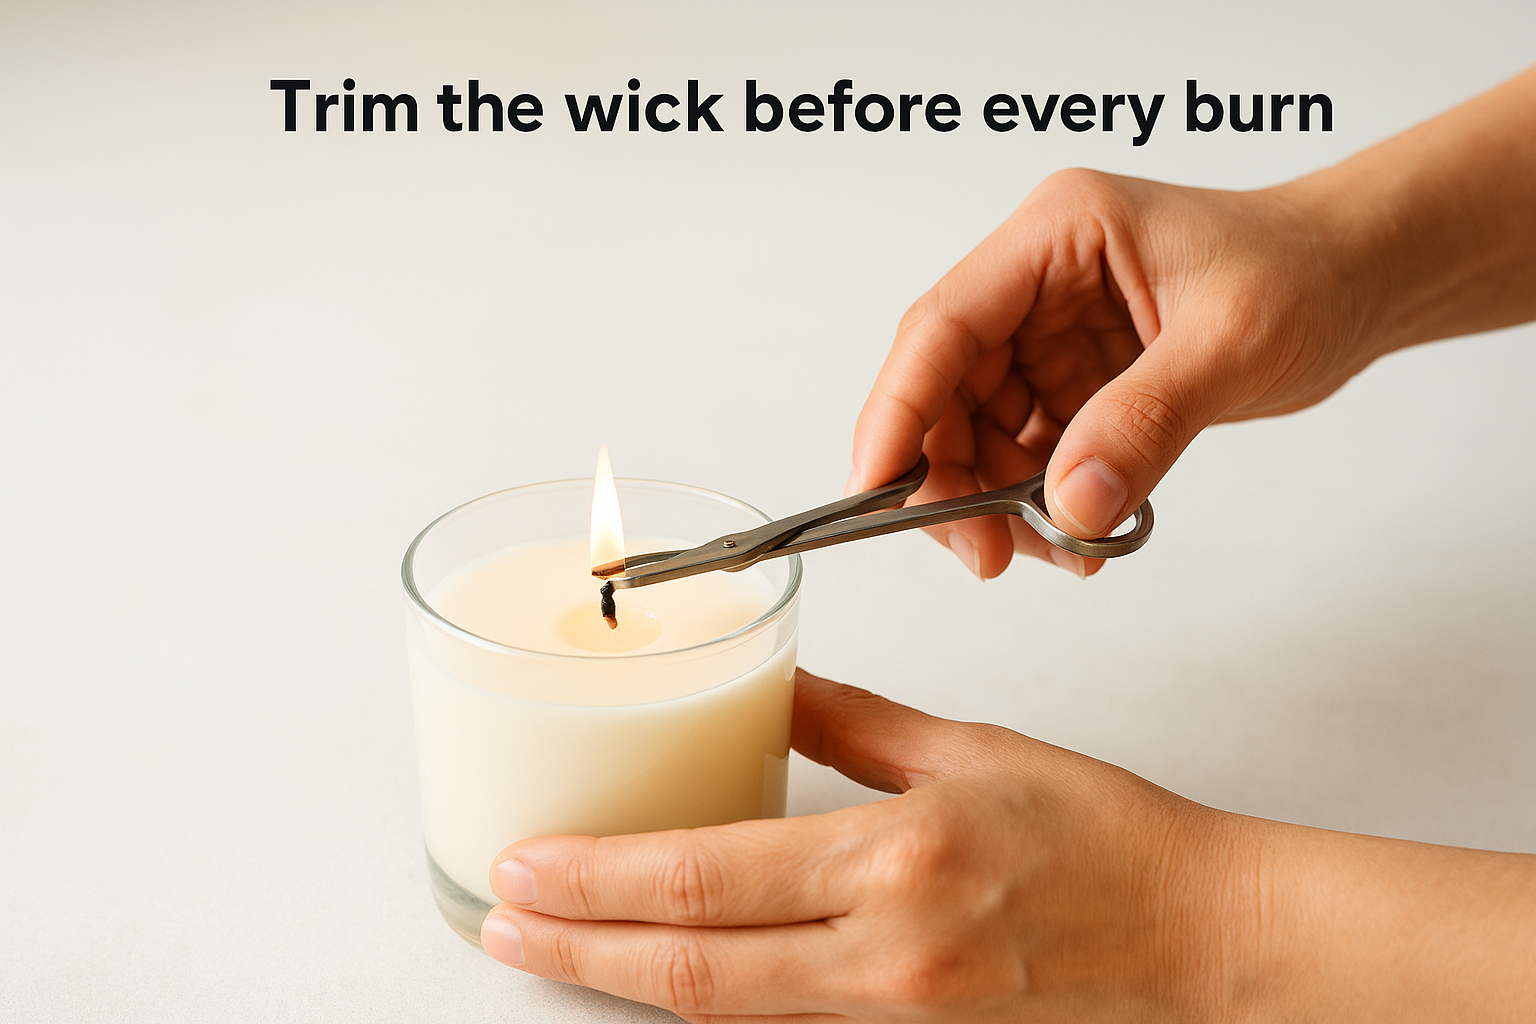
Trim the wick before every burn
Wick length controls how much heat your candle generates. A wick longer than 1/4 inch produces a flame that is too large, burns hotter in the center, and pulls wax down rather than outward. Trim the wick to 1/4 inch before every single burn using wick trimmers or clean nail scissors, and remove any trimmed debris from the wax before you light.
- Wick too long (over 1/4 inch): oversized flame, excessive heat, faster tunneling
- Wick too short (under 1/8 inch): weak flame, poor melt pool spread, also causes tunneling
- Wick just right (1/4 inch): steady flame, even heat distribution across the surface
A properly trimmed wick is the single easiest maintenance step you can take to protect your candle from tunneling on every burn.
Let the candle reach room temperature first
Cold wax resists melting at the edges, giving the flame little choice but to burn straight down before the outer wax catches up. If your candle has been sitting in a cool space or near an air vent, let it sit at room temperature for at least 30 minutes before lighting it.
Step 2. Master the first burn and avoid short burns
The first burn is the most important burn your candle will ever have. Wax memory locks in the melt boundary from that first session, so giving it enough time to melt fully across the surface sets a healthy pattern for every burn after it. This single session is your most direct tool for how to prevent candle tunneling from the start.
How long your first burn should last
Plan your first burn around candle diameter, not your schedule. Allow one hour of burn time per inch of diameter as your baseline. A 3-inch jar candle needs at least three hours to reach a full, edge-to-edge melt pool before you extinguish the flame.
| Candle diameter | Minimum first burn time |
|---|---|
| 2 inches | 2 hours |
| 3 inches | 3 hours |
| 4 inches | 4 hours |
Never extinguish a candle before the melt pool reaches the container's edge, especially on the first burn.
Keep every burn long enough to matter
Short burns cause cumulative tunneling damage over time. Each session where the wax doesn't melt fully to the edge reinforces a narrower melt pool pattern. Aim for a minimum of two hours per burn, and confirm the melt pool reaches the jar's wall before you blow out the flame.
Before you extinguish the candle, check these two things:
- The melt pool touches the container's edge on all sides
- At least two hours have passed since you lit the wick
Step 3. Fix tunneling with the foil method
If your candle has already developed a tunnel, the aluminum foil method is the most reliable fix available. The technique works by trapping heat around the top of the candle, forcing the temperature to rise enough to melt the wax walls and level the surface. This is the approach most people searching for how to prevent candle tunneling wish they had known about sooner.
What you need
You only need two things: standard aluminum foil and a lit candle with an existing tunnel. Tear off a piece large enough to fold over and fully cover the jar's top opening, with a few extra inches on each side so you can shape a tent over it.
- Standard aluminum foil (any kitchen roll works)
- Oven mitts or a folded towel for safe removal
- A candle with a visible tunnel and a trimmed wick
How to apply the foil fix
Light the candle first, then loosely tent the foil over the jar opening, leaving a small hole in the center directly above the wick so the flame gets enough oxygen to stay lit. Let it burn for 30 to 45 minutes.
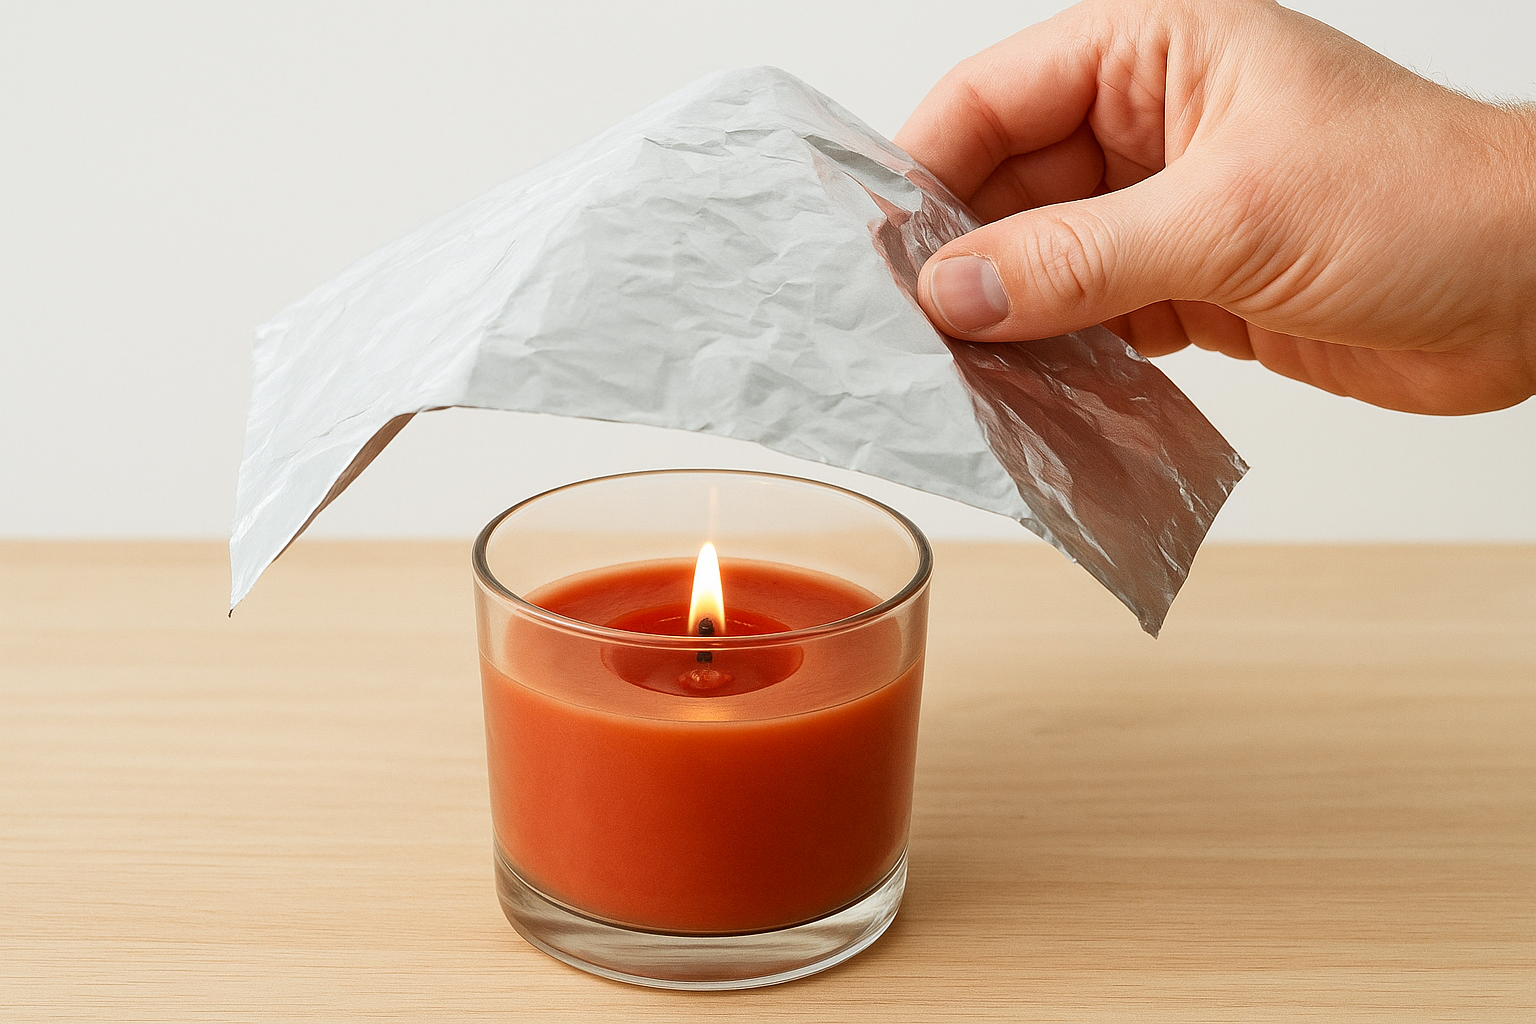
The foil tent redirects heat inward, melting the wax walls without overpowering the flame or creating a fire hazard.
Check the surface every 15 minutes. Once the wax has melted fully to the container's edge, carefully remove the foil using oven mitts and let the candle finish its burn normally.
Step 4. Fix tunneling without foil and troubleshoot issues
Foil is not always on hand, and some candles are too wide for a simple tent to work well. Two alternative methods can rescue a tunneled candle without any foil, and fixing the underlying cause is just as important as leveling the surface if you want to understand how to prevent candle tunneling from coming back.
Use a heat gun or hair dryer to melt the surface
A heat gun or hair dryer on a low setting lets you target raised wax walls directly. Hold the dryer 4 to 6 inches above the surface and move it in slow circles until the wax levels out. Once the surface is flat and liquid, let the candle cool completely before you relight it. Do not pour off the melted wax; let it resettle on its own so the wick stays centered.
Pouring off excess wax looks like a quick fix but removes wax your candle still needs to burn correctly.
Troubleshoot a wick that keeps drowning
When a wick gets buried under pooled wax, it cannot generate enough heat to stop tunneling on the next burn. Use a toothpick or skewer to carefully prop the wick upright before the wax hardens. If the wick repeatedly drowns, your candle's wick may be undersized for its container diameter, a manufacturing issue no surface fix can fully correct.
Keep your candles burning evenly
Knowing how to prevent candle tunneling comes down to a handful of consistent habits: trim the wick to 1/4 inch before every burn, give your candle enough time to reach a full edge-to-edge melt pool, and never cut a burn session short before the wax has leveled all the way out. When tunneling does appear, the foil method and a heat gun both give you real options to recover the wax and reset the surface before the damage compounds further.
These habits apply to every candle you own, but they matter most with quality wax. Hand-poured candles made with a premium coconut-soy wax blend reward the small effort you put into burning them correctly with longer burn times and a noticeably stronger scent throw throughout the room. If you want candles built to burn evenly from the very first light, browse the Small Flame Candle Co. coconut wax collection for clean-burning, toxin-free options in a wide range of scents.