
How To Use Wax Melts: Electric vs. Tealight Warmers Safely
Wax melts are one of the easiest ways to fill a room with fragrance, no open flame required (depending on your warmer). But if you've never used one before, figuring out how to use wax melts can bring up a few questions. How much wax do you put in the dish? Electric or tealight warmer, does it matter? And what do you do with the wax once the scent is gone?
At Small Flame Candle Company, we spend our days surrounded by fragrance. We hand-pour our own candles and carry a range of wax warmers, from Edison bulb illumination warmers to fan-powered and decorative ArtScents models. So walking people through the best way to get the most from their wax melts is something we do regularly, both in conversation and in practice.
This guide covers everything you need to get started: choosing between electric and tealight warmers, using wax melts step by step, staying safe while they're running, and swapping out old wax when the scent fades. Whether you just picked up your first warmer or you're troubleshooting a setup you've had for a while, you'll find straightforward answers below.
Wax melts basics and the right supplies
Wax melts are small, wickless pieces of scented wax designed to be slowly heated in a warmer until they release their fragrance into the air. Unlike candles, the wax doesn't burn away. It stays in the dish throughout the session, and only the scent molecules evaporate as the wax heats up. That's why you eventually end up with unscented wax that needs to be swapped out.
What wax melts actually are
Knowing how to use wax melts correctly starts with understanding what you're actually working with. Most wax melts come in clamshell packs, individual cubes, or shaped bars. Each piece is essentially a single-use fragrance unit, though some people split larger pieces in half when they want a lighter scent throw in a smaller room. The wax itself is typically made from paraffin, soy, or a blend of both. Soy-based melts tend to release fragrance more gradually, while paraffin throws scent harder and faster right from the start.
The wax never disappears or "burns off" - only the fragrance does. Once the scent fades, plain wax is still sitting in the dish, waiting to be removed.
What you need to get started
Only a few basic supplies stand between you and your first melt. The most important piece of equipment is the warmer itself, which we'll break down in the next step. Beyond the warmer, here's what to keep within reach:
- Wax melts in your preferred scent (one or two cubes is enough for most warmers)
- Cotton balls or paper towels for wiping the dish clean between scents
- A spoon or small scraper to help lift cooled wax without scratching the dish
- A stable, flat surface away from curtains, air vents, and anything that could catch heat
Your warmer dish should always be clean and completely dry before you add a new melt. Leftover residue from a previous melt can dilute or muddy the scent of whatever you put in next, especially when two fragrances blend together without intention. A quick wipe-down between each new melt keeps your scent throw sharp and prevents waxy buildup from collecting in the dish over time.
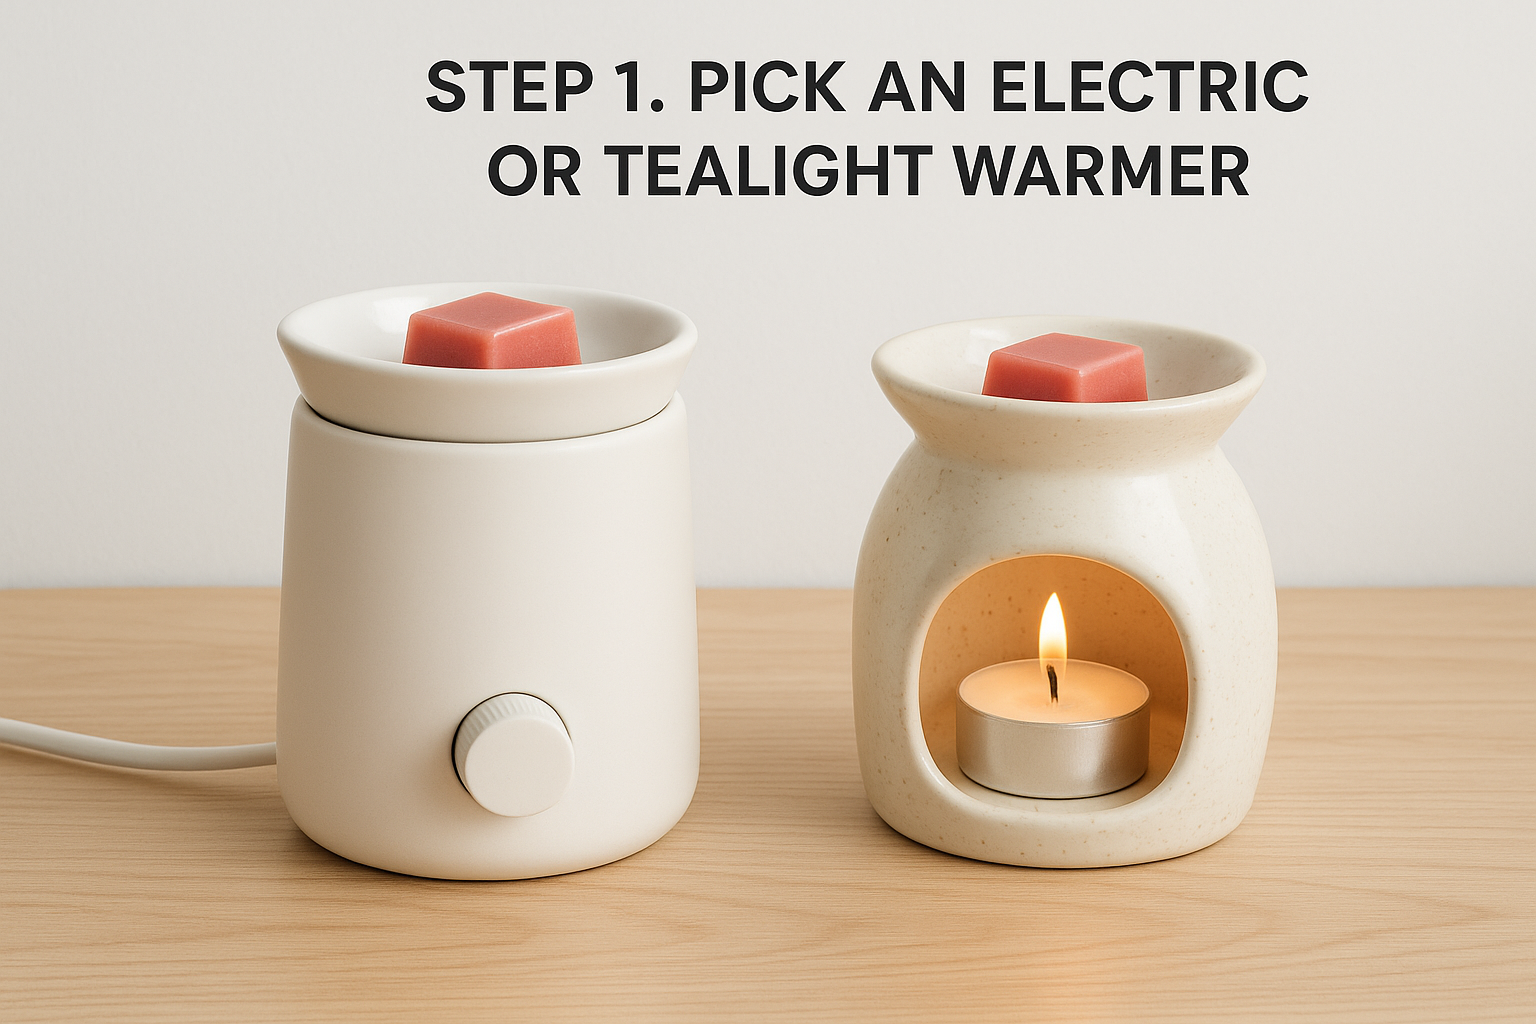
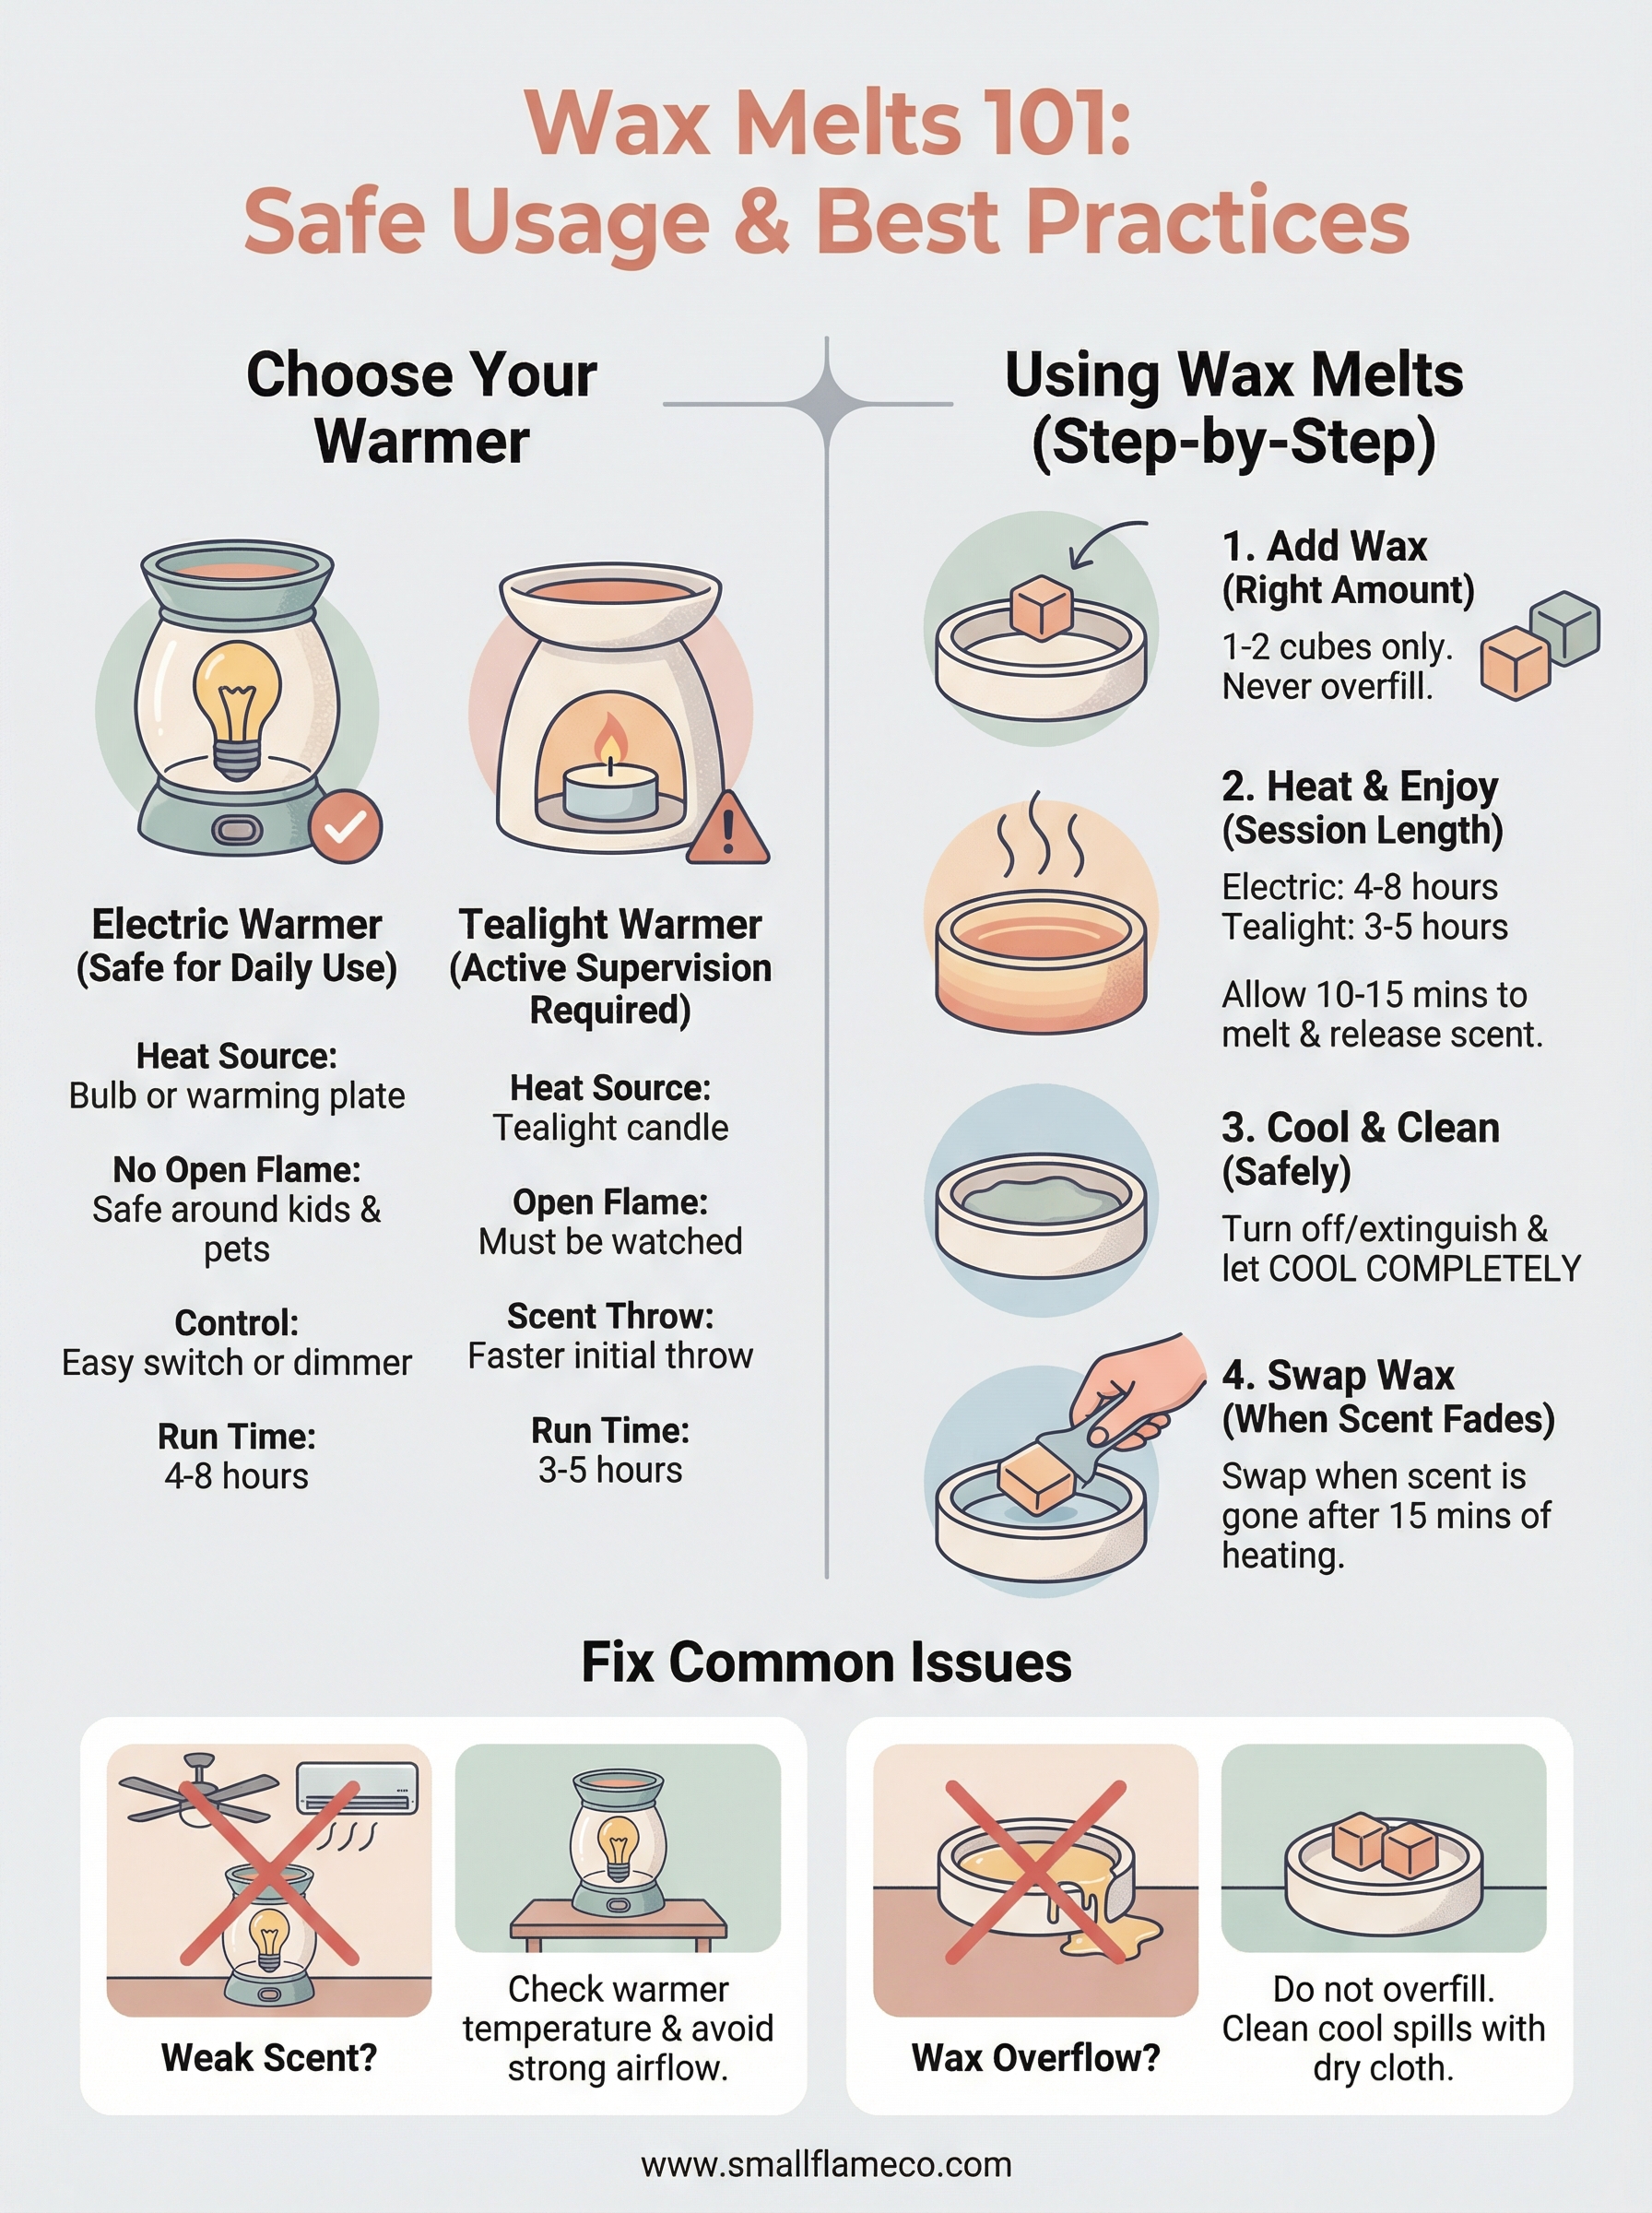
Step 1. Pick an electric or tealight warmer
Knowing which warmer you own is the first real decision in learning how to use wax melts correctly. Electric and tealight warmers both melt scented wax and release fragrance into your space, but they heat wax differently and carry different safety requirements.
| Feature | Electric Warmer | Tealight Warmer |
|---|---|---|
| Heat source | Bulb or warming plate | Tealight candle |
| Open flame | No | Yes |
| Best for | Everyday, unsupervised use | Occasional, supervised use |
| Scent throw speed | Gradual | Faster initial throw |
Electric warmers
Electric warmers use a built-in bulb or heated plate to warm the wax without any open flame. Small Flame Candle Company carries Edison bulb illumination warmers and fan-powered models, which work well for daily use in living rooms, bedrooms, and offices. Here are the main reasons people prefer them:
- No open flame to monitor
- Safe around children and pets
- Easy to control with a simple switch or dimmer
Because there's no flame involved, electric warmers give you the most flexibility about where you place them and how long you run them.
Tealight warmers
Tealight warmers hold a small, unscented tealight candle beneath a ceramic or glass dish, and the flame heats the wax from below. This tends to melt the wax faster than most electric models and delivers a strong initial scent throw right after you light it.
Active supervision is required with this warmer type. Never leave a lit tealight warmer in a room without someone present, and always place it on a stable, non-flammable surface away from curtains or paper.
Step 2. Use wax melts the right way
Once your warmer is in place and ready, the process of how to use wax melts correctly comes down to two things: the right amount of wax and the right session length. Start with one or two cubes in the dish, and never fill it to the brim. Most warmer dishes hold between one and two tablespoons of melted wax, and overfilling leads to spillage once the wax liquefies.
How much wax to add
One cube is the right starting point for most standard warmers. If you want a stronger scent throw in a larger room, such as an open-plan living area over 300 square feet, add a second cube. Avoid mixing more than two different scents at once, since competing fragrances tend to produce a muddled result rather than a pleasant blend.
Less wax in the dish usually produces a cleaner, more accurate scent than overloading the warmer.
How long to run your warmer
Electric warmers can run safely for four to eight hours at a stretch. After that, switch the warmer off and let the wax cool completely before you handle or remove it. Tealight warmers are limited by the candle burn time, which is typically three to five hours for a standard tealight. Never leave either type running overnight or unattended for extended periods.
Follow this routine each time you use your warmer:
- Place one or two cubes in a clean, dry dish.
- Turn on the warmer or light the tealight.
- Allow 10 to 15 minutes for the wax to melt fully and release scent.
- Switch off or extinguish after your session ends.
Step 3. Change the wax and clean up safely
Knowing when and how to swap out your wax is the part of how to use wax melts that most people skip over until they run into trouble. Used wax left sitting in the dish can pick up dust, mix with new scents, and leave a residue that builds up over time. Staying on top of this step keeps your warmer working well and your scent throw clean every session.
Know when to swap the wax
The wax is ready to be replaced when you can no longer detect a noticeable fragrance within 15 minutes of turning your warmer on. The wax will look the same as it always has, so color and clarity are not reliable signals. Scent strength is the only indicator you need to pay attention to.
If the wax has gone completely odorless after a full warm-up cycle, it has nothing left to give and needs to come out.
Remove and clean the dish
Wait until the wax has fully cooled and solidified before you attempt to remove it. Once solid, use a plastic spoon or flexible silicone scraper to lift the wax out in one or two pieces. Avoid metal tools, which can scratch ceramic or glass dishes.
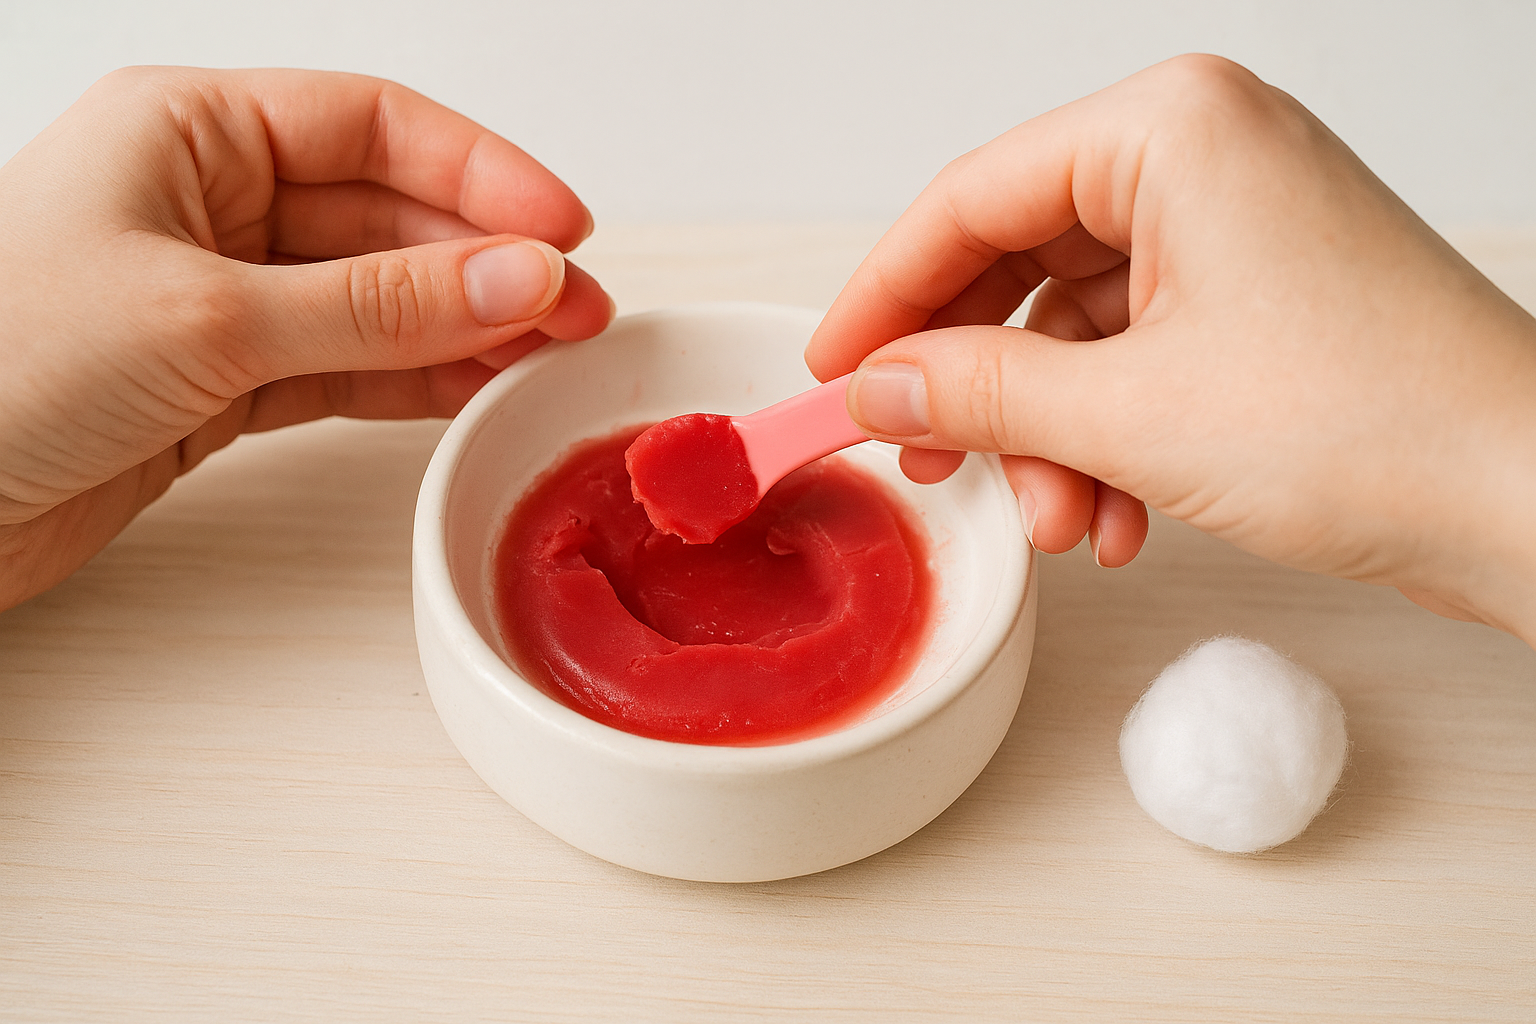
Follow these steps each time you clean the dish:
- Pop out the cooled, solid wax with a scraper or spoon.
- Wipe the dish with a dry cotton ball to lift any remaining thin film.
- Follow with a second cotton ball lightly dampened with warm water if residue remains.
- Dry the dish completely before adding new wax.
Fix common wax melt problems and mistakes
Even when you know how to use wax melts correctly, a few common issues can still come up. Most of them trace back to warmer placement, wax quality, or dish maintenance rather than anything more complicated.
Small adjustments to your setup fix the majority of wax melt problems without needing to replace any equipment.
Scent is weak or disappears too fast
If your wax melts are not throwing scent well, the most likely cause is a warmer that runs too cool or a dish that still carries residue from a previous melt. Start by checking whether your warmer reaches the right temperature: the wax should fully liquefy within 10 to 15 minutes of turning it on. If it takes longer or barely melts, the bulb may need replacing, or the warmer itself is not suited to the size of your room.
You should also think about room airflow when placing your warmer. Setting it directly under an air vent or near a ceiling fan pulls the fragrance out of the space before it settles. Move the warmer to a central location on a stable shelf, away from drafts, for the best results.
Wax overflows or makes a mess
Overfilling the dish is the single most common mistake new users make. More wax does not mean more scent. When you add too much, liquid wax can spill over the edge as it expands with heat. Stick to one or two small cubes per session, and make sure the dish sits completely level before you switch the warmer on.
If wax does spill, let it cool completely before you attempt cleanup. Wipe the surface down with a dry cloth or paper towel, and avoid using water on a warmer that is still warm.
Keep your home fragrance simple and safe
Learning how to use wax melts comes down to a few repeatable habits: the right amount of wax, a clean dish, and a warmer suited to your space. One or two cubes per session, a full cool-down before you swap, and keeping the warmer away from drafts will cover most of what you need to get a consistent, satisfying scent throw every time.
Safety deserves a final mention. Electric warmers are the better daily option for homes with kids or pets since there is no open flame involved. Tealight warmers deliver a strong initial scent but require active supervision whenever the candle is lit. Neither type should be left on overnight or run in an empty room.
Ready to find quality wax melts that perform well in your warmer? Explore Small Flame Candle Co.'s hand-poured wax melt collection for toxin-free fragrance options crafted from a premium coconut-soy wax blend.