

Diptyque Candle Burn Time: Hours By Size & Session Rules
A Diptyque candle is a serious investment, some sizes run well over $70, so knowing the exact diptyque candle burn time before you light that wick matters. You want every hour of fragrance you paid for, and poor burn habits can cut that lifespan short.
The total burn time depends on which size you bought. A standard 190g Diptyque candle offers roughly 50 to 60 hours, while larger and smaller sizes land on either side of that range. But total hours only tell part of the story. How long you burn per session, and how you handle that first light, determines whether you get a clean, even melt pool or a tunneled mess that wastes wax along the edges.
At Small Flame Candle Company, we hand-pour every candle we sell, so burn science isn't abstract to us, it's part of the craft. We put this guide together to break down burn times by Diptyque candle size, walk through session length rules, and share the care steps that apply to any quality candle, whether it's a luxury French label or one from our own collection.
Why Diptyque candle burn time varies
Diptyque prints estimated burn times on their packaging, but those numbers come from controlled lab conditions that rarely match your living room. The actual diptyque candle burn time you experience depends on several overlapping factors, and understanding them helps you protect your investment and extract every hour the candle was built to deliver.
Wax blend and fragrance load
Your Diptyque candle uses a proprietary wax blend that combines paraffin with natural components. This blend burns at a specific rate, but the amount of fragrance oil mixed into that wax shifts the equation. Higher fragrance concentrations produce a denser wax that melts slightly slower, which is part of why Diptyque candles project scent so effectively without burning through the wax too fast.
A heavier fragrance load can slightly extend your burn time, but it also makes wick maintenance more critical, because a fragrance-dense wax produces more residue near the wick.
That ratio between wax and scent also affects melt pool viscosity, meaning how liquid the wax becomes as it heats up. A more fluid melt pool spreads faster, which supports an even burn, but it also makes your candle more sensitive to the surrounding environment, including drafts and room temperature.
Wick size and vessel shape
The diameter of the vessel directly controls how large the wick needs to be to push heat to the outer wax edges. Diptyque calibrates each wick to the specific container it ships in, so a 190g candle uses a different wick than a 1.5kg version. A wick that is too thin for the vessel causes tunneling, while a wick that is too thick produces excessive soot and burns through the wax faster than intended.
Vessel shape also plays a role. A straight-sided glass container creates a more predictable melt pool than a tapered or wide-mouth design. Diptyque's classic oval containers are intentionally proportioned to support an even burn, but that geometry only works as intended when you follow correct session lengths.
Room conditions and your habits
Even a quality candle burns differently depending on where you place it. Drafts from open windows, ceiling fans, or air vents push the flame sideways, creating an uneven melt that strands wax along the edges. Position your candle on a stable, flat surface away from any airflow so the flame stays centered throughout each session.
Your habits carry as much weight as the environment. Burning a candle for too short a session prevents the melt pool from reaching the glass edges, and that first incomplete burn creates a wax memory that causes every future burn to follow the same narrow channel.
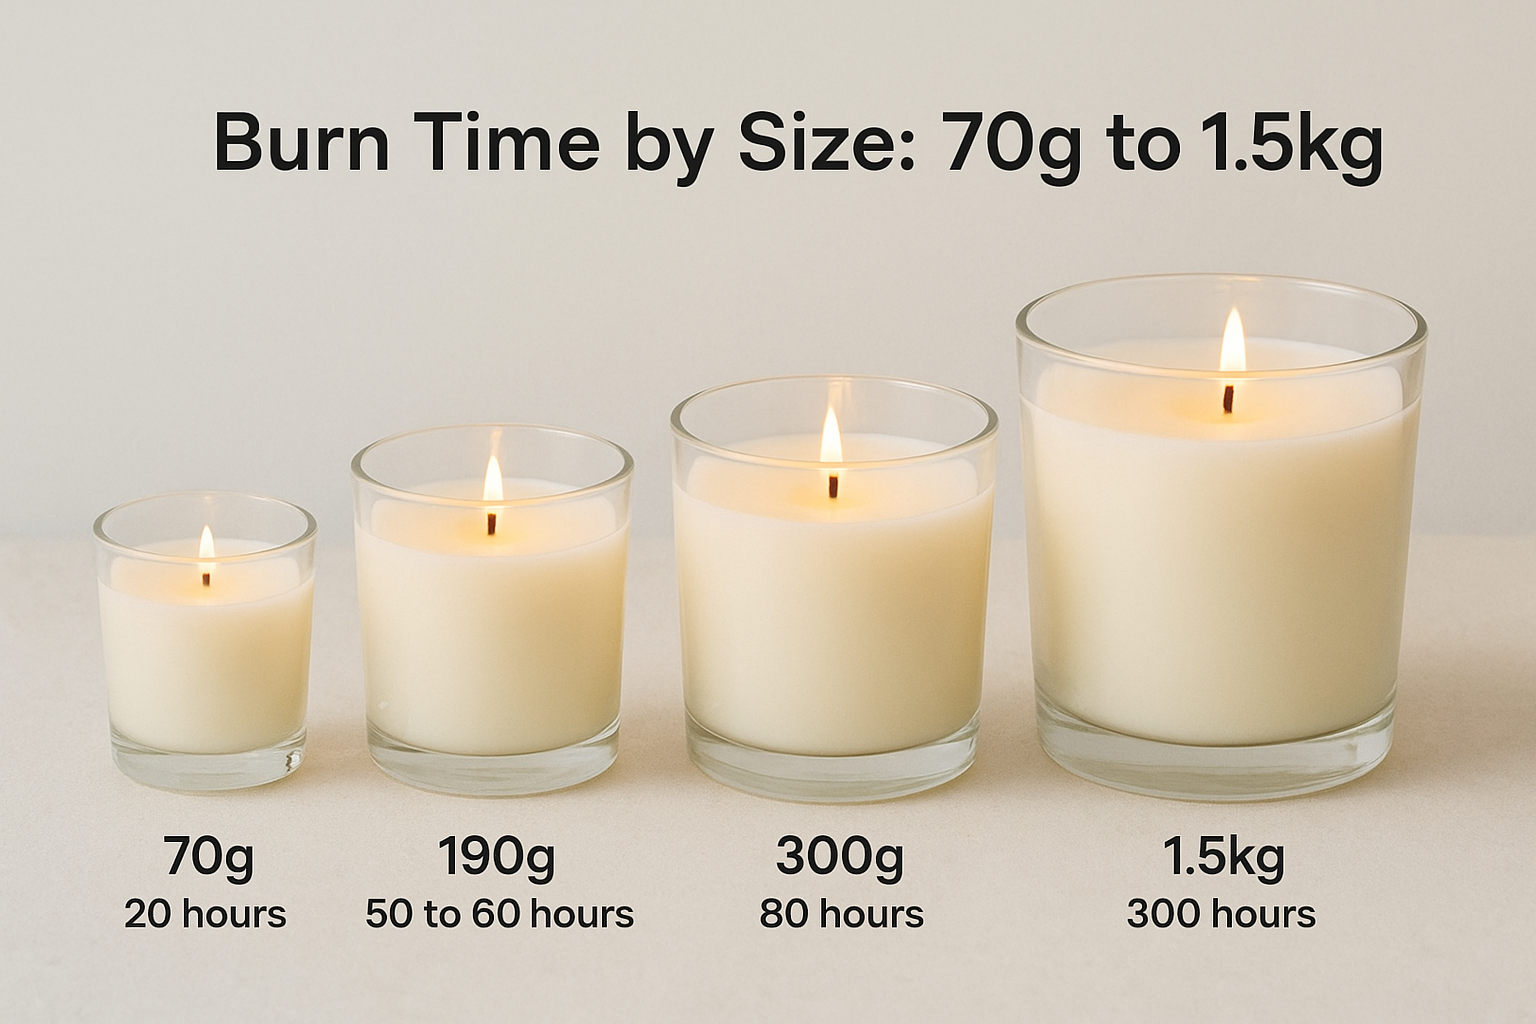
Burn Time by Size: 70g to 1.5kg
Diptyque produces candles across four main sizes, and each one carries a different total burn time printed on the box. Those numbers give you a useful starting range, but your actual diptyque candle burn time will fall slightly above or below depending on the habits covered in the previous section. The table below shows what you can realistically expect from each size.
Small and Standard Sizes
The 70g candle is Diptyque's smallest format, designed for travel or a shorter scent experience. The 190g size is their most popular option and the one most people picture when they think of the brand.
| Size | Approximate Burn Time |
|---|---|
| 70g | 20 hours |
| 190g | 50 to 60 hours |
Treat the 190g as your baseline. Every care decision, from wick trimming to session length, applies here before you scale up to a larger format.
Large and Statement Formats
The 300g candle is a noticeable step up from the standard size, offering roughly 80 hours of burn time in a wider vessel that produces a stronger scent throw across larger rooms. It requires more attention on that first burn because the wider diameter means you need a longer initial session to push the melt pool fully to the glass edges.
Diptyque's 1.5kg large-format candle sits at the top of the range with approximately 300 hours of burn time. That format works best as a permanent fixture in a living room or dining space rather than a candle you move between rooms. Its size also means the wax takes longer to liquefy fully, so rushed burns cause more visible tunneling than they would on smaller versions.
Session rules for an even burn
How you handle each burn session shapes the entire diptyque candle burn time from start to finish. The wax develops a memory with every lighting, so the habits you build early determine whether you get a smooth, level melt or a stubborn tunnel that wastes the outer wax.
The first burn sets everything
Your first lighting session is the most important one. You need to let the candle burn long enough for the melt pool to reach the full diameter of the glass before you extinguish it. On a 190g candle, that typically takes two to three hours. Cutting that first session short leaves a ring of unmelted wax along the edges, and once that wax memory forms, it is very hard to reverse without deliberate intervention.
If you only have 30 minutes, skip lighting the candle entirely until you have a proper block of time available.
How long to burn per session
After the first burn, keep each subsequent session between two and four hours. Burning longer than four hours causes the wick to overheat, which produces excess soot and accelerates wax consumption faster than the candle was designed to handle. Burning for less than two hours on a wide-format candle risks repeating that shallow melt pool problem.
Before each lighting, trim the wick to approximately one-quarter inch. A wick left at full height produces a larger, hotter flame that burns through wax unevenly and leaves visible black residue on the inside of the glass. Trimming takes ten seconds and directly protects both your scent throw and your total burn hours.
Fix tunneling, soot, and uneven burns
Even with good habits, problems show up. A tunneled candle, a soot-stained glass, or a lopsided melt pool can all cut into your diptyque candle burn time if you leave them unaddressed. The good news is that most of these issues are reversible if you catch them early.
Reverse a tunnel before it gets worse
Tunneling happens when the melt pool never reaches the edge of the glass during earlier sessions, leaving a ring of hardened wax around the perimeter while the center keeps sinking. To fix it, take a sheet of aluminum foil and fold it over the top rim of the candle, leaving a small opening at the center to allow ventilation. Light the candle and let it burn for two to three hours. The foil traps heat and redirects it toward the outer wax, which softens and melts down toward the level of the center pool.
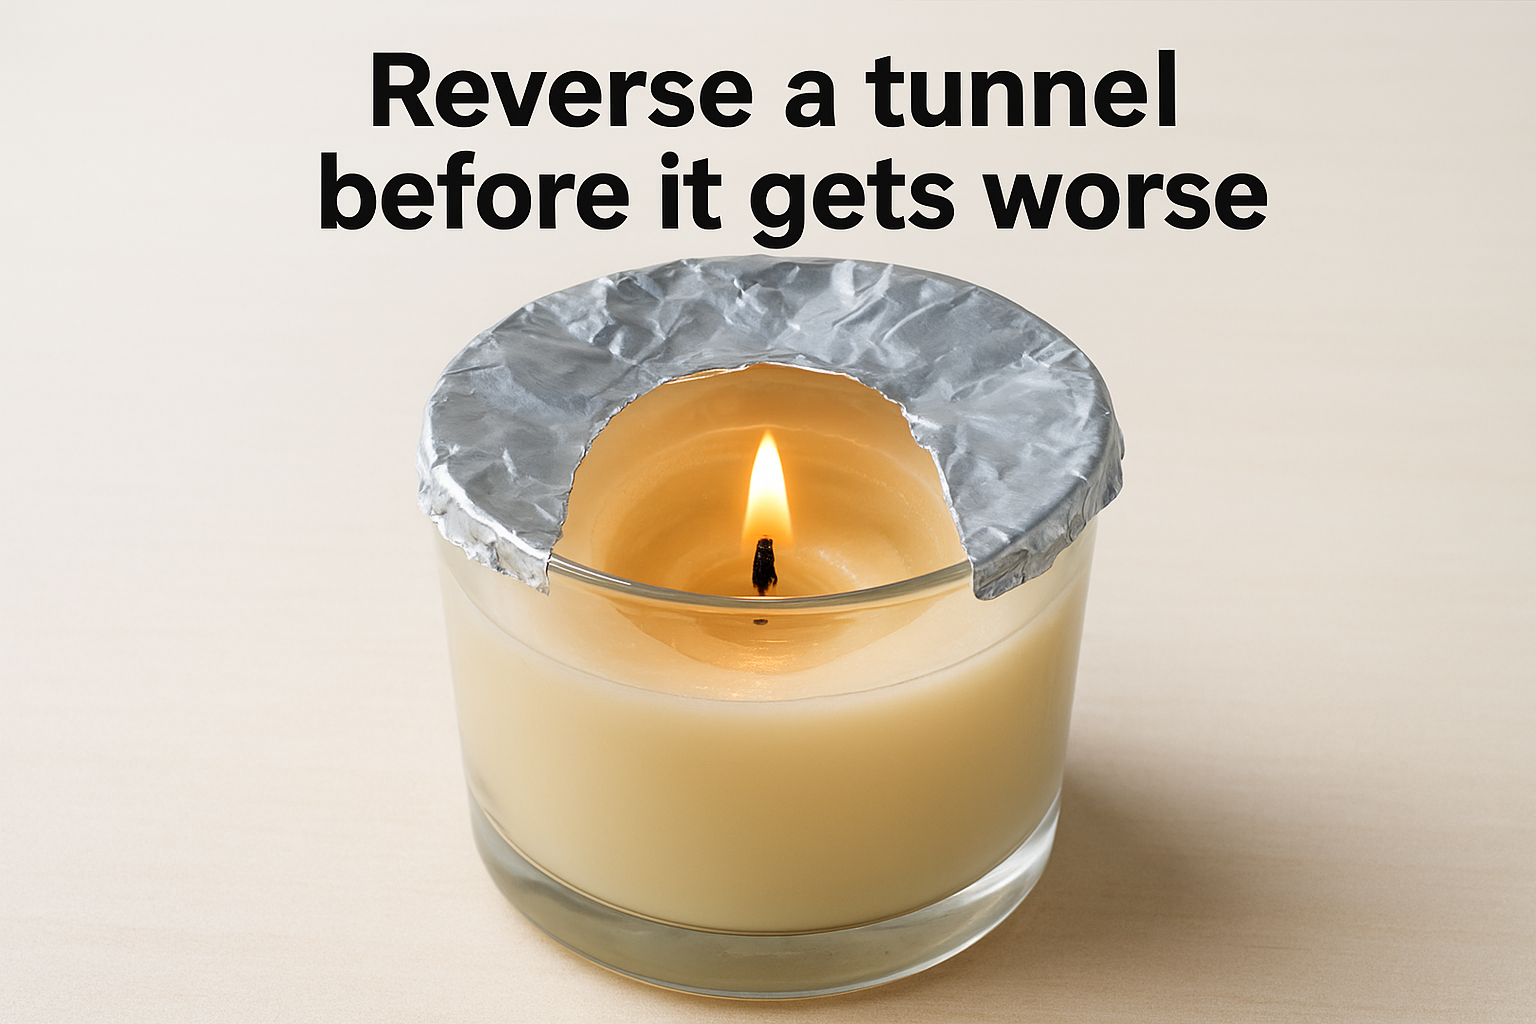
Do not seal the foil completely over the flame. Leave a ventilation gap so oxygen reaches the wick and the candle burns safely.
You can also use a hair dryer on a low setting to gently warm the surface wax before lighting, softening the tunnel edges enough that the next full burn session can level them out.
Reduce soot and black glass
Black residue on the inside of the glass usually means the wick is too long or the candle is sitting in a draft. Trim the wick to one-quarter inch before every single burn session, no exceptions. If the dark staining has already built up on the glass, wipe the inside carefully with a damp cloth after the wax solidifies and the glass cools completely. Removing that residue prevents it from dropping back into the wax pool during the next burn.
Safety and when to stop burning
Your diptyque candle burn time has a hard limit, and pushing past it creates real safety risks. Every candle, regardless of quality or price, reaches a point where continuing to burn it becomes dangerous rather than enjoyable. Knowing where that line is protects both your home and the investment you made in the candle.
Stop at the half-inch wax mark
Diptyque recommends you stop burning when approximately half an inch of wax remains in the vessel. At that depth, the glass bottom receives direct heat from the flame with very little wax acting as a buffer. That concentrated heat can crack the glass or cause the surface beneath the candle to overheat. Once the wax drops to that level, retire the candle and repurpose the vessel instead of pushing for one more session.
You can clean out the remaining wax by placing the vessel in a freezer for an hour. The wax contracts and lifts away cleanly, leaving you with an intact glass you can reuse.
Watch for signs that a burn session needs to end early
Some warning signs tell you to extinguish the flame immediately, regardless of how much time has passed. If the flame grows unusually tall and flickers erratically, the wick has likely lost its trim and needs to be shortened before the next session. A strong smell of something burning beyond the fragrance, or visible black smoke rather than faint white wisps, means the candle is consuming wax too fast and needs to be put out. Always use a candle snuffer rather than blowing the flame out, which pushes hot wax and carbon back into the melt pool.
Final Burn Time Takeaways
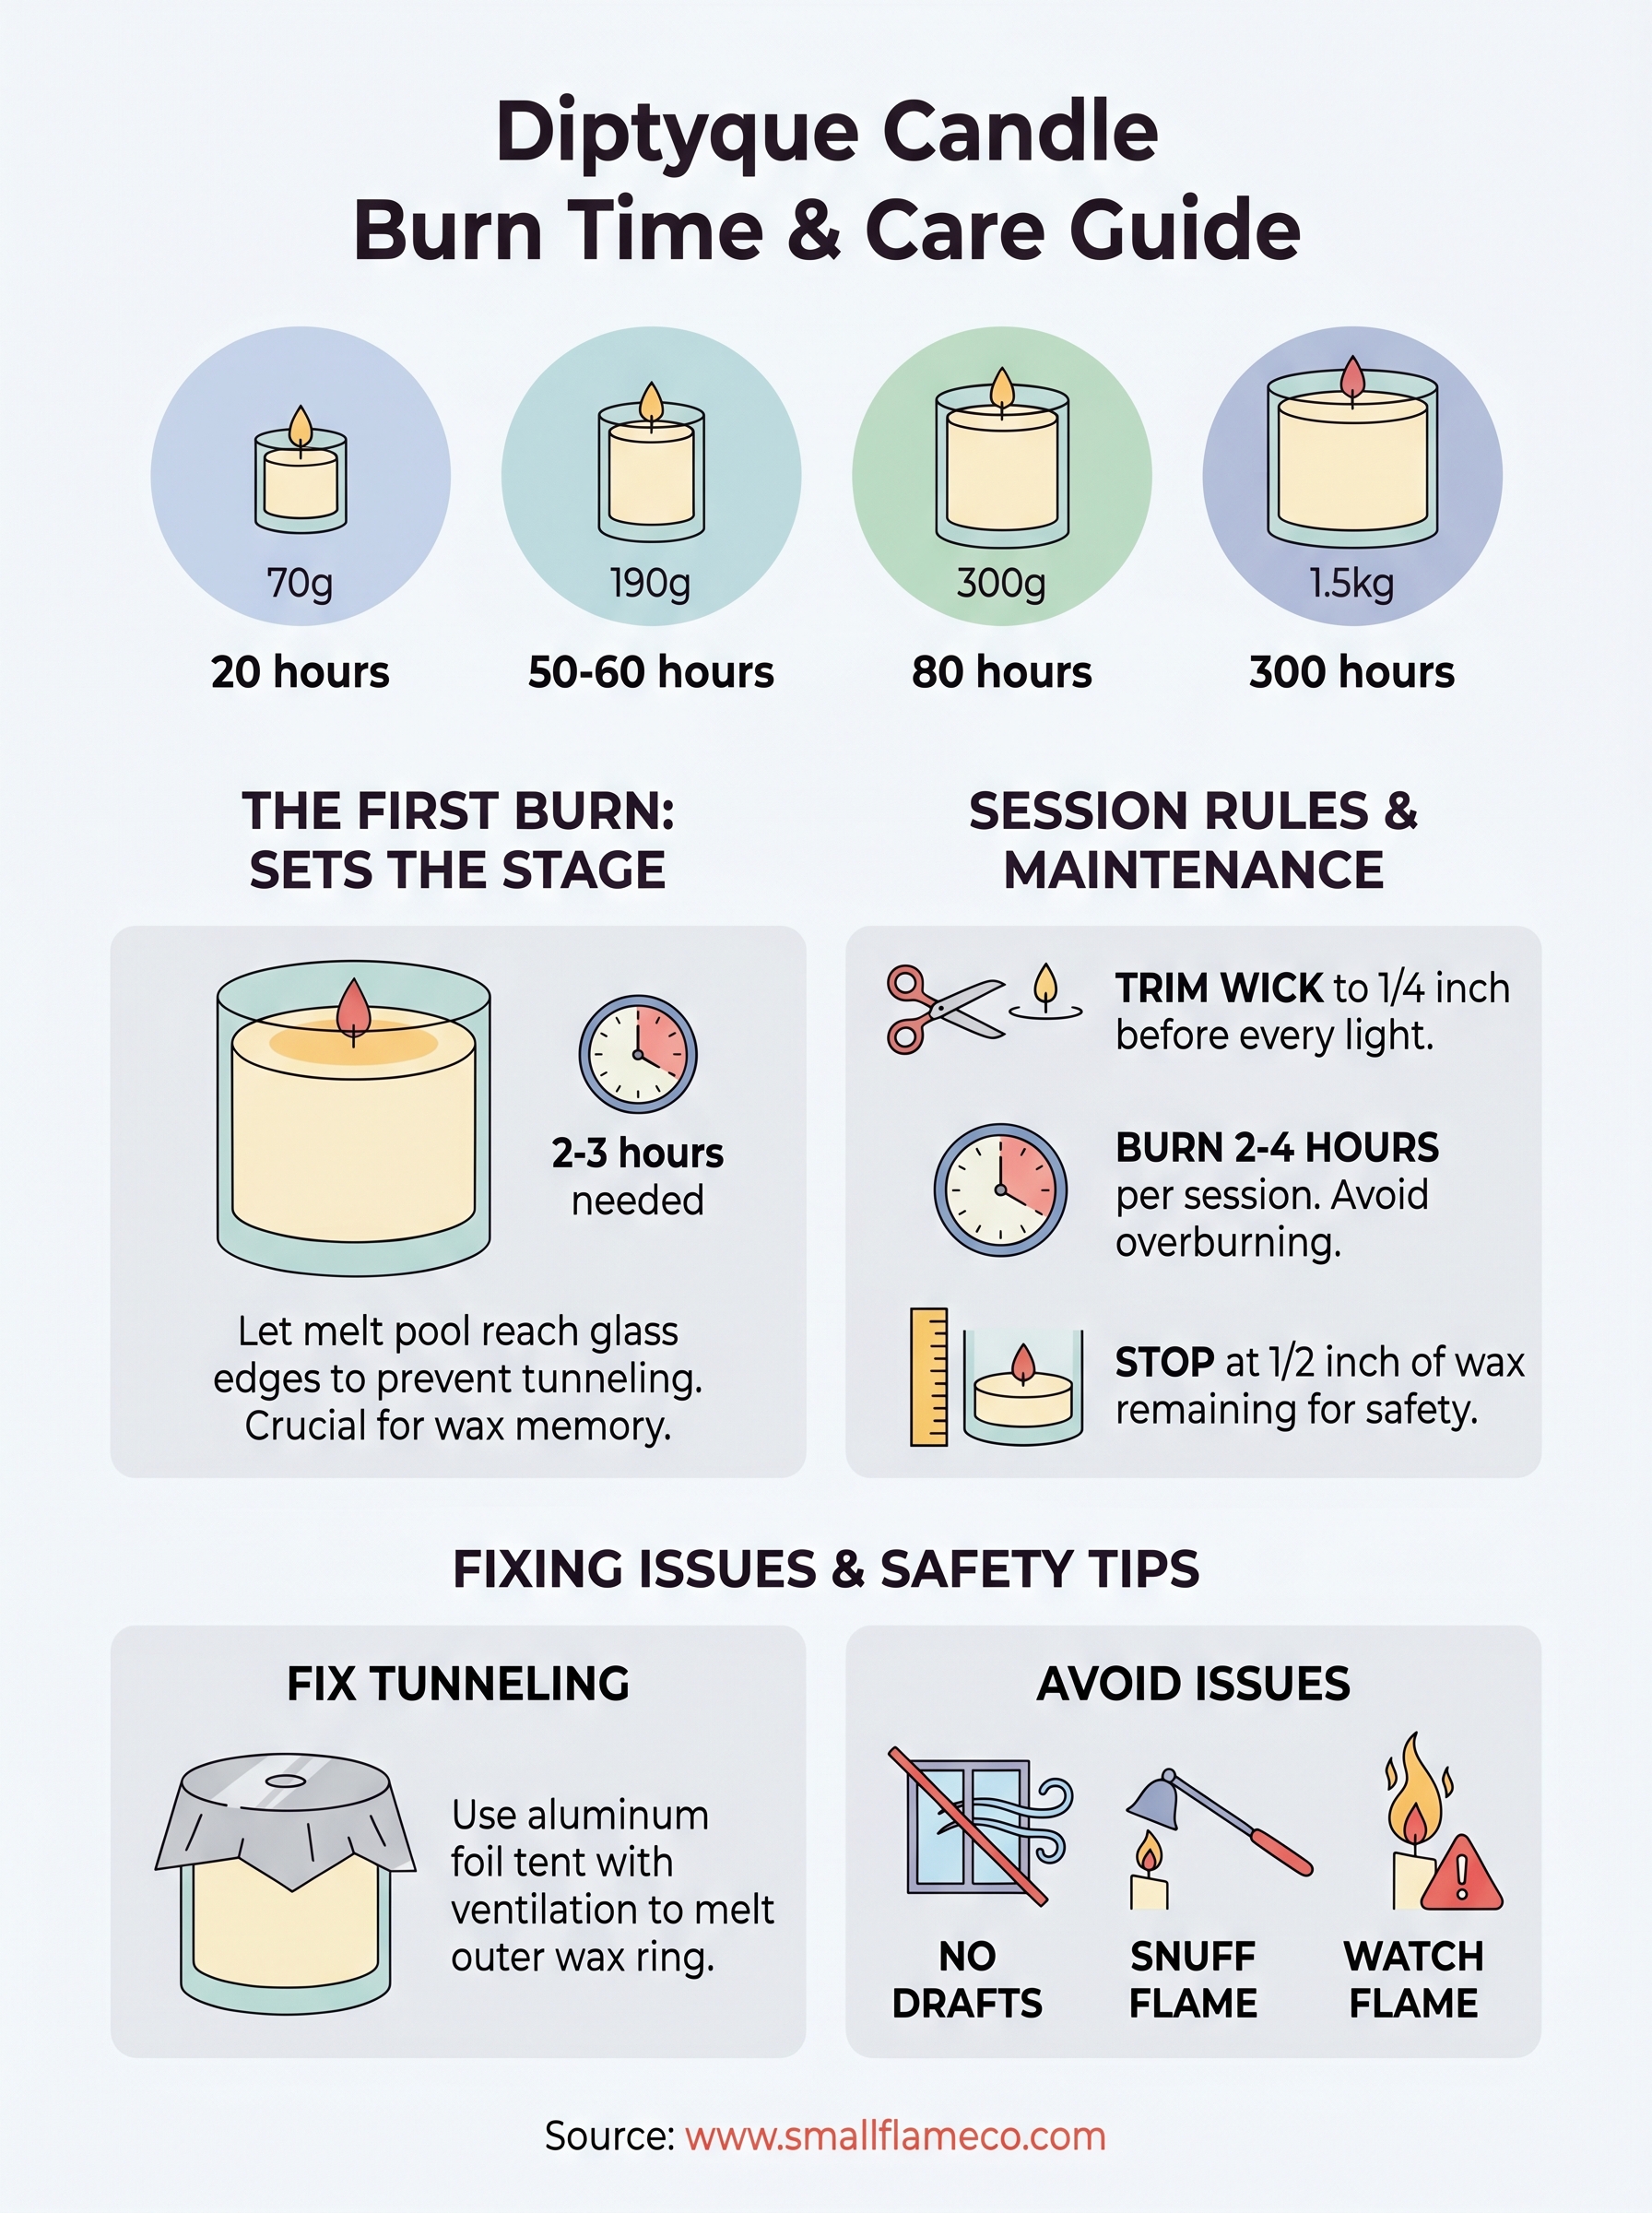
Getting the most from your diptyque candle burn time comes down to a handful of repeatable habits. Trim the wick to a quarter inch before every lighting, give the first session two to three hours so the melt pool reaches the glass edges, and keep each subsequent session under four hours. Stop burning at the half-inch wax mark, place your candle away from drafts, and address any tunneling with the foil method before it deepens. These steps apply regardless of which size you own, from the compact 70g up to the 1.5kg statement piece.
Quality candle care applies to every hand-poured candle, not just luxury labels. If you want a clean-burning, long-lasting option at a more accessible price point, explore the hand-poured coconut wax candles at Small Flame Candle Company, where every candle is crafted with the same attention to wax blend, wick calibration, and fragrance load that makes burn time matter.