

Better Homes And Gardens Wax Warmer Instructions Easy Guide
You just unboxed a Better Homes and Gardens wax warmer, plugged it in, and now you're staring at it wondering what comes next. You're not alone. Thousands of people search for Better Homes and Gardens wax warmer instructions every month because the included manual is either missing, too vague, or got tossed out with the packaging. The good news: these warmers are simple to use once you know the basics.
At Small Flame Candle Company, we hand-pour candles and sell wax warmers daily, so we've spent plenty of time working with different warmer styles, including the popular Better Homes and Gardens lineup. We've tested Edison bulb warmers, fan warmers, and decorative plate-style models, and we know firsthand what works and what causes problems. That hands-on experience is exactly what shaped this guide.
Below, you'll find step-by-step setup instructions, safe operating tips, wax melt insertion methods, cleaning advice, and troubleshooting for the most common issues people run into. Whether you picked up a full-size illumination warmer or a smaller tabletop unit, this guide covers the process from start to finish. By the end, you'll know how to get the strongest scent throw possible while keeping your warmer in good shape for years to come.
What you need and how to identify your warmer
Before you follow any Better Homes and Gardens wax warmer instructions, you need to confirm exactly which warmer model you have. Better Homes and Gardens sells several distinct warmer styles, and each one operates a little differently. Using the wrong bulb wattage or missing a setup step because you assumed all models work the same is one of the most common mistakes new users make. Spend two minutes identifying your unit first, and every step that follows will go much more smoothly.
The three main Better Homes and Gardens warmer types
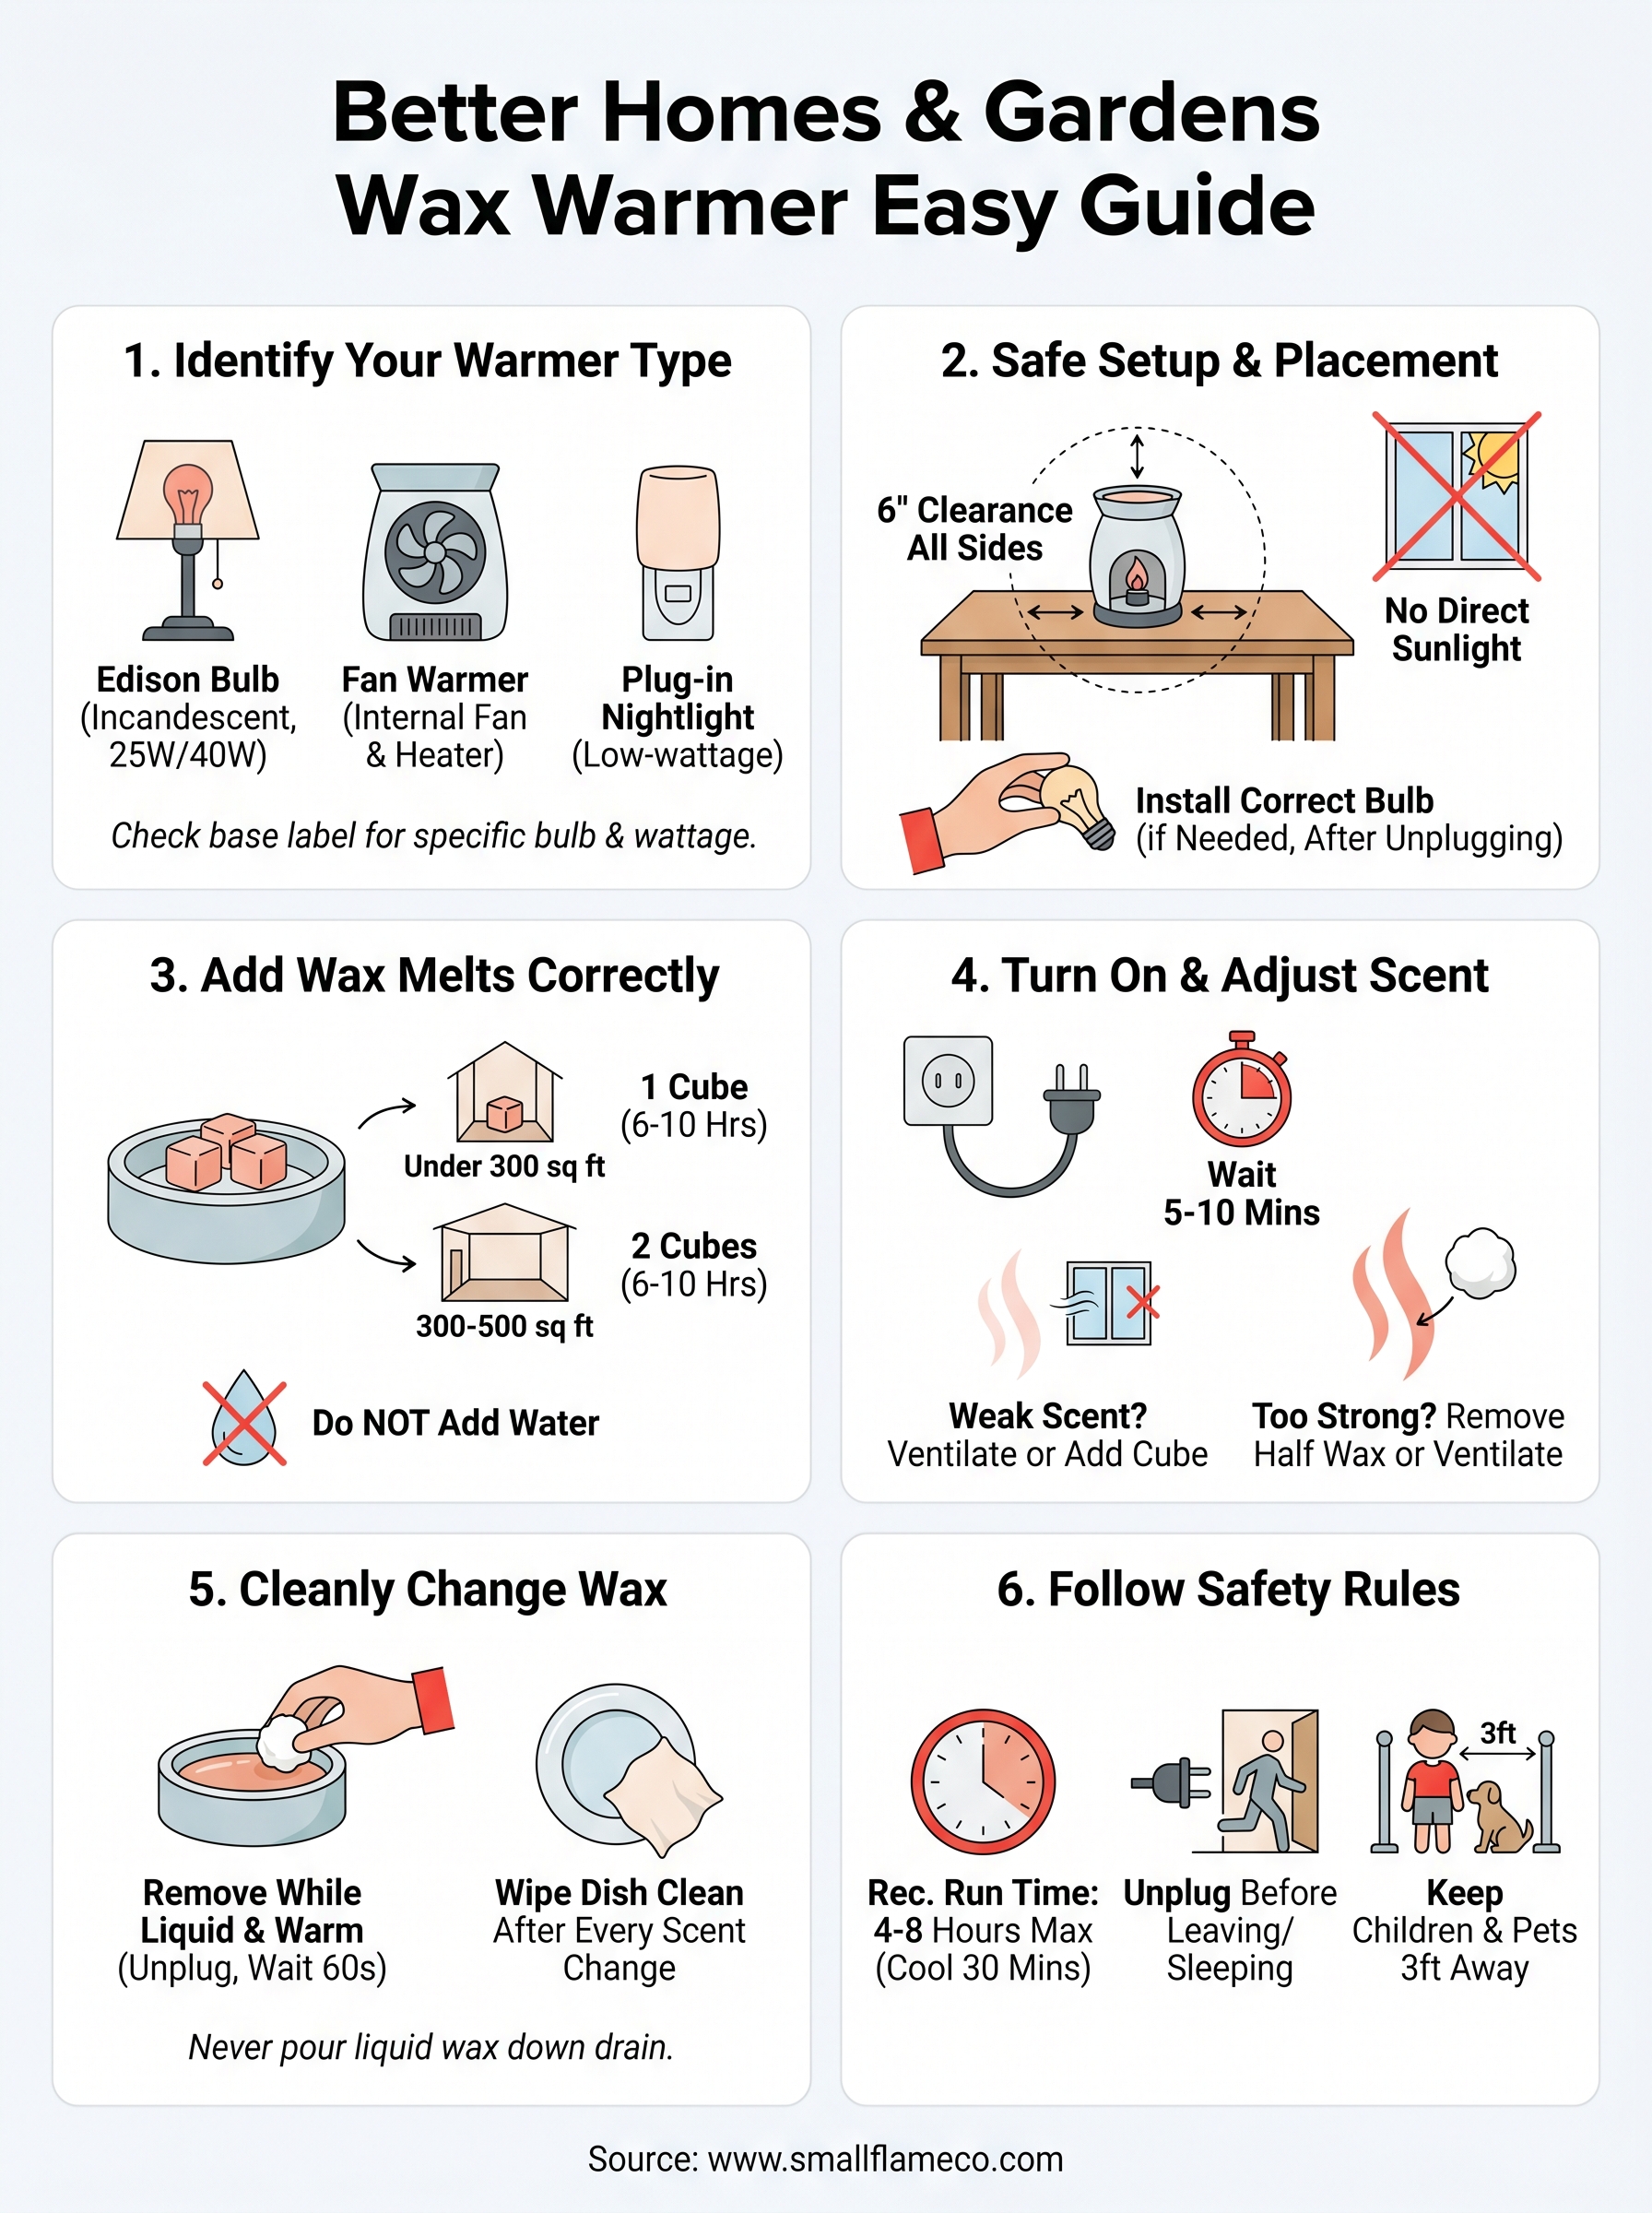
Better Homes and Gardens warmers fall into three broad categories, and the primary heating method is the clearest way to tell them apart. Edison bulb warmers use a screw-in incandescent bulb mounted below a dish to melt wax through radiant heat, and they often double as a decorative accent light. Fan warmers rely on an internal electric fan to push warm air over the wax from below or from the side, which means they produce no light at all. Plug-in nightlight-style warmers connect directly to a wall outlet and use a small bulb or compact heating element housed in a short, decorative case.
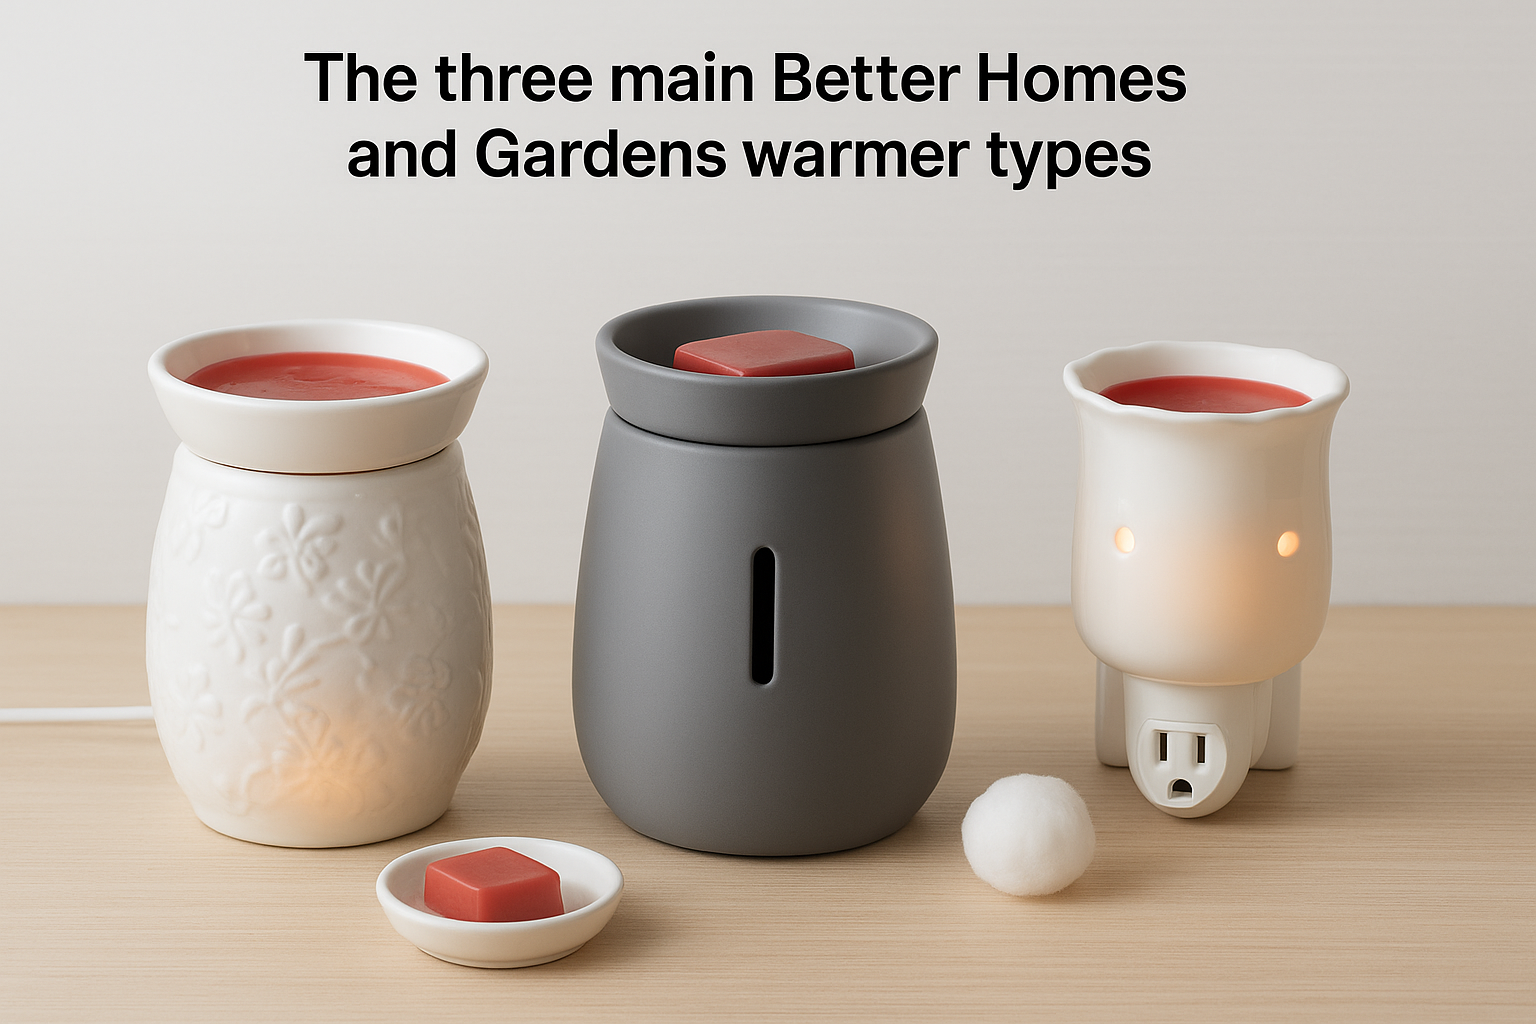
Knowing your warmer type before you plug anything in prevents the most common setup mistakes, including installing a bulb with too high a wattage.
Use the quick reference table below to identify which type you have:
| Warmer Type | Heat Source | Typical Size | Bulb Required |
|---|---|---|---|
| Edison bulb illumination warmer | Incandescent bulb (25W or 40W) | Full-size tabletop | Yes |
| Fan warmer | Internal fan + heating element | Full-size tabletop | No |
| Plug-in nightlight warmer | Low-wattage bulb or heating element | Compact, wall-mounted | Sometimes |
Flip your warmer upside down and read the label on the base. That label lists the exact bulb type and maximum wattage your specific model requires. If the label has faded or is missing, look for a model number stamped into the base or printed on a small sticker, then search that number at the retailer where you bought the warmer to pull up the original product details.
What to gather before you start
Once you know your warmer type, gather everything you need before you plug anything in. Stopping midway through setup to hunt for a missing bulb or a cotton ball is more frustrating than it sounds, especially when there is already warm wax involved. Most of what you need comes in the box or is available at any hardware or home goods store.
Here is a full supply list:
- The warmer itself, fully unboxed and inspected for cracks, chips, or damage from shipping
- The correct replacement bulb (typically 25W or 40W incandescent) if your model uses one
- Wax melts in your chosen scent (one standard cube works well for a first use)
- A cotton ball or paper towel for removing used wax between scent changes
- A flat, stable, heat-safe surface where you plan to run the warmer
- The original packaging or instruction sheet if you still have it
Before you add any wax, look closely at the dish or bowl at the top of the warmer. A cracked or chipped dish can leak hot liquid wax during operation, which creates a burn and fire risk. Replace any damaged dish before you use the warmer, and look for replacements at the same retailer where you purchased the unit.
Step 1. Pick a safe spot and set it up
Placement is the first real decision you make when following any Better Homes and Gardens wax warmer instructions, and it has a direct impact on both safety and scent performance. A warmer sitting on the wrong surface, too close to a wall, or near an open window will either underperform or create a hazard. Getting the location right before you plug in takes less than a minute and prevents most of the problems people blame on the warmer itself.
Choose the right surface
Your warmer needs to sit on a flat, stable, heat-resistant surface during every use. The dish at the top gets warm enough to melt wax, and that heat transfers down through the warmer's base over time. A solid wood shelf, a ceramic tile countertop, or a sturdy side table all work well. Avoid placing the warmer on fabric surfaces, bare plastic shelving, or anything that wobbles, because a tipped warmer spills liquid wax that is difficult to remove and can stain or damage surfaces permanently.
Keep your warmer on a surface where you can see it clearly from across the room. If something looks wrong, you want to catch it fast.
Check clearance on all sides
Once you have your surface selected, check the space around the warmer. Most BHG warmers need at least six inches of clearance on every side, including the top if you have a cabinet above the spot you chose. Curtains, paper decorations, and lightweight fabric items pose the biggest risk because they can fall toward the warmer without much force. Here is a quick checklist to run through before you finalize the spot:
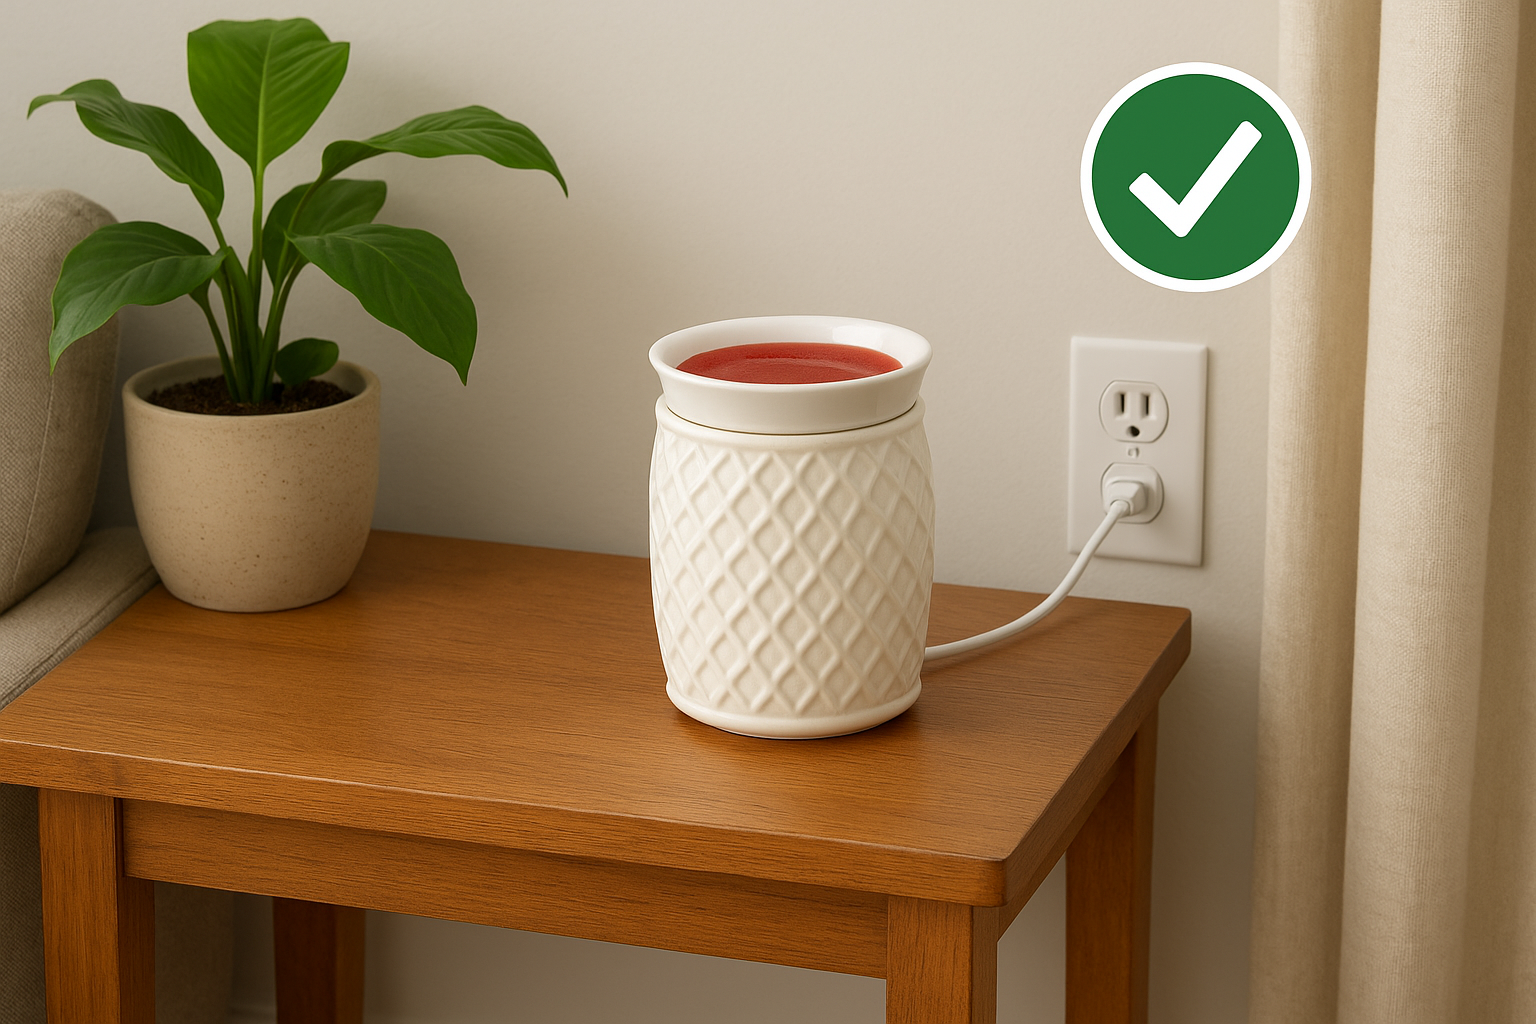
- Nothing flammable within six inches on all sides
- Surface is level with no wobble
- Cord can reach the outlet without stretching across a walking path
- Direct sunlight does not hit the warmer's dish during peak hours, which can accelerate wax evaporation and reduce scent life
- Children and pets cannot easily reach or bump the unit
Once you confirm all five items, your warmer is ready for the next step.
Step 2. Install the bulb or confirm the heat source
If your warmer uses an incandescent bulb, installing the correct bulb is the single most important setup task you will complete before following any other Better Homes and Gardens wax warmer instructions. The wrong wattage overheats the dish, burns through wax too fast, and can crack the ceramic over time. Fan-style and plug-in warmers skip this step entirely, but you still need to confirm the internal heat source is functioning before you add any wax.
For bulb-based warmers
Before you screw in any bulb, unplug the warmer completely and let it sit for at least two minutes if it has been used before. Residual heat in the socket can crack a new bulb on contact. Once the socket is cool, check the wattage requirement on the base label and match it exactly. Most full-size BHG illumination warmers take a 25-watt or 40-watt candelabra-base incandescent bulb, not an LED or CFL, because those bulb types do not generate enough radiant heat to melt wax at the dish level.
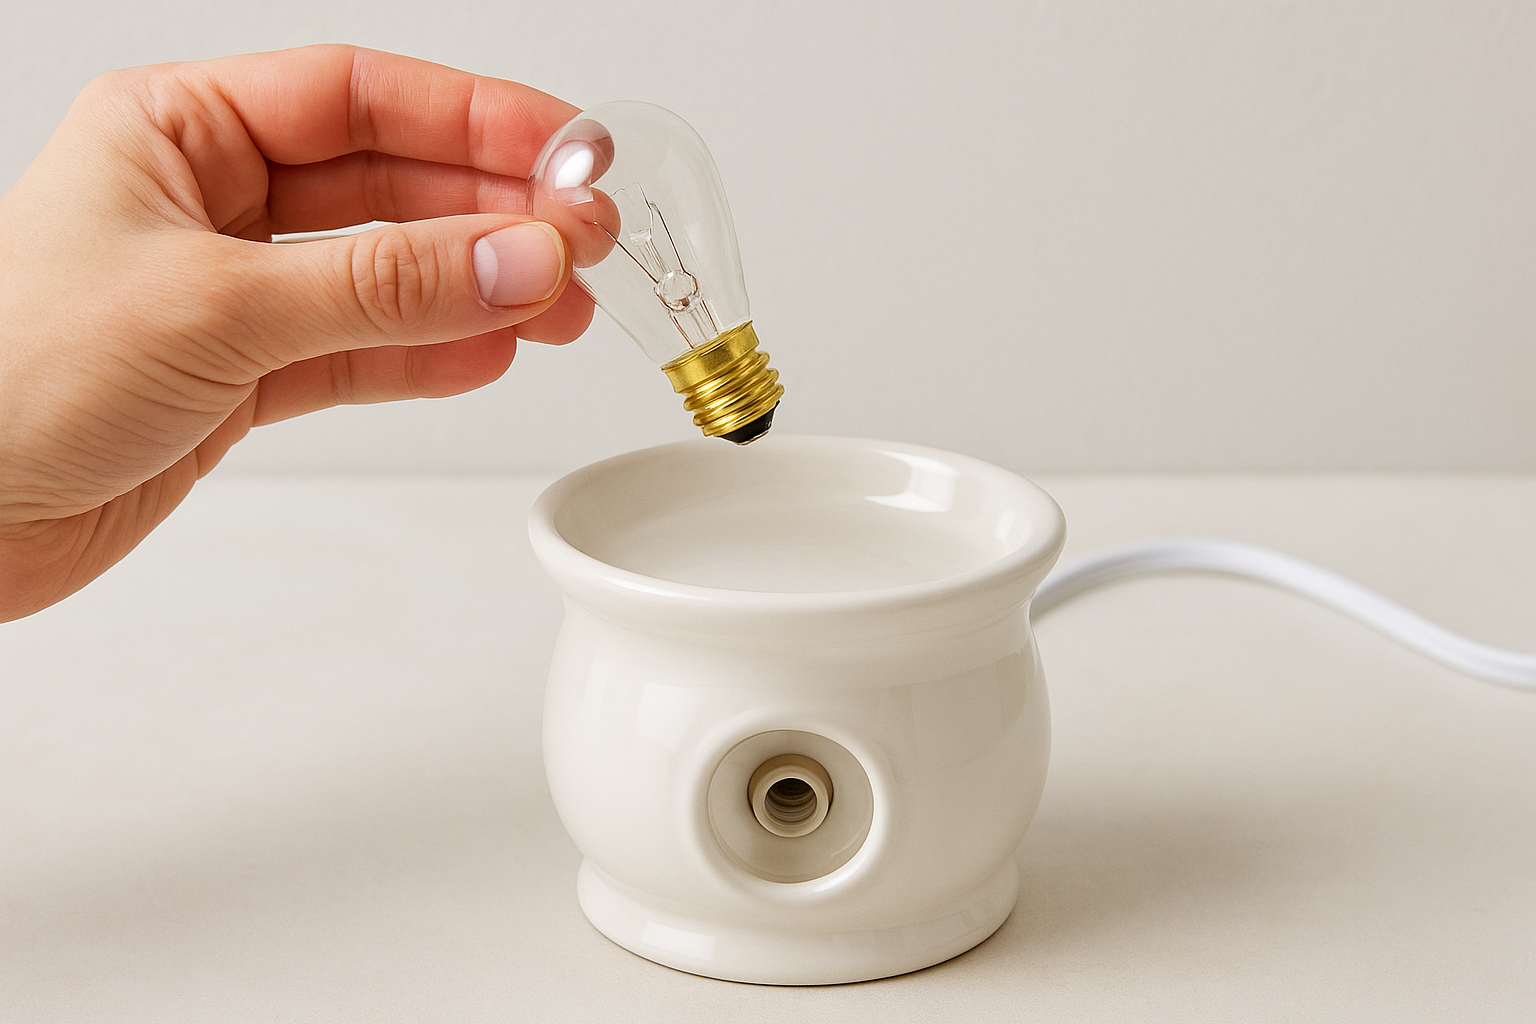
Never exceed the maximum wattage printed on your warmer's base label. A bulb that runs too hot can crack the dish and create a burn hazard.
Follow these steps to install the bulb correctly:
- Hold the base of the bulb, not the glass, to avoid oil transfer from your fingers
- Align the bulb with the socket threads and turn it clockwise until snug, not overtightened
- Plug the warmer in and watch the dish for two to three minutes to confirm it warms gradually
For fan and plug-in warmers
Fan warmers and plug-in units contain sealed internal heating elements that you cannot and should not try to access yourself. Your only job here is to confirm the unit powers on correctly. Plug it into a working outlet, wait 30 to 60 seconds, and then hold your hand about two inches above the dish. You should feel a gentle, consistent warmth rising from the surface.
If the dish stays completely cold after two minutes, try a different outlet before assuming the warmer is defective. A tripped circuit breaker or a faulty outlet is the cause more often than a broken warmer.
Step 3. Add wax melts the right way
Adding wax melts sounds straightforward, but the amount you use and the way you place them in the dish makes a real difference in scent throw and how long each cube lasts. Most people overfill the dish on their first try, which shortens the life of the wax and leaves a weaker scent over time. Follow these Better Homes and Gardens wax warmer instructions for loading the dish, and you'll get a consistent, strong fragrance from every cube.
How much wax to use
Start with one standard wax cube for any room under 300 square feet. A single cube typically provides 6 to 10 hours of fragrance, depending on the scent's oil concentration and how hot your warmer runs. For a larger open-concept space, two cubes in the dish at once is reasonable, but stacking more than two cubes rarely improves scent throw and usually just wastes wax faster.
One cube is almost always enough to scent a standard bedroom, office, or bathroom effectively on the first use.
Use the guide below to match wax quantity to room size:
| Room Size | Wax Amount | Expected Scent Duration |
|---|---|---|
| Under 150 sq ft (bathroom, small office) | Half a cube | 5 to 8 hours |
| 150 to 300 sq ft (bedroom, living room) | 1 cube | 6 to 10 hours |
| 300 to 500 sq ft (open kitchen, large living room) | 2 cubes | 6 to 10 hours |
What to avoid when loading the dish
Never pour water into the dish before adding wax. Some people assume this helps wax melt more evenly, but it actually weakens fragrance release and can cause sputtering as the warmer heats up. Also avoid mixing scents from different fragrance families on your first load, since you will not be able to identify which scent is performing well or which one you want to reorder.
Place the wax cube flat in the center of the dish and avoid pushing it against the edges. Wax pooled at the outer rim of the dish heats unevenly and sometimes drips down the side of the warmer before it fully liquefies.
Step 4. Turn it on and dial in scent strength
With your wax cube in the dish and your warmer in the right spot, you are ready to power it on. This step covers what to watch for in the first few minutes and how to adjust scent output so you get exactly the fragrance level you want without burning through wax too quickly. It is one of the most overlooked parts of any Better Homes and Gardens wax warmer instructions guide, but it makes a real difference in your day-to-day experience.
Turn it on the right way
Plug your warmer into the wall outlet and avoid touching the dish for the first five minutes. The wax will begin melting from the bottom up, and the process looks slow at first. That is normal. Resist the urge to add more wax because you think nothing is happening. Give it a full eight to ten minutes before you judge the scent output, since fragrance disperses gradually as the wax liquefies and warms to operating temperature.
The first five minutes after you plug in the warmer are the most important for catching any early problems, like a dish that is cracking or wax that is pooling to one side.
Watch for these signs that your warmer is working correctly:
- Wax edges begin to soften and pull away from the sides of the dish within five minutes
- A light, even fragrance becomes noticeable in the room within eight to ten minutes
- The dish surface feels warm but not uncomfortably hot when you hold your hand two inches above it
Adjust scent strength to match your space
If the scent feels too faint after fifteen minutes, the most effective fix is ventilation, not more wax. Close a nearby window or door to keep fragrance contained in the room rather than drifting out. Open floor plans disperse scent faster, so in those spaces, two cubes in the dish from the start gives you a stronger baseline.
If the scent is too strong or gives you a headache, the simplest solution is to remove half the melted wax using a cotton ball and let the warmer run with a smaller pool. You do not need to unplug and start over.
Step 5. Change scents without making a mess
Swapping scents is where most people run into trouble when following Better Homes and Gardens wax warmer instructions for the first time. The key is knowing that you remove wax while it is still liquid and warm, not after it has cooled and hardened back into a solid. Hardened wax chips and crumbles, and trying to pry it out can scratch the dish or leave waxy residue behind that mixes with your next scent.
Know when the wax is ready to swap
Your wax is ready to remove when the fragrance fades noticeably even though the warmer is still running. This tells you the scent oil has fully evaporated out of the wax, leaving behind an odorless pool. Do not wait until the wax looks different or changes color. Scent loss is the only reliable signal that it is time to swap.
Swapping wax while it is still liquid takes less than two minutes and keeps your dish clean. Waiting until the wax cools doubles your cleanup time.
Some warmers develop a slight discoloration in the wax as the scent depletes, but this varies by fragrance. Fresh bakery or food-based scents fade quickly and cleanly, while earthy or resin-based scents sometimes leave a faint tint in the dish. Either way, rely on your nose, not your eyes, to decide when to swap.
How to remove warm liquid wax cleanly
Pull the warmer's plug first and wait 60 seconds so the wax cools just enough to thicken slightly without hardening. Thickened wax absorbs faster than a fully liquid pool. Take a cotton ball, paper towel, or a folded piece of parchment and press it firmly into the wax pool. The material soaks up the wax quickly. Repeat with a second cotton ball if any residue remains. Here is the process in order:
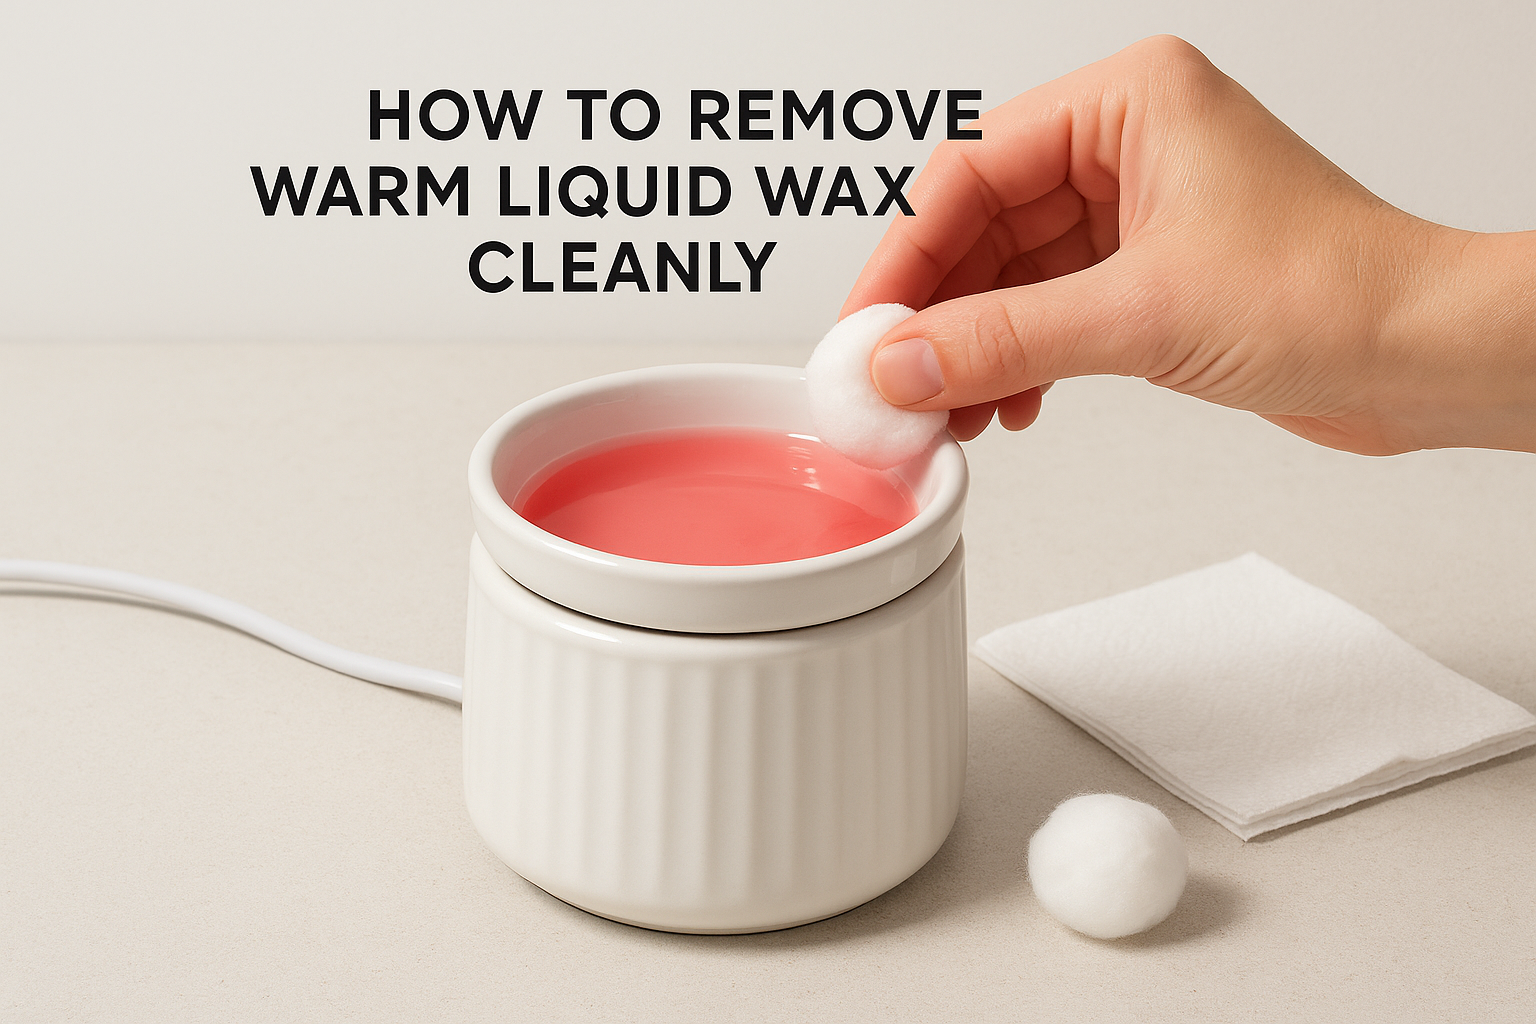
- Unplug the warmer and wait 60 seconds
- Press a cotton ball into the warm wax and hold for five seconds
- Lift and discard the cotton ball with the absorbed wax
- Wipe the dish with a dry paper towel to remove any thin film
- Add your next wax cube and plug back in
Never pour liquid wax down a drain, because it solidifies in pipes and causes clogs.
Step 6. Clean your Better Homes and Gardens warmer
Regular cleaning keeps your warmer performing at its best and prevents old scent residue from mixing with your next fragrance load. Most people skip this step entirely, which is why their Better Homes and Gardens wax warmer instructions experience falls short after the first few uses. A clean dish and exterior also protect the warmer's finish and extend its working life.
Clean the dish after every scent change
The dish needs a quick wipe every time you swap wax, not just when buildup becomes visible. Thin wax films left behind from the previous scent are nearly invisible when cold but will discolor and weaken the fragrance of your next cube. Once you have removed the bulk of the liquid wax using the cotton ball method from the previous step, follow these cleaning steps while the dish is still slightly warm:
- Wipe the entire dish surface with a dry paper towel using firm, circular strokes
- Dip a second paper towel in warm water only, no soap, and wipe the dish again
- Dry the dish completely with a third paper towel before you add the next wax cube
- Check the outer rim of the dish for any drips or overflow from the previous load
Never add wax to a dish that still has moisture on the surface, since water in a hot wax pool causes sputtering and weakens fragrance throw.
Deep clean the exterior and base
The exterior and base of your warmer collect dust, wax splatter, and fingerprints over time, and a monthly deep clean keeps the decorative finish looking fresh. Unplug the warmer and let it cool completely before you touch the outside. Mix a small amount of dish soap with warm water, dip a soft cloth into the solution, wring it nearly dry, and wipe the entire exterior. Avoid submerging the warmer or letting water run into the power cord connection or base vents, since moisture near electrical components creates a safety risk.
Wipe the exterior again with a clean, dry cloth after washing, and let the warmer sit unplugged for at least 15 minutes before using it again to confirm it is fully dry.
Step 7. Follow safety rules and time limits
Safety is not optional when you operate a wax warmer, and the Better Homes and Gardens wax warmer instructions included with your unit cover the basics for a reason. Most accidents happen when people treat warmers like a set-it-and-forget-it appliance, running them overnight or leaving the house without unplugging. A few consistent habits protect your home, your family, and the warmer itself.
Never leave the warmer unattended for long stretches
You should always unplug your warmer before you leave the room for more than a few minutes, and definitely before you go to sleep or leave the house. A tipped warmer spills hot liquid wax, which can damage surfaces and, in rare cases, contact flammable materials nearby. Keep the following safety rules in place every single time you use your warmer:
- Unplug the warmer whenever you leave the house, even for a short trip
- Never place the warmer in a bedroom where you might fall asleep with it running
- Keep the cord flat against the baseboard so no one trips over it and pulls the warmer off the surface
- Always keep children and pets at least three feet away from an operating warmer
- Never add foreign materials like essential oils directly onto the heating element
Treating your warmer like a candle, something you extinguish before leaving the room, is the single best habit you can build.
Stick to the recommended run time
Most Better Homes and Gardens full-size warmers are designed for continuous use sessions of four to eight hours, not 24-hour operation. Running your warmer past the recommended window does not improve scent throw; it just puts unnecessary stress on the heating element and bulb socket over time. A simple timer outlet, available at most hardware stores, lets you set an automatic shutoff so you never have to think about it.
Use the table below as a quick reference for safe run times based on warmer type:
| Warmer Type | Recommended Run Time | Maximum Before Rest |
|---|---|---|
| Edison bulb illumination warmer | 4 to 6 hours | 8 hours |
| Fan warmer | 4 to 8 hours | 10 hours |
| Plug-in nightlight warmer | 4 to 6 hours | 8 hours |
After each session, give the warmer 30 minutes to cool before you handle the dish or swap wax.
Step 8. Fix common problems fast
Even when you follow Better Homes and Gardens wax warmer instructions carefully, small issues come up. Most of them have a simple fix that takes under a minute, and none of them require replacing the warmer. Running through this troubleshooting list before you give up on a unit has saved plenty of people from buying a replacement they did not actually need.
Weak scent, no scent, or wax not melting
These three problems share a common cause in most cases: the dish is not reaching the right operating temperature. For bulb-based warmers, check that you installed the correct wattage bulb. A bulb running below the required wattage heats the dish too slowly, and the wax never fully liquefies. For fan warmers, confirm the fan is actually running by listening for a faint hum after plugging in.
If the scent fades after just two hours, the wax cube has likely exhausted its scent oil, meaning it is time to swap in a fresh cube rather than troubleshoot the warmer itself.
Use this table to match symptoms to fixes quickly:
| Symptom | Most Likely Cause | Fix |
|---|---|---|
| No scent after 15 minutes | Wrong bulb wattage or cold dish | Check and replace bulb; confirm outlet works |
| Wax not melting after 10 minutes | Fan not running or bulb burned out | Test a different outlet; replace bulb |
| Scent fades in under 2 hours | Wax cube scent oil depleted | Swap in a fresh cube |
| Weak scent in large room | Single cube in open floor plan | Add a second cube or move warmer closer to room center |
Wax overflowing, discoloration, or a burning smell
Overflow happens when you load too many cubes into the dish at once. Liquid wax expands as it heats, and a dish filled to the rim before heating will spill over the edge. Remove half the wax using a cotton ball, let the remainder melt fully, and keep future loads to two cubes maximum.
A burning smell almost always means something contacted the warmer's exterior or fell onto the dish during operation. Unplug immediately, let everything cool, and inspect the area around the unit. If the smell comes from inside the base itself, stop using the warmer and contact the retailer directly for a replacement or refund.
Quick wrap-up
You now have everything you need to set up, run, and maintain your warmer with confidence. These Better Homes and Gardens wax warmer instructions walk you through every stage, from identifying your model and installing the correct bulb to swapping wax cleanly and troubleshooting weak scent output. The process is straightforward once you build a few consistent habits around safe run times and regular cleaning.
Most problems people blame on a broken warmer trace back to a wrong bulb, too much wax in the dish, or skipping the wipe-down between scent changes. Fix those three things, and your warmer will perform well for years.
If you want wax melts that deliver a strong, clean scent throw every time, check out the hand-poured coconut wax melts at Small Flame Candle Co. Each batch uses toxin-free fragrance oils that pair perfectly with any BHG warmer setup.